Advanced Serial Data LoggerTrust In Confidence! For Windows 2000 - Windows 11 (2022) (incl. Server, x86 and x64). Latest version: 4.7.7 build 417. April 17, 2024. Write data to an XLS file without ExcelDownload a Free Trial Version. It allows you to try all features! Plugins can be downloaded separately here
Task: We are filling bags of powder on a six-head filling machine and require to record each bag weight as it comes off the filling machine. We would like to have data sent directly into a Microsoft Excel spreadsheet. Each recorded weight should appear on a new row. The program should create a new log file every day. Each new sheet should be labeled as the day of the data recording. Typically there will be approximately 1000 recorded data entries for the production for the day. We only require the "date" and "head weight" figure to be inserted into the spreadsheet. Requirements:
It is assumed that: You've prepared parser items for export. For this tutorial, all items were prepared in the previous part. Also, you may read other examples:
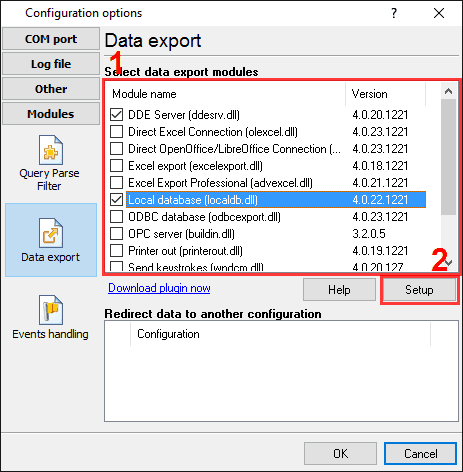
Solution: All parser items are now ready for export using the "Local database" plugin. Please, open the configuration window of the "Local database" plugin (fig.1 and 2) by selecting the module in a list and clicking the "Setup" button on the "Data export" page.
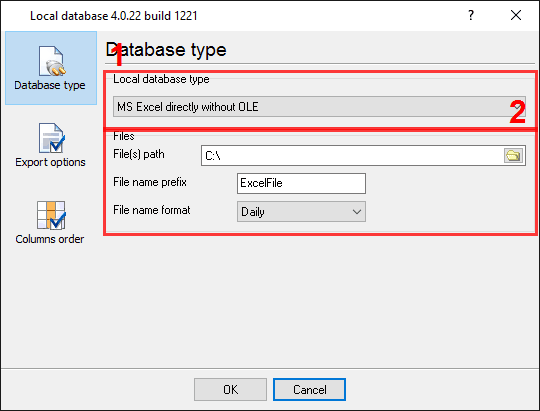
First of all, select a database type in field #1. Then type or choose the database path in field #2 type, where the plugin will create new files. Last, specify a file name prefix in field #3. On the next tab, you should specify basic format options as per fig.3.
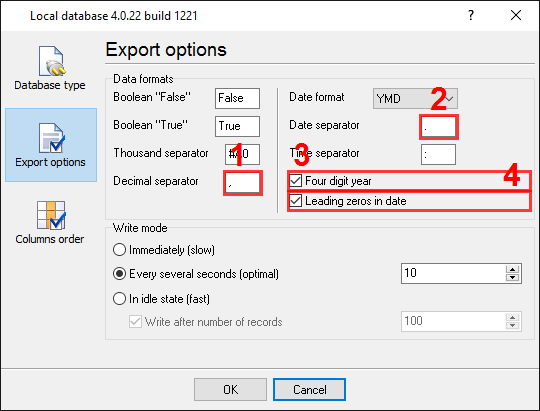
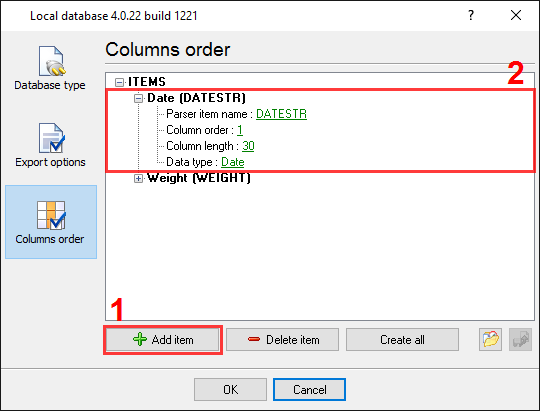
Because one of our variables has the "float" data type, we should specify a necessary decimal separator in field #1. The next variable has the "time" data type. Therefore you should specify a date and time separator in field #2. The option at the pos.3 allows you to add leading zero before the hour, month, or year digits. Other options are unnecessary in our case because we don't use diverse data types. On the last "Columns order" page (fig.4), you can specify, how our variables will be being placed in a spreadsheet. Because we need two variables only, therefore, please, create two items on this page by pressing the "Add item" button (fig.4, pos.1).
Any new items may be added by clicking the "Add item" button (Fig.4, pos. 1). Before adding an item, the program will ask you about an item description. You can type any characters here, which will help you to remember a variable's content. For this example, two variables with their corresponding descriptions have been added. Each data export item has few properties:
Click the "OK" button and close the local database plugin configuration window and the "OK" button in the options window. Okay, all settings have been completed, and we are ready to capture weight data from scales to an Excel file. Related articles:
|
|
| Copyright © 1999-2024, AGG Software. All rights reserved. Terms of use | Privacy policy |