Undo
Keyboard shortcut: Ctrl+Z
Toolbar button: ![]()
Undo the last operation of moving or deleting visualization blocks and deleting tabs. The program remembers 100 last operations that you can later undo. After you load a configuration from a file, the list of operations you can undo is cleared.
Redo
Keyboard shortcut: Ctrl+R
Toolbar button: ![]()
Redo the last undone operation of moving or deleting visualization blocks and deleting tabs.
New Tab
Keyboard shortcut: Ctrl+T
Toolbar button: ![]()
The command adds a new tab you can put visualization blocks on. Once you select this item, you will see the Tab Parameters dialog box (fig.1).
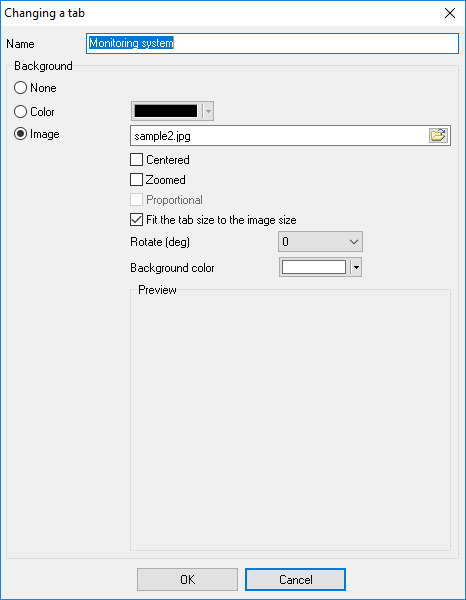
Fig.1. Tab Parameters dialog box
You can specify the name that will be displayed on the title of the tab and also select the background type:
1.None - the tab will have no background image and will use the default background color;
2.Color - the tab will have no background image and will use the specified background color;
3.Image - the specified image will be used as a background image over which visualization blocks will be placed. Our program has no built-in tools for drawing graphical elements displaying a technological process. However, you can do it in any other graphics editor.
You can use images of the following formats as a background image: BMP, JPG, PNG and GIF.
If you use a background image, you can specify the following options:
•Center - the image will be placed in the center of the tab;
•Fit - the image will be zoomed to fit the tab size;
•Keep proportions - this option becomes available when the "Fit" option is enabled. If the "Keep proportions" option is disabled, the background image will be distorted in order to cover the entire area of the tab without keeping the proportions. If the "Keep proportions" option is enabled, the image will be zoomed with the proportions kept, but it is possible that there will be margins visible at the sides of the image in this case;
•Fit the tab size to the image size - if this option is enabled, the image will always occupy the entire area of the tab and the program window will be automatically resized to fit the image size. Also, you will not be able to resize the window of the program;
•Rotate - the option allows you to rotate the background image to the specified number of degrees;
•Background color - if you keep proportions while zooming the image to fit the tab size, the areas of the tab that are not covered by the image will be of the specified color.
Delete Tab
Toolbar button: ![]()
This command becomes available after you create one or several tabs using the "New Tab" command. You can use this command to delete the current tab with all its visualization blocks. If you select this command, the program will ask you to confirm the operation before it deletes the tab.
Edit Tab
Toolbar button: ![]()
This command becomes available after you create one or several tabs using the "New Tab" command. The command allows you to open the Tab Parameters dialog box (fig.1).
Keyboard shortcut: Ctrl+N
Toolbar button: ![]()
This command becomes available after you create one or several tabs using the "New Tab" command. The command allows you to add a visualization block, which is an indicator, to display the values of an OPC tag (OPC variable). You can find out how to add a block in the "Visualization block" section.
Delete Block
Toolbar button: ![]()
This command becomes available if you select a visualization block on the tab and allows you to delete the selected block. If you select this command, the program will ask you to confirm the operation before it deletes the block.
Edit Block
Toolbar button: ![]()
This command becomes available if you select a visualization block on the tab and allows you to edit the parameters of the block. While editing the visualization block parameters, you will see the dialog box similar to the one described in the "Visualization block" section. You can also double-click a visualization block to edit its parameters.
Copy Block
Keyboard shortcut: Ctrl+Shift+C
Toolbar button: ![]()
This command becomes available if you select a visualization block on the tab and allows you to copy the selected block. If you select this command, the selected block is automatically copied. Its parameters are identical to the original ones, except for the title. After you copy the block, you can edit the parameters of the copy the way you need it. This feature makes it easier to create several blocks of the same type.