Our program has a built-in HTTP (web) server. The HTTP server will enable you to view reports remotely using a regular browser. The program allows you to provide employees with access to personal reports.
To activate and configure this feature, select "Edit - Preferences..." and switch to the "Web server" page (fig. 23).
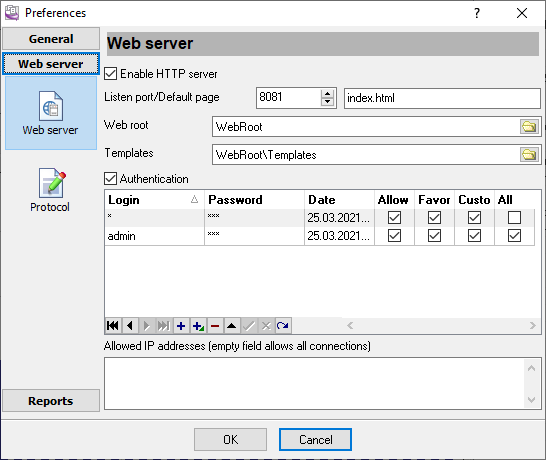
Fig. 23 HTTP server settings
Listen port. The HTTP server will use this port to send data to the clients. The default value of this parameter is 8081. If another server already uses this port, you can specify any suitable value.
To access the server from the same computer where the program is running, you should type the following in the browser address line: http://127.0.0.1. If you specify a nonstandard port, specify it after a colon. For example, in the case of the above image:
http://127.0.0.1:8081
To access the webserver:
1.Open the port specified in the settings in your firewall.
2.Instead of 127.0.0.1, specify the computer's IP address in the network or its name if you access the server from the local area network.
Default page. This page will be opened by default when you access the address http://127.0.0.1:8081.
Web root. This folder will contain pages with reports the remote user will view. It must be possible to write to this folder.
You can use this folder to store your page that the web server can send to the remote client.
Templates. This folder contains page templates that the program will use to display pages in the browser. For an additional fee, the AGG Software company can develop a template in your corporate style, or you can do it yourself using existing templates. It would be best if you kept the file names of templates completely changing their contents.
Authentication. This option enables password-protected access. If this option is disabled, everyone can get access. Otherwise, access parameters are specified in the table below.
You can specify several users with different rights in this table (fig. 23).
There are two users shown in fig. 23.
1.admin - It is the administrator with all rights and password-protected access to all reports and data.
2.The "*" character is specified as the second user, which means a user with any name. The user will have to enter the password once he accesses the webserver. In this case, the password is empty, so the user has to specify only his name. As a result, this user will be able to view only reports with events related to him.
Suppose you are going to provide access to the webserver via the Internet. In that case, it is recommended to specify the list of addresses accesses to the webserver is permitted from in the "Allowed IP addresses" field. If this field is empty, access from any remote computer will be allowed.