The remote client is a separate program that is installed on client computers and monitors all local printers on those computers.
Advantages of using the remote client:
1.The remote client automatically determines the list of printers on the local computer. It detects when a new printer is added and automatically starts to monitor it.
2.The central data collection server is loaded less because the client takes a large part of monitoring functions upon itself.
3.You don't need to create a list of all printers on the network.
4.You don't need to share access to the printer.
5.The network load is decreased because the client groups and compresses data before sending it to the server.
6.You do not need to create additional configurations to monitor printers loaded with work.
Disadvantages:
1.It is necessary to install additional software on client computers
It is necessary to enable the "Enable TCP/IP server" option to receive remote clients' data. The received data will also be displayed in the program's main window and processed according to the program settings.
If the "Send monitor settings to remote clients" option is enabled (fig. 2.7.5), all options from the "Monitor options" page will be automatically sent to remote clients as soon as they are modified on the server software. If this option is disabled, every client can use its own monitor options.
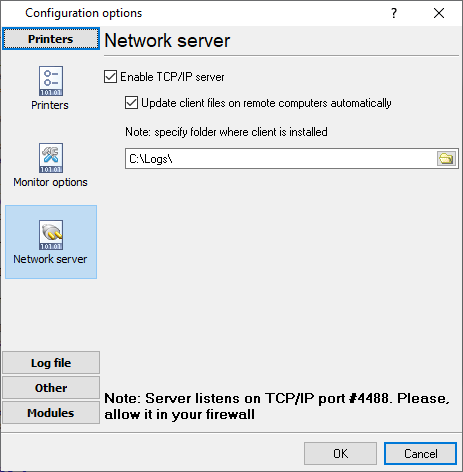
Fig. 2.7.5. Network server
Remote client installation
The client installation software is distributed as a separate installation package in the MSI format. This installation file format makes its installation on client computers considerably easier. In particular, you can do it remotely with the help of Active Directory services.
It is possible to install the client from the command line specifying the default parameters:
Example:
msiexec /i "C:\PrinterMonitorClient.msi" AGG_INSTALLDESKTOPSHORTCUT="" AGG_DONTINSTALLPROGRAMGROUP="1" /qn
Command-line parameters:
/qb - quiet installation with the minimum interface
/qn - quiet installation without any requests
AGG_INSTALLDESKTOPSHORTCUT="1" - create a desktop shortcut
AGG_INSTALLDESKTOPSHORTCUT="" - do not create a desktop shortcut
AGG_DONTINSTALLPROGRAMGROUP="1" - do not create a program group in the "Start" menu
AGG_DONTINSTALLPROGRAMGROUP="" - create a program group in the "Start" menu
AGG_PROGRAMGROUP="Accurate Printer Monitor Client" - create a group in the "Start" menu with the specified name
WIXUI_INSTALLDIR="C:\Custom Program Folder\" - install the program in the specified folder
AGG_SERVER="192.168.0.1" - specify the address of the data collection server the monitoring data will be sent to
Note: During the remote client's installation, the installation program will automatically add exceptions for port 4488 for the remote client in the standard Windows firewall. If some other firewall is used on cli-ent computers, you should allow TCP connections via TCP port 4488.
Remote client configuration
To configure the remote client, you should prepare and apply the program settings on the client computers. To do it:
1.Install the remote client on one of the computers.
2.Configure the remote client on this computer.
3.Save the client configuration to a file with the ".reg" extension using the "Save and Load - Save Settings" button in the remote client configuration window.
4.Copy this file to all client computers using the Active Directory services or other remote administration tools.
If you enable the "Send monitor options to remote clients" option (fig. 2.7.5) on the server and install the client with the AGG_SERVER command line parameter, there is no need to configure the remote client. You can complete the above steps in case of the detailed configuration of parameters or change the data collection server's address.
How the remote client works
The program is installed as a Windows service and is automatically run at Windows startup. While running, the client monitors adding and removing printers. As soon as a new printer is added, the program automatically starts to monitor events on this printer. When an event occurs on the printer, the client sends it to the server. When the client receives a configuration update command from the server, it sets the received settings and saves them to the registry. If the connection to the server is unsuccessful, the client saves the events to the internal storage. The events saved to the storage will be sent when the next event occurs, but not earlier than 10 seconds. The storage can store 1000 events. When the storage is full, the oldest events are permanently deleted from the storage.
The process of how the program works is logged in the file c:\ProgramData\Accurate Printer Monitor\printermoncli-service.log