Advanced Serial Data LoggerTrust In Confidence! For Windows 2000 - Windows 11 (2022) (incl. Server, x86 and x64). Latest version: 4.7.7 build 408. April 8, 2024. Export data to the MySQL databaseProblem scenario: I have an application that requires the use of two devices. The first device is a barcode scanner connected. It will scan bar codes (EAN-13) using an RS232 port. When read, the scanner sends its identification number (four digits) and bar code information (thirteen 13 digits). And the other is a Mettler Toledo scale that will output an ASCII string (Continuous Output - scales continually sends updates which are read from the port). We need to take the scan and weight data and parse it and log all the data into a MySQL database. The data needs to be stored as a single record with time and date stamp. Requirements:
It is assumed that: You've prepared parser items for export. For this tutorial, all items were prepared in the previous part. Also, you may read other examples:
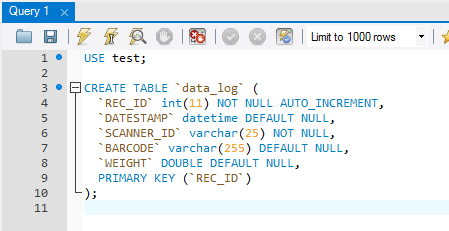
Solution: Note: This configuration process is complex and might prove to be difficult for the unskilled user. It is assumed that you have access to the database and can manage it. First of all, create a table in a database. Select an existing user database or create a new one. The simplest way is to use MySQL Workbench. This software ships with a standard distribution, and you can find it in the "MySQL" menu in the "Programs" group. We will create a table called "data_log" in the "test" database in this example. The table's structure is shown in Fig.1 below.
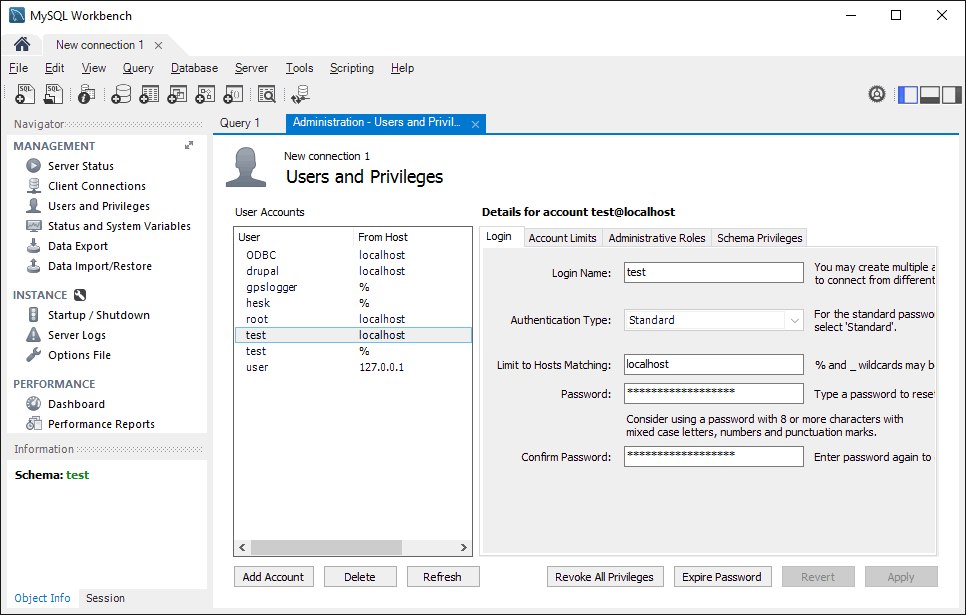
Note that four columns have been added to the table, for all variables from both parsers and one ID column, which will contain an auto-incremental value. You can add more columns if you want or use tables with your structure. Note: You should specify unique column names. You cannot use reserved words of the ANSI92 SQL standard in names. In this example, we could use the "Datetime" name for the last column. However, as it is a reserved word, we will use the "DATESTAMP" name instead. Now that our table is ready, the security within MySQL has to be addressed. Within MySQL, each user may be configured for access to specific tables only. In our example, a new user could be created, or access could be granted for the table above to an existing user account. It is also possible to connect using an administrator account, which has full access rights. However, we suggest using the administrator account for testing only. We have created the user with the name of "test" (see Fig.2).
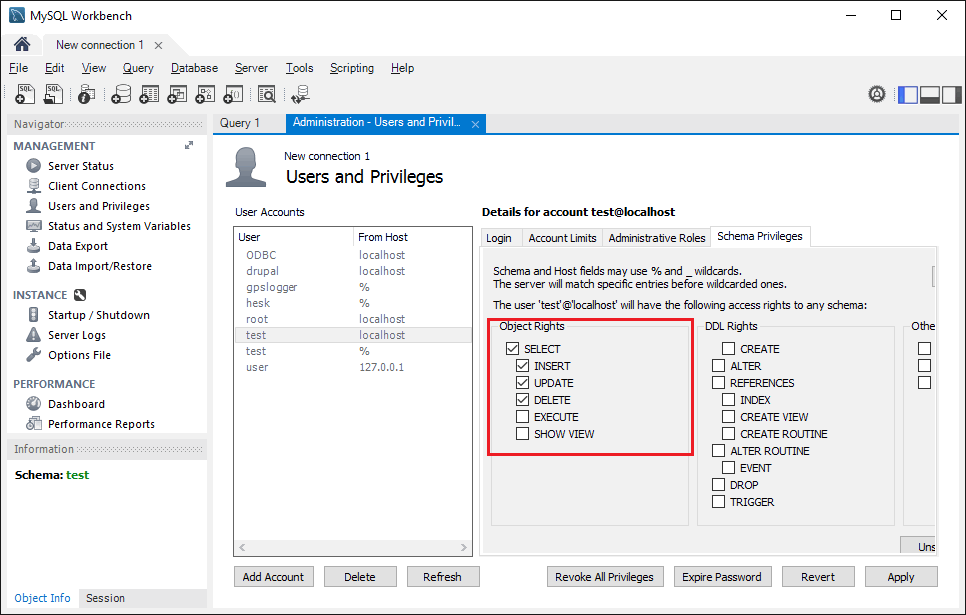
By default, the user does not have any rights. It would be best to grant "write" access rights to the user to our table (Fig.3).
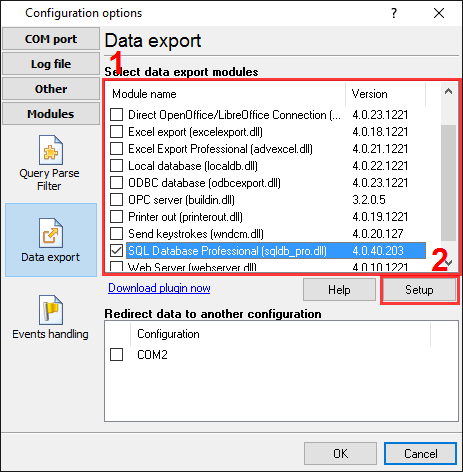
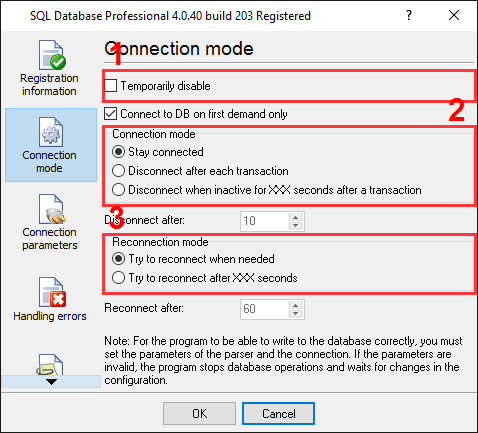
The "SQL Database Professional" plugin uses a direct access method, but the plugin depends on the "libMySQL.dll" file. You can download this system library from the MySQL home page or our site and place a file from the archive to your Windows\system32 folder. OK, the database and table are both ready. Next, go to the "SQL Database Professional" plugin configuration window and click the "Common" button on the left of the window (Fig.4).
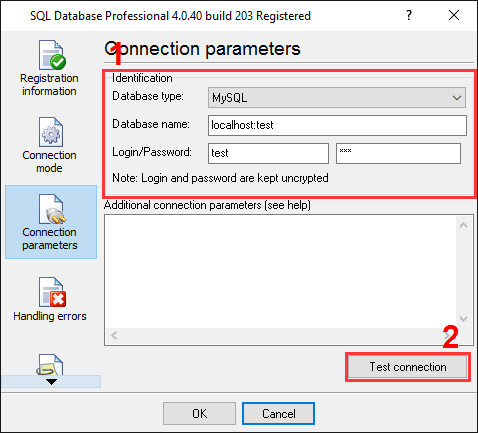
The disabled state of the tick-box at position #1 enables writing to the database, and the radio button #2 specifies that the database is to be kept open. This option serves to minimize the writing time and allows other users to write data to the same time without locks and freezes. The radio button #3 will enable you to reconnect to a database when a connection is lost. On the second "Connection parameters" page (Fig.5), you can specify the parameters of your database. Here select your database type "MySQL" (pos.1), set the host and database name (pos. 2), the user name, and the password (pos.3). You should test the connection. Just click the "Test connection" button (pos.4).
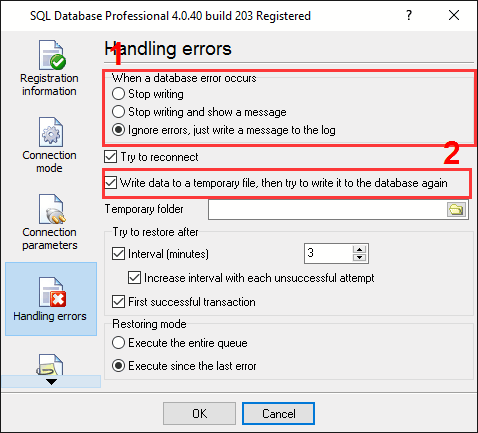
In our example, no additional connection parameters are necessary. On the third "Handling errors" page (Fig.6), specify how the software should react to errors that occur while the plugin writes data to a database.
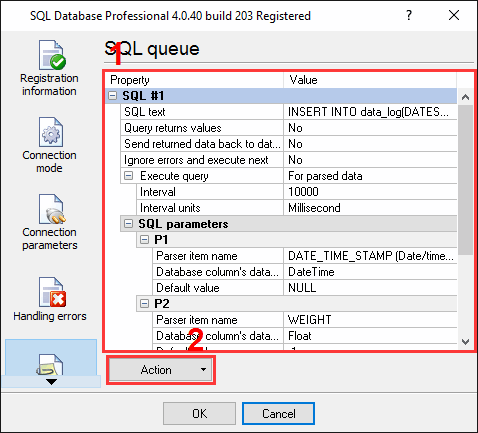
In this example, the 3rd option (pos. #1) was checked as the data is important, and we require the program to operate regardless of the error. You may use other variants when you test the plugin module with a new database. The option at position #2 allows you to write data for an invalid SQL query to a temporary file and restore it later when the configuration problems are fixed. The option at position #3 allows you to specify the restoring mode. If your SQL queue (from the next page) contains more than one SQL query and one query depends on another, you may select the first radio item in this group. The last "SQL queue" page (Fig.7) is significant. You can add a SQL statement and bind parser's variables to SQL query parameters. The plugin allows you to use your SQL statements and insert the data as you want. For example, you may use stored procedures or insert the data into multiple tables.
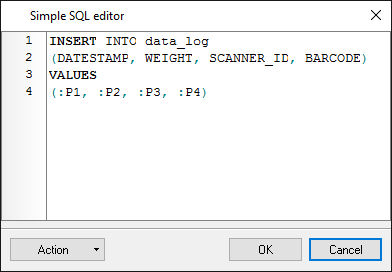
You can create SQL query by SQL query on this page by selecting the "Action → Add SQL in to queue " menu item (Fig.7, pos. #3). In this case, the plugin will create an item (Fig.7, pos. #1) and allow you to edit a SQL query (Fig.7 pos. #2). You can access the SQL editor (fig.8) by clicking a button with dots, which appears by clicking on a value field (Fig.7, pos. #5).
You should create a valid SQL statement in the SQL editor. You may use any syntax and commands, which are supported by database engine. You may use parameters in your statements like ":P1". The plugin will automatically bind variables from the parser to these parameters before executing the SQL statement. After clicking the "OK" button, the SQL editor will be closed, and the module creates parameter items in the SQL queue (Fig.7 pos. #3). Each parameter item in the SQL queue has somef properties:
Click the "OK" button to close the SQL Database Professional plugin configuration window as well as the "OK" button in the options window. Okay, all settings have been completed, and we are ready to capture the data to the database. Suppose you configured the SQL Database Professional module correctly. In that case, while accessing the database, the data logger will display messages in the drop-down box at the bottom of the main window. Related articles:
|
|
| Copyright © 1999-2024, AGG Software. All rights reserved. Terms of use | Privacy policy |