Avaya Communication Manager (Customized Output Format ACM 6.3+). SMDR/CDR data format and connection settings
This data is being extracted with help of the "Advanced PBX Data Logger" software only. It may not applicable for other software titles.
Configuring ACM
System parameters
Type change system-parameters cdr. Press Enter.
The CDR System Parameters screen appears.
In the Primary Output Format field, select customized.
In the CDR Date Format field, select day/month.
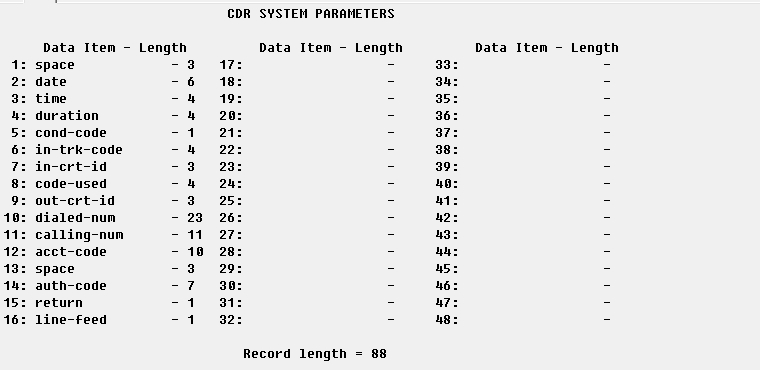
On the page #2 define CDR fields descriptions as on the figure above.
IP services - Client mode (Preferred)
The PBX can also work in the TCP client mode. You may use this mode instead of the TCP server mode.
Type list node-names all.
Press Enter.
Add a new node with the following settings.
Type - IP
Name - pbxlogger
IP Address - 192.168.10.33 (this is the IP address where Advanced PBX Data Logger is installed. The computer with the logger must have a static IP address)
Type display ip-services.
Press Enter.
Verify or change the settings for the CDR1 service.
Enabled - Y.
Reliable Protocol - N.
Local port - 0.
Remote node - pbxlogger.
Remote port - 5555.
IP services - Server mode
Type display ip-services.
Press Enter.
Verify the settings for the CDR1 service.
Enabled - Y.
Reliable Protocol - N.
The following suggested settings instruct the PBX to work in the TCP Server mode.
Local port - 5555 (you may use any other port number above 1024. But you must specify the same port number in Advanced PBX Data Logger).
Remote node - Any.
Remote port - 0.
Avaya Communication Manager (ACM) 6.3 and higher. Customized format.
This parser is designed for the following customized format.
Date format
The parser expects date in MMDDYY format (month/day/year).
Configuring ACM
System parameters
Type change system-parameters cdr. Press Enter.
The CDR System Parameters screen appears.
In the Primary Output Format field, select customized.
In the CDR Date Format field, select day/month.
On the page #2 define CDR fields descriptions as on the figure above.
IP services - Client mode (Preferred)
The PBX can also work in the TCP client mode. You may use this mode instead of the TCP server mode.
Type list node-names all.
Press Enter.
Add a new node with the following settings.
Type - IP
Name - pbxlogger
IP Address - 192.168.10.33 (this is the IP address where Advanced PBX Data Logger is installed. The computer with the logger must have a static IP address)
Type display ip-services.
Press Enter.
Verify or change the settings for the CDR1 service.
Enabled - Y.
Reliable Protocol - N.
Local port - 0.
Remote node - pbxlogger.
Remote port - 5555.
IP services - Server mode
Type display ip-services.
Press Enter.
Verify the settings for the CDR1 service.
Enabled - Y.
Reliable Protocol - N.
The following suggested settings instruct the PBX to work in the TCP Server mode.
Local port - 5555 (you may use any other port number above 1024. But you must specify the same port number in Advanced PBX Data Logger).
Remote node - Any.
Remote port - 0.
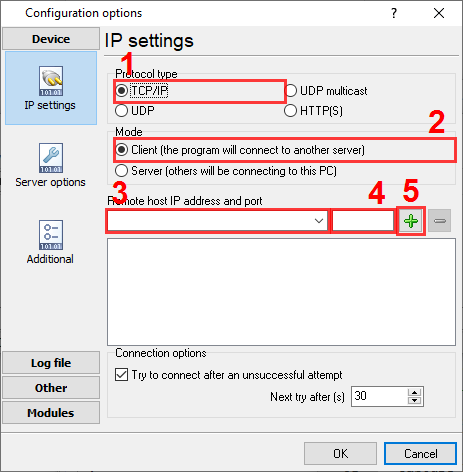
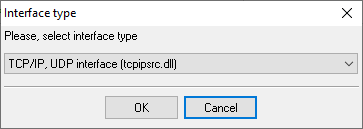
Configuring PBX Data Logger as a TCP client
Our software should work in the TCP client mode. It means that our software will initiate connection with the PBX and the PBX will work as a server. Add one or several PBX IP addresses here (the IP address of the (none)). The port number should match the port that you have defined within the PBX (5555 in the example below).
1. Add a new configuration with the TCP data source (if you didn't it before).
2. Configure the TCP settings as shown below.
192.168.1.220
5555
192.168.1.220:5555
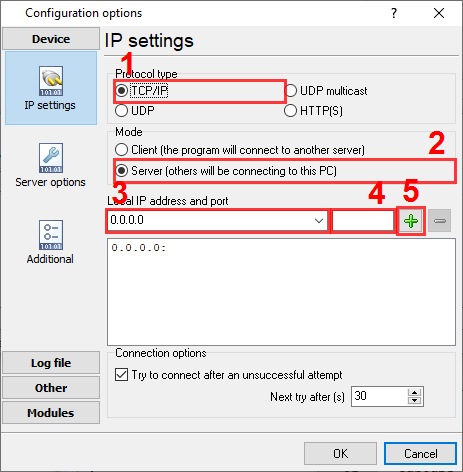
Configuring Advanced PBX Data Logger as a TCP server
Advanced PBX Data Logger should be configured to the TCP server mode and listen on 0.0.0.0:5555 (see below). The IP address 0.0.0.0 allows receiving data from all network connections on your computer. The port number should match the value from the SMDR settings in your Avaya CM.
1. Add a new configuration with the TCP data source (if you didn't it before).
2. Configure the TCP settings as shown below.
5555
5555
Selecting the correct parser for Avaya Communication Manager (Customized Output Format ACM 6.3+)
Avaya Communication Manager (Customized Output Format ACM 6.3+)
Avaya Communication Manager (Customized Output Format ACM 6.3+)
Data items
Description
Data type
Column name
Call time
datetime
CALL_TIME
Call duration (s)
integer
CALL_DURATION_S
Call duration
datetime
CALL_DURATION
Condition code
string
CALL_TYPE
Direction
string
DIRECTION
Incoming trunk code
string
TRUNK
Incoming circuit ID
string
FLAG4
Access code used
string
FLAG1
Outgoing circuit ID
string
FLAG5
Dialed phone
string
DIALED_PHONE
Caller phone
string
CALLER_PHONE
Extension
string
EXT
Acount code
string
ACC
Auth code
string
AUTH
Interested in reports for PBX usage?
We offer the PBX Reports utility with various manual, scheduled and email reports, built-in web-server, and other features. Look here
Want PBX call logs in a database?
This is the standard feature. The logger captures exports SMDR or CDR data in real-time to your database. Follow this link
Note: Products and companies mentioned here are used only for definition and identification purposes and can be trademarks and/or registered trademarks of the respective companies.