Creating a list of printers for monitoring
You can create a new configuration with a click on the button with the "+" sign on the toolbar in the main window of the program (fig. 2.7.1) or the "Options" menu. After you click this button, you will see a new dialog box (fig. 2.7.2). This dialog box has several tabs with options. The "Printers" tab is described in this section. The installation software could create the default configuration during the installation of the program. In this case, you can modify the existing configuration by opening it with the corresponding menu.
To monitor several printers at a time, you need to add these printers to the list. If you need to specify different modes for monitoring the printers, you should create several configurations. To do it, repeat the above operation for each configuration. Later, you will be able to access every configuration with the drop-down menu's help next to the "+" button (fig. 2.7.1).

Fig. 2.7.1 Access to the printer configuration
The "Monitor printers" page allows you to define the list of printers to monitor. You should specify the name of your group of printers in the "Printer group name" field on this page. This name will be displayed in the main window of the program.
To add a printer to the list, type the name of the printer in the field and click the "+" button. You can select a printer from the list that contains all local printers.
To add a remote printer, you should specify the name of the remote computer before the name of the printer: \\COMPUTER_NAME\PRINTER_NAME, where
COMPUTER_NAME is the name of the remote computer on the local area network. If the printer is not available by its name, you can specify the computer's IP address instead of COMPUTER_NAME.
PRINTER_NAME is the full printer name. In the case of a network printer, you can specify the network name specified for this printer instead of its full name.
Note 1: to monitor network printers, you need the program to be run as an administrator account. If the remote computer is not located in the domain, an account with administrator permissions, username and password must be added on the remote computer. The program will be run as this account.
Note 2: to monitor network printers, you need to install the client program on the remote computer and configure it tot write data to the centralized database (for example, MSSQL or MySQL).
Note 3: to monitor network printers, you need to have shared printer access enabled. To allow shared printer access for the administrator only, you should add the "$" character to the end of the network printer name. In this case, it will be possible to access the printer only by specifying its name explicitly. This printer will not be seen in the network neighborhood.
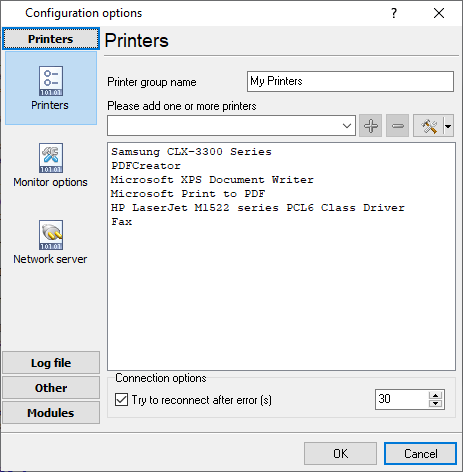
Fig. 2.7.2 Printer list
The program has several options that ensure printers are constantly monitored:
Try to reconnect after error - this option allows you to connect the printer to the monitoring system in the specified number of seconds after a connection error occurs. A connection error often occurs when the printer is disconnected from the computer or switched off.
Additional tools
You can use the "Tools" button next to the "+" button and the drop-down menu that appears after a click on this button (fig. 2.7.3) to perform the following operations with the list:
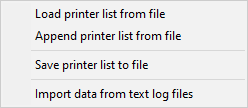
Fig. 2.7.3. Additional tools
Load printer list from file - this menu item allows you to load the printer's list from a text file. Every line in the text file must contain the name of one printer.
Append printer list from file - this item allows you to add printers from a text file to the existing list.
Save printer list to file - this item allows you to save all printers from the list to a text file.
Import data from text log files - this item allows you to import log files created by the program earlier. The data is read from the log file and imported into the database according to the program settings.