How it works
After the program is loaded, it analyzes the configuration tree, and items are added to the internal structures of the data program during this analysis. The existence of items on the server is also checked during this analysis. This process may take from several seconds to several minutes, depending on the OPC server. If an item does not exist, the corresponding message is added to the log, and this item will be highlighted in red when you open the configuration. If the OPC server is sending data, the program will immediately start receiving data from it provided that the configuration tree is not empty. Also, the program will send data received from the core to OPC servers for the corresponding items.
The following happens when data is being received from an OPC server:
1.If the "Wait till all items are updated" checkbox is selected in the group parameters, the item update flag is set first and the value of the item is changed. Then the items of the group the item (whose data is received) belong to are checked for value updates. If all items in the group have been updated, the data is sent to a data export module. The "Export valid values only" and "Don't export NULL values" checkboxes are taken into account during export, i.e., if an item has a valid value and the checkbox is selected or if it is not selected. The following check is performed: if the value of the item is different from NULL and the checkbox is selected or if the checkbox is not selected, the item is exported into the core provided it exists. After the data is exported, the item update flag is cleared.
2.If the "Wait till all items are updated" checkbox is not selected in the group parameters, items are exported. The "Export valid values only" and "Don't export NULL values" checkboxes are taken into account during export, i.e., if an item has a valid value and the checkbox is selected or if it is not selected. The following check is performed: if the value of the item is different from NULL and the checkbox is selected or if the checkbox is not selected, the item is exported into the core provided it exists.
When data is received, the server name will be added to the item name if the "Add server name to item name" checkbox is selected in the group properties. The <;>, <">, <['>, <]> characters in server and item names are replaced with the <_> character. If an item is of the string type, the <\>, <"> characters are replaced with <\\>, <\">, if a character has a code within the range $00..$1F, <\x> characters are added before the character.
The following happens when data is being sent to an OPC server
(e.g., from a data query module):
1.The data is copied to the temporary buffer;
2.A line is singled out from the temporary buffer. Lines can be separated by the <CR> or <CR+LF> characters;
3.An item is singled out from the line. Items are separated by the <;> character;
4.The item is decoded and, as a result, you get the server name (may be absent), the item name, the item type (may be absent), the item value. If no item type is specified, it is determined automatically according to the following rules: if the value starts from quotation marks, the data type is "string", or if the value can be converted into an integer without any errors, the type is "integer", or of the value can be converted into a fraction without any errors, the type is "double". In all other cases, the program interprets the value as being the "string" data type;
5.The item is sent to the core. If no server name is specified, the value is sent to all items specified in the configuration and having the corresponding item name.
Groups, servers, and variables
Data can be sent and received at any time. The "OPC groups, servers, and variables" tree is used for that. For the program to be able to receive/send data, you should add at least one group with one item. The tree allows you to add, remove, edit, view, and assign other names to items and also move items and groups.
Select the "OPC settings" tab in the settings dialog box, and you will see the group and item tree on the screen. It is empty by default.
OPC Settings
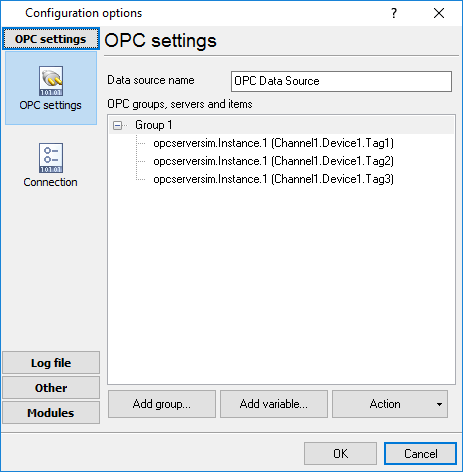
Fig. 2.4.1. OPC settings
Data source name - the field contains any name that will denote the operations performed with OPC servers.
OPC groups, servers, and variables - the tree contains groups of servers and variables used to send/receive data.
Action - the button allows you to add groups and items from OPC servers to the configuration, remove groups and items, assign new names to items, view and edit data, move groups and items up/down the tree. You can right-click the tree instead of this button, and you will see the same menu that you see when you click the "Action" button.
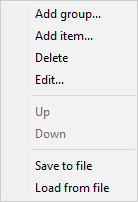
Fig. 2.4.2 The action menu after a right-click on a group
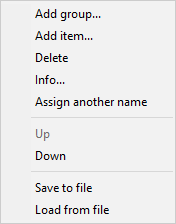
Fig. 2.4.3 The action menu after a right-click on an item
Adding a group
Click the "Action" button or right-click the "OPC groups, servers, and variables" tree, and you will see the action menu (Fig. 2.4.2 or Fig. 2.4.3). Select the "Add group..." item, and you will see the Group properties dialog box on the screen (Fig. 2.4.4).
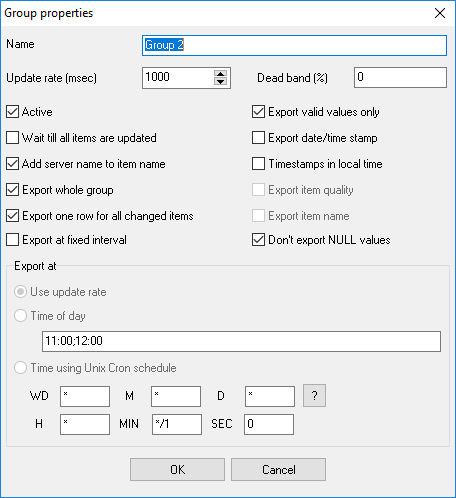
Fig. 2.4.4 Group properties
Name - the field contains the name of the group. The name may contain any characters. By default, it is Group XXX, where XXX is the number of the group.
Update rate (msec) - the field contains the update rate of items in the group when they are read from the OPC server. The value is specified in milliseconds. By default, 1000 milliseconds, i.e., 1 second.
Dead band (%) - the field contains the value of the dead band in percent. The default is 0 percent.
Active - the checkbox defines whether the group is active. If it is selected, items from this group will be exported (items will be read from servers), if it is not selected, they will not be exported (items will not be exported). By default, the checkbox is selected.
Export valid values only - the checkbox enabled/disabled exporting only valid values. If it is selected, only those items in the group whose value is OPC_QUALITY_GOOD will be exported, if it is not selected, the quality of the item value is not taken into account. By default, the checkbox is selected.
Export date/time stamp - the checkbox enabled/disabled exporting of update date and time of an OPC tag.
Export whole group - if this checkbox enabled then the program will export all tags in the group at once; otherwise each tag in the group will be export separately: one tag on a new line.
Timestamp in local time - if this checkbox enabled, then the program will export the timestamp in local time zone. Otherwise the "UTC" time zone will be used.
Export item name, Export item quality - these options are available if the "Export whole group" option is disabled. In this case the program will add two special items to the output that will contain the tag name and tag quality. For example:
ITEM_NAME[8]="opcserversim.Instance.1.T1";ITEM_VALUE[3]=1606521099;ITEM_QUALITY[3]=192
ITEM_NAME[8]="opcserversim.Instance.1.T2";ITEM_VALUE[3]=1170485188;ITEM_QUALITY[3]=192
ITEM_NAME[8]="opcserversim.Instance.1.Val1";ITEM_VALUE[5]=4958.32440443337;ITEM_QUALITY[3]=192
ITEM_NAME[8]="opcserversim.Instance.1.Val2";ITEM_VALUE[5]=4970.36790242419;ITEM_QUALITY[3]=192
Export at fixed interval - if this checkbox enabled then the program will export all tags in the group periodically, even if a tag value isn't changed. You may export data by fixed interval, at a fixed time or define a flexible schedule using the "Cron" time format.
Add server name to the item name - if this checkbox enabled then the program will append a server name before the tag name. It allows you to distinguish identical tags from different servers.
Don't export NULL value - the checkbox allows you not to export items with null values. If it is selected, items in the group that have a null value will not be exported, if it is not selected, the null value of an item is not taken into account. By default, the checkbox is selected.
Wait till all items are updated - the checkbox enables/disables waiting till all items in the group are updated. If it is selected, items in this group will be exported only when all items in the group are updated (the "Export valid values only" and "Don't export NULL values" checkboxes are taken into account during export), if it is not selected, all items will be exported taking into account the "Export valid values only" and "Don't export NULL values" checkboxes. By default, the checkbox is selected.
Note: See the paragraph "How it works" for more details about the export algorithm.
After you specify the group properties, click the "OK" button to save the properties or the "Cancel" button to cancel it. The dialog box will be closed, and a new group will appear in the tree.
Adding an item
Click the "Action" button or right-click the "OPC groups, servers, and variables" tree, and you will see the action menu (Fig. 2.4.2 or Fig. 2.4.3). Select the "Add item..." item, and you will see the Item properties dialog box on the screen (Fig. 2.4.5).
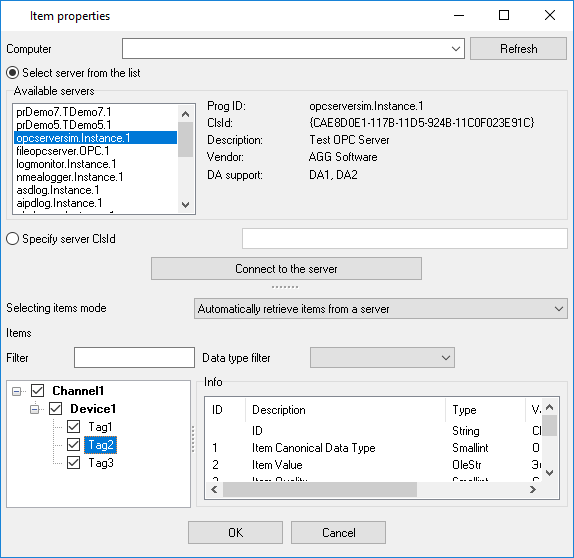
Fig. 2.4.5 Automatic mode item properties
Servers - the list contains the list of available OPC servers.
Info - the group shows brief information about the selected OPC server.
Prog ID - the field shows the program identifier (the name of the program).
Description - the field shows a brief description of the server.
DA support - the fields shows the supported DA.
Vendor - the field shows the name of the vendor.
Connect - the button connects the program to the server and after that items (if there are any on the server) appear in the "Items" list. It is also possible to connect to the server with a double click on the server selected in the "Servers" list.
Selecting items mode - the list allows you to select one of the modes for item selection/input. There are two modes available: Automatically retrieve items from a server and Manual mode.
Items - the list contains items available on the selected server. There is a checkbox next to each item. It enables/disables adding the corresponding item to the tree (Fig. 2.4.1) after you click the "OK" button and close the dialog box. Once a connection is established to the server, the checkboxes of all items are selected. You can select or clear a checkbox by clicking it. Also, you can use the menu (Fig. 2.4.6) opened with a right-click on the list.
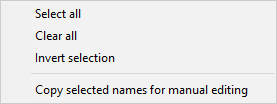
Fig. 2.4.6 Item menu
Select all (Fig. 2.4.6) - select the checkboxes of all items.
Clear all (Fig. 2.4.6) - clear the checkboxes of all items.
Invert selection (Fig. 2.4.6) - invert the checkboxes of all items.
Info - the group shows information about the selected item.
ID - the column shows the item identifier. It cannot be edited.
Description - the column shows a brief description of the item. It cannot be edited.
Type - the column shows the item type. It cannot be edited.
Value - the column shows the item value. It cannot be edited.
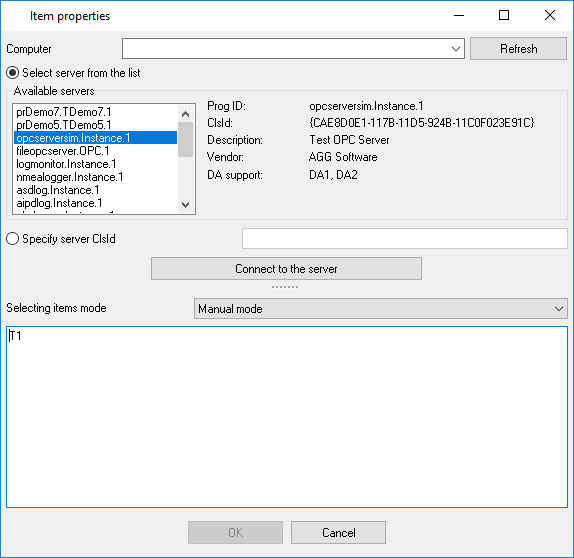
Fig. 2.4.7 Manual mode item properties
Items - the text field allows you to type items manually. The number of items is unlimited.
Removing an item:
Click the "Action" button or right-click the "OPC groups, servers and variables" tree, and you will see the action menu (Fig. 2.4.2 or Fig. 2.4.3). Select the "Delete" menu item, and you will see the confirmation dialog box on the screen. Click the "Yes" button in this dialog box, and the group or the item will be removed from the tree after that. If you change your mind, click the "No" button. The "Delete" menu item is not available when the tree is empty.
Editing a group:
Click the "Action" button or right-click the "OPC groups, servers and variables" tree, and you will see the action menu (Fig. 2.4.2 or Fig. 2.4.3). Select the "Edit..." menu item, and you will see the Group properties dialog box on the screen (Fig. 2.4.4).
Note: Note that a group must be selected in the tree; otherwise, you will not see this menu item.
See "Adding groups:" for the description of group properties.
Note: See the paragraph "How it works" for more details about the export algorithm.
After you specify the group properties, click the "OK" button to save the properties or the "Cancel" button to cancel it.
Viewing information about an item:
Click the "Action" button or right-click the "OPC groups, servers, and variables" tree, and you will see the action menu (Fig. 2.4.2 or Fig. 2.4.3). Select the "Info..." menu item, and you will see the Item properties dialog box on the screen
All item properties except the "Info" group will be unavailable. Click the "Close" button after you view the information.
Note: Note that an item must be selected in the tree; otherwise, you will not see this menu item.
See "Adding an item:" for the description of item properties.
Assigning another name to an item:
Click the "Action" button or right-click the "OPC groups, servers, and variables> tree, and you will see the action menu (Fig. 2.4.2 or Fig. 2.4.3). Select the "Assign another name..." menu item, and you will see the dialog box where you can type a new name for the item. Type a new name for the item and click the "OK" button - the new name of the item will appear in the tree. Note that the name must differ from those already existing in the tree; otherwise, you will see the corresponding message on the screen and the item will not be renamed.
Note 1: It is this assigned item name that is used during export/import, not the one in the tree. By default, the assigned name has the same value as the value selected when the item was added.
Note 2: Note that an item must be selected in the tree; otherwise, you will not see this menu item.
Moving a group or an item up:
Click the "Action" button or right-click the "OPC groups, servers, and variables" tree, and you will see the action menu (Fig. 2.4.2 or Fig. 2.4.3). Select the "Up" menu item, and the group or the item will move one position up. If a group or an item is the only one or if there are no groups and items at all, the menu item will be unavailable.
Moving a group or an item down:
Click the "Action" button or right-click the "OPC groups, servers, and variables" tree, and you will see the action menu (Fig. 2.4.2 or Fig. 2.4.3). Select the "Down" menu item, and the group or the item will move one position down. If a group or an item is the only one or if there are no groups and items at all, the menu item will be unavailable.
Note: you can add any number of groups and items with different parameters.
OPC HDA specific
While working with OPC HDA data, the logger saves a timestamp of the read value. Next time, the logger starts reading history data from the saved time. If the logger reads data the first time, it reads data for the last 30 days.
You may force (re)read archive values from the necessary date. Please, open the OPC settings (fig. 2.4.1), and execute the "Actions - (Re)read archive from date" command. Please, note, the logger does not check for previously read values. The logger receives and processes all data.
OPC AE specific
Some OPC AE servers do not support browsing for alarm categories and groups. Therefore, you should specify a mask of necessary events in the manual mode (fig. 2.4.7) like:
Category name:Group name
You may specify one or more masks in the list. Also, you may use mask symbols:
* - one or more any characters in a name.
? - any one character in a name.
Examples:
Simulated Event:*
Simulated Item Creation Event:*
aaaa :: :*
*:*
If you want to receive events for all categories and groups, please, specify the following mask:
*:*
OPC UA DA specific
You should specify the server URL using the following format:
opc.tcp://login:password@127.0.0.1:10000/url
127.0.0.1 - the IP address, where the OPC server is installed. You may use a domain name instead of the IP address.
10000 - the IP port number.
login:password - an optional login and password, delimited by a colon.
Please, note, you should specify the link to an OPC server in the "Server URL" field. This field does accept links to an LDS or GDS server (Local/Global Discovery Server, generally, the IP port number is 4840). The IP address of this server you may use in the "Computer" field, then click the "Refresh" button (fig. 2.4.1).
Currently, the logger supports the following security policies:
•None.
•Sign.
•Sign&Encrypt.
Key types:
•Basic128Rsa15
•Basic256
•Basic256Sha256
You should trust our software key on your OPC server.