
TCP Splitter - Online help | TCP Splitter
About the application
General information
TCP Splitter is a software tool that can split a TCP or UDP data stream into two or three identical data streams, so more than one application can simultaneously process the incoming data. For example, you can send NMEA 0183 data to a navigation application and simultaneously log the data using one of our loggers.
You can use TCP Splitter to build distributed monitoring systems where data is duplicated.
Features:
•You can configure data stream splitting for multiple ports at once.
•Each port can have its own data stream splitting settings.
•TCP Splitter supports TCP and UDP both for the local network and for the Internet.
•TCP Splitter can convert a data stream from TCP to UDP, or vice versa.
•When accessing the Internet, TCP Splitter can handle dynamic IP addresses by using a domain name.
•You can also create local connections on one computer.
•When working in the TCP server mode, TCP Splitter can receive data from multiple data sources.
•TCP Splitter creates a separate connection for each data recipient.
•TCP Splitter can be automatically launched as a service and set up network connections before any user logs on.
Typical use cases:
You can find four typical use cases for TCP Splitter in this section.
LIABILITIES:
In no case shall we be liable for any loss or damage incurred by using this software product.
The user can try out the demo version of this product for twenty-one (21) days. During the trial period, the user can create only two connections on one computer, and the traffic through each connection is limited to 56 kilobytes.
Our company website: https://www.aggsoft.com/
System requirements
Windows 2000 Professional - Windows 10 (2019), including x64 and x86 OS, Workstation, and Server OS.
It is necessary to have at least one free COM port, not busy by any device (mouse, for example) to connect an external device.
Installation process
If any beta-version was installed on your computer, remove it.
Quit of the working TCP Splitter on installation time.
Run an installation file.
By default, the installation wizard installs TCP Splitter in the "C:\Programs Files\TCP Splitter" or "C:\Programs Files (x86)\TCP Splitter" directory of your system disk, but you can change this path.
In the standard distributive of TCP Splitter are no additional modules files, which you can download from our site.
Introduction
Basic essentials:
•When using TCP Splitter, you don’t need to reboot the computer. You can create, establish, or remove connections in real time.
•You can split data streams for a few IP ports at once.
•TCP Splitter can be automatically launched as a service or as a desktop application. If the TCP Splitter service is already running, the second instance of TCP Splitter will run as a desktop application in the configuration editor mode. The second instance cannot display data transmission statistics.
As soon as you launch TCP Splitter, its main window will appear (Figure 1). You can use it for configuration purposes. Below you can see the TCP Splitter main window, which consists of a few areas.
| 1. | Main menu. For more details about its commands, see the Menu section of this Help. |
| 2. | Connection list shows all existing connections, including their status. |
| 3. | Startup mode is an option that allows you to select the automatic startup for TCP Splitter (it will be launch automatically after Windows starts) or keep the manual startup mode. As soon as TCP Splitter starts, it will automatically establish all the necessary connections. |
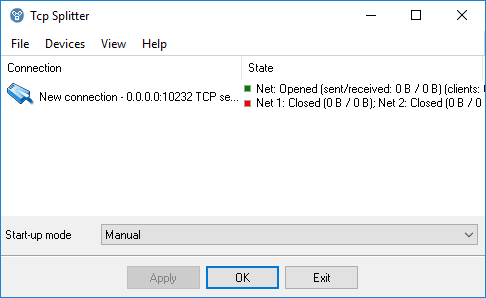
Figure 1: The TCP Splitter main window
The main menu contains the following commands: File, Devices, View, and Help. Below you can find a description of each menu. You can use hotkeys to invoke some commands (see thisHelp section). Each menu item usually contains brief information about the corresponding hotkey and toolbar button.
After adding a new connection, click the “OK” button in the connection settings dialog box to apply all changes. The “Status” column displays the connection status for the incoming data stream and for all activated post-split directions.
Please note that your firewall may block TCP Splitter’s operation. If you see a firewall alert asking you if you want to allow access for TCP Splitter, make sure that you allow it (Figure 2). If no alert is displayed, check your firewall’s settings.
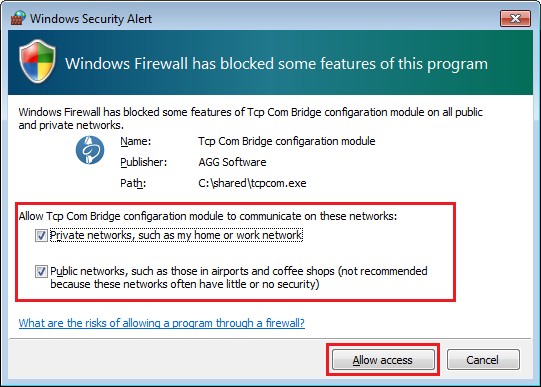
Figure 2: A firewall alert
“Devices” menu
Add
Hotkey: Ctrl+N
How to open the menu: Right-click
This command creates a new connection.
Configure
Hotkey: Ctrl+C
How to open the menu: Right-click
This command opens a dialog box for editing an earlier-created connection. This menu item is only available if you have selected a connection in the list.
Delete
Hotkey: Ctrl+X
How to open the menu: Right-click
This command removes the selected connection from the list. All the relevant connections with the data sources and recipients will be closed. This menu item is only available if you have selected a connection in the list.
Delete all
How to open the menu: Right-click
This command clears the connection list.
Connection settings
If you select this menu item, the connection settings dialog box will appear (Figure 1).
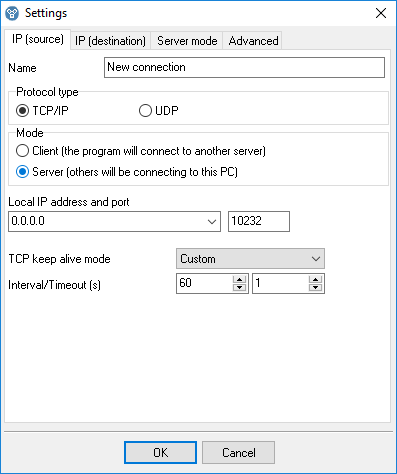
Figure 1: Data source connection settings
IP address (source)
Use this tab to configure the incoming connection settings. The incoming data stream will be split into two or more identical data streams (replicated) and delivered to the specified recipients.
Protocol types
TCP is a time-proven, reliable protocol. It is probably the one that is most widely used in IP networks. The benefit of using this protocol is its ability to maintain and control a connection between computers. TCP also inherently supports data integrity checking. Some of this protocol’s drawbacks are data redundancy and a transmission delay due to connection establishment.
UDP is a connectionless protocol, that is, it allows you to send data without establishing a connection. Like TCP, UDP is an upper-layer protocol for IP networks. Unlike TCP, UDP doesn’t guarantee data delivery and doesn’t support error checking. But UDP allows you to directly send and receive data packets, while applications using UDP can check for data integrity and, if necessary, resend data. For example, you can use this protocol to send small multicast packets. When using UDP, applications follow the “fire and forget” principle.
Connection
Each connection in TCP Splitter can work as:
| 1. | A client. You need to specify the IP address and port of the remote computer (TCP/IP server) you want to connect to. When configuring TCP Splitter, you can specify a domain name (like www.yourserver.com) or the name of a computer in the local network instead of an IP address. For example, if you need to connect to a computer named “Plant1” in the local network, just enter “Plant1” in the “IP address” input field. It may be handy if you are configuring TCP Splitter as a client and your network uses dynamic IP addresses. In that case, it would be easier to use a computer name instead of its IP address. |
| 2. | A server. If you use TCP Splitter in this mode, you need to specify the IP address of the computer that hosts TCP Splitter and the port to listen to. If your computer has more than one network adapter (network interface card), TCP Splitter will display a list of IP addresses for each network interface card (NIC) installed on your computer. In that case, select the IP address of the network interface you want to use. If you want TCP Splitter to run as a server, you must assign at least one network card with an IP address to it. A Windows-based computer may be configured to get an IP address automatically. If that is the case, your system administrator will need to assign a static IP address to the computer and bind that IP address to the selected network interface. If you want TCP Splitter to listen to all IP addresses assigned to the computer, enter 0.0.0.0 in the “IP address” input field. |
Name is the name of your connection. It will be displayed in the list in the TCP Splitter main window.
IP address and port are specified for a remote server if TCP Splitter runs in the client mode, or for the local computer if TCP Splitter runs in the server mode.
Sending timeout is a parameter that allows you to set a time interval for grouping data and sending them in one IP packet.
The following settings apply only to TCP/IP:
TCP keep-alive mode is an option that, if turned on, makes TCP Splitter send keep-alive data packets at the specified interval. If the client (server) doesn’t respond within the specified time, TCP Splitter will automatically close the connection because the lack of response indicates a loss of connection with the client (server). If you select “System” for the keep-alive mode, TCP Splitter will apply the interval and timeout values used by Windows.
Server mode
These settings (Figure 2) are only applicable if the connection to the data source works in the server mode.
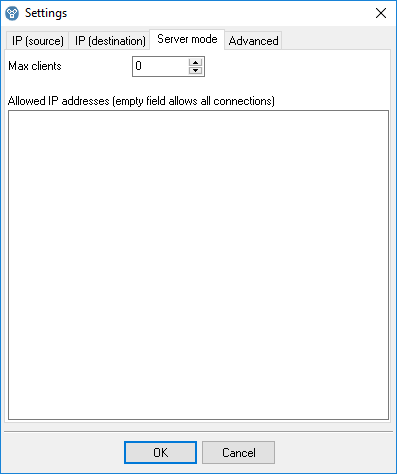
Figure 2: Additional server settings
Max. number of clients is a parameter that allows you to limit the number of clients that can simultaneously connect to the server. This way, you can optimize the server load if there are too many clients. If the value is zero, it means that the number of connections is not limited.
Allowed IP addresses is a parameter that can be used in the server mode only. It allows you to specify one or more IP addresses allowed to connect to the server. In that case, any connection attempts originating from any other IP addresses will be rejected. This parameter is very useful if you are sending data over the Internet, or if the server is connected to a large corporate network. You can enter multiple allowed IP addresses, one address per line. If you leave the field empty, TCP Splitter will accept connection attempts originating from any IP addresses.
IP address (recipient)
Use this tab (Figure 3) to configure connections to the data recipients. Such connections always use the client mode. If you do not specify any IP address and/or port for a data recipient, that recipient will be effectively disconnected.
IP address and port are parameters for the remote server.
Protocol type is either TCP or UDP. Please note that the source and the recipient do not have to use the same protocol.
Data direction is a parameter that you can use to forbid data transmission in one of the directions (from the data source to the data recipient, or vice versa). A check mark means that data transmission in that direction is allowed.
Please note that if you split a data stream that contains packets whose reception must be acknowledged by the recipient, sending such an acknowledgment by the second or third recipient may result in data desynchronization. In that case, we recommend that you disable data transmission from secondary recipients to the source.
Source → Recipient. Send only in the last active connection is an option that you can use if the recipient initiates data transmission from the source to the recipient. For example, the recipient sends a request and waits for a response. If you turn this option on, any data that TCP Splitter receives from the source will be sent only to the specific recipient that sent the request. This condition will be automatically deactivated when the specified time is over. It will be automatically activated again if TCP Splitter receives a new request from the recipient.
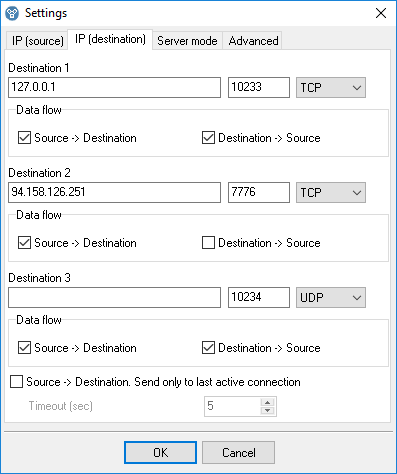
Figure 3: Data recipient connection settings
Additional settings
Use this tab (Figure 4) to configure additional connection settings for the data recipients. These settings will be applied only if the recipient is TCP Splitter (for example, in the “Bypassing NAT” use case).
Encrypt transmitted data is an option that allows you to encrypt all transmitted data.
Additional keep-alive packets is an option that, if turned off, makes TCP Splitter add nonstandard keep-alive packets for the TCP connection. It may be necessary if the standard keep-alive packets are blocked by the routers.
Send zeros is an option that, if turned off, makes TCP Splitter use a special keep-alive packet: one zero byte.

Figure 4: Additional settings
How does it work?
As soon as you configure the connection, TCP Splitter will connect to the specified address (if TCP Splitter runs in the client mode), or wait for clients to connect to it (if it runs in the server mode). When a connection is established, TCP Splitter will try to establish a new connection with each specified data recipient. If the data source operates in the server mode, a new connection will be opened for each client connected.
In case TCP Splitter fails to connect to a data recipient, it can store up to 1 MB of data for each connection in its internal buffer. When the connection is reestablished, TCP Splitter will first send the data from the buffer. If the buffer is full, the oldest data will be overwritten.
If the connection to the data source fails, TCP Splitter will automatically close the corresponding connections with the recipients. In that case, the data from the internal buffer will be irretrievably lost.
“View” menu
Icons
There are four options for displaying icons in TCP Splitter: Big icons, Small icons, List, and Table. In the Table mode, the network connection status is displayed, too.
Auto arrange icons
This icon arrangement mode makes it easier to view and use icons.
Command line parameters
-f "C:\file.ini"
When started, TCP Splitter will import all settings from the specified INI file. The list of existing connections will be cleared, and new connections will be added to the list from the INI file.
-i "C:\file.ini"
Import the settings for one connection from the specified INI file.
-d 0
-d "New connection"
Delete the connection with the specified index or name.
-с
Clear the connection list.
-s0
Do not show any messages (silent mode).
-s1
Write messages to the Windows event log (silent mode).
-s2
Show a message box (by default).
Note: Make sure that you enter parameters in the correct order. For example, the following command will load the settings from the specified INI file without displaying any messages:
tcpsplitter -s0 -f "C:\file.ini"
FAQ and known issues
Q: How can I handle (create or remove) connections programmatically?
A: You can do it via the command line interface.
Q: I have TCP Splitter running as a service. When I launch TCP Splitter as a desktop application, it does not display any statistics. Why is that so?
A: The second instance of TCP Splitter runs in the configuration editor mode. It cannot get any statistics from the TCP Splitter service.
Typical use cases
There are a number of TCP Splitter use cases. You can find the most typical ones below.
1. Splitting a TCP data stream into two or three identical data streams
Splitting a TCP data stream allows you to concurrently process the incoming data. Using this approach, you can minimize hardware costs when expanding an existing data processing system or building a new one.
Typical examples of using TCP Splitter:
Example 1: Two navigation systems need to get readings from one sensor. You need to split the data stream from the sensor into two data streams; otherwise you would have to install a second sensor, which may be impossible.
Example 2: A production control system has a sensor whose readings you need to log, but the system does not support data logging. To solve the problem, you can install additional software to split the data stream into two data streams, one of which will be used by the production control system, and another one, by the external logger.
Example 3: You need to log data for some time to identify abnormal situations.
Example 4: A production line monitoring system is connected to a closed local network. You need to make some of the collected data available in the Internet without compromising the security of the local network.
Example 5: You need to ensure reliable data transmission between network segments, sensors, or data collection systems, but communication between them is unreliable because it is implemented over a mobile network in a remote area.
The benefit of using TCP Splitter on a computer will be even greater if you need to simultaneously split a few TCP/IP data streams from a few data sources. You can use TCP Splitter to build robust data communication systems. It can monitor the status of each connection, reconnect if the connection is lost, and buffer data while the connection is unavailable.
2. Splitting a UDP data stream into two or three data streams
This use case is similar to the previous one, but TCP Splitter can also convert the data stream from UDP to TCP (for example, if the recipient supports only the TCP protocol).
3. Bypassing NAT
In this use case, the data-source TCP server located in the local network is connected to the Internet via a router or firewall. Connection to the server is forbidden at the router, or you cannot configure such a connection. But if outgoing connections to the Internet are allowed, TCP Splitter installed on a computer in the local network with the data-source server can initiate connections to the data source and to the data recipient in order to ensure data communication.
4. Redirecting a TCP/IP port
In this use case, the source port does not match the recipient port, and you only need to configure a connection to one recipient.
Selecting a TCP/IP port
When you are configuring TCP/IP connections, TCP Splitter allows you to choose any TCP/IP port number. The range of possible port numbers is from 1 to 65,535. Please note that port numbers from 1 to 1000 may be used by the operating system or system tools. But you can freely use any TCP/IP port numbers starting from 1001. We recommend assigning port numbers greater than 1000.
Keep in mind that even if you select a port, it can be used by other applications, too. But two applications cannot simultaneously use the same port. Even if the port that you selected when configuring TCP Splitter was free at the moment, that does not guarantee that it will not be used later by another application.
If you find out that another application uses “your” TCP/IP port, just change the port number.
Checking the TCP Splitter service status
To check the status of the TCP Splitter service, look into the TCP Splitter message log:
С:\ProgramData\Tcp Splitter\tcpsplitter.log
All major events and errors are logged to that file.
The file size is limited to 10 MB. If the limit is reached, the oldest entries will be automatically overwritten.
Configuring the program to run as a service
You can configure TCP Splitter to run as a service in all Windows operating systems, starting from Windows 2000. This will allow the program to set up connections and create virtual COM ports automatically as soon as Windows loads, before any user logs on. In this mode, TCP Splitter runs in background mode and usually is not noticed by users. To configure the program to run as a service, do the following:
1. Run TCP Splitter and configure connections as necessary.
2. Select the “Windows service” operating mode via the program’s main window.
3. Test all connections to make sure that they work properly.
4. Close the program by clicking the “Exit” button and agreeing to close all active connections.
5. If you reboot the computer, the service will be launched automatically. You can also launch the service manually without rebooting the computer: Control Panel → Administration → Services → TCP Splitter.
6. You can check if the service is running via the Task Manager. In the list of processes, you should see tcpsplitter.exe
Change connection settings or add new connections as follows:
1. Launch TCP Splitter by clicking its icon on the desktop or via “Start → Programs.”
2. Agree to launch the program in restricted mode (because the service is already running in background mode).
3. Change the program’s settings as you need.
4. Go to “Control Panel → Administration → Services” and restart the TCP Splitter service.
To disable the service mode, do the following:
1. Go to “Control Panel → Administration → Services.”
2. Stop the TCP Splitter service.
3. Open the Properties dialog for the TCP Splitter service.
4. Change the start-up mode to “Manual.”
Using the program to transmit data via the Internet
You can configure TCP Splitter to transmit data via the Internet. To enable data transmission, you might need to change the network settings on your computer and/or the router in your network.
Most computers are not connected directly to the Internet, so other computers may be unable to connect directly to your computer via the Internet and transmit data.
How to check whether your computer is connected directly to the Internet?
If your network address belongs to one of the ranges listed below, it means that your computer is in a local private network and is connected to the Internet via a router:
10.0.0.0 - 10.255.255.255
172.16.0.0 - 172.31.255.255
192.168.0.0 - 192.168.255.255
For more details, read this article: https://en.wikipedia.org/wiki/Private_network
Your public IP address on the Internet may be entirely different. You can check it via Google:
https://www.google.com/search?q=my+ip+address
To configure a connection for TCP Splitter operating as a client, you only need to now the public IP address of the other computer on the Internet.
To configure a connection for TCP Splitter operating as a server, you need to configure port forwarding on your router. Port forwarding on the router lets you redirect all data, coming to the specified public IP address and port, to the local IP address.
For example: Your address in the local network is 192.168.1.12. Your public IP address is 66.249.75.147. All clients will be sending data only to your public IP address. The router will forward data to 192.168.1.12, implicitly binding your local IP address to your public IP address.
Note: For TCP Splitter to operate as a server, it must run on a computer with a static local IP address. That’s because the router is configured to forward data to a specific address only.
How to configure the router to redirect data?
1. Open your router’s control panel. Usually you configure the router via a web browser. Try entering http://192.168.1.1/ in the address bar.
2. On the control panel, look for “Port Forwarding” or “Virtual Server” settings.
3. Add a data forwarding rule.
Example:
Local port: 10232
Local IP address: 192.168.1.12
Remote port: 10232
4. Save the changes, and reboot the router.
For more details about configuring port forwarding for any router model of any vendor, visit this website: https://www.portforward.com/. If your router model is not listed, try reading instructions for similar models.
Dynamic public IP address
Having a dynamic public IP address may not let TCP Splitter operate as a server. Each time you connect to the Internet, your public IP address may change, so a remote computer will be unable to connect to a predefined IP address. If you don’t know what type of IP address you have, ask your Internet service provider.
Dynamic DNS services can solve this problem by binding your dynamic IP address to your permanent domain name. For example, you can use these dynamic DNS services:
If you register at such a website, you will get a permanent domain name. If you install a special software from the DNS service provider on your computer, you can automatically update the binding of your dynamic IP address to the domain name.
Many state-of-the-art routers have built-in support for dynamic DNS services.
Firewall
Another thing that may hinder the transmission of data via the Internet is the firewall. The firewall’s purpose is to prevent any unauthorized transmission of data. All modern operating systems have a built-in firewall. All-in-one antiviral bundles include a firewall too.
When TCP Splitter attempts to use any TCP port for the first time, the Windows Firewall will show a warning. To let TCP Splitter operate properly, you must allow it to connect to the network. You can see an example of firewall warning in Figure 1.
Figure 1: Firewall warning
If you use a third-party firewall, you may also need to configure it to let TCP Splitter connect to the network. Please refer to your firewall’s manual, and add TCP Splitter to the list of exceptions.