
Parse data from the filling machine
Task:
We are filling bags of powder on a six-head filling machine and require recording each bag weight as it comes off the filling machine. At present, the incoming data from the RS232 is viewed on a log file as "DD MON YYYY, HH:MM,HEAD NUMBER,HEAD WEIGHT" as it comes in. At the end of each hour, a brief 1 line summary of the production is sent to the log file.
We would like to have this data sent directly into a Microsoft Excel spreadsheet:
- One row should contain one weight value.
- Create a new spreadsheet every day.
- The new sheet should be labeled as the day of the data recording.
Typically, there will be approximately 1000 recorded data entries for the production for the day. We only require the "date" and "head weight" figure to be inserted into the spreadsheet.

Fig.1. Serial data captured
Requirements:
- Advanced Serial Data Logger Professional, Enterprise, or a trial version;
- ASCII Data Query and Parser
It is assumed that:
You've configured communication parameters (baud rate, the number of data bits, flow control, etc.) in the data logger and can receive any data without communication errors.
Solution:
The image above shows that the data flow is simple, where each record has a fixed number of items, where each item is delimited by a comma. At the same time, the figure doesn't contain non-printable characters and doesn't show the ending characters of a data packet. We need to recognize the ending characters of each data record. Please enable display output for non-printable characters with a character code below than 0x20h. You need to create a port configuration. Please click the "Plus" button in the main window if you didn't make it before and set the following options.

Fig.2. Scales data logger. Serial data view setup
Then click the "OK" button and try to receive the data from a port. You should receive the data as in the figure below.

Fig.3. Scales data logger. Data received.
It is the other view of the data received. Notice that all non-printable characters were replaced with their code, i.e., #0D. It is clear from the data screen above that the data block (within the green rectangle) ends with #0D (underlined by red).
We are now ready to configure the modules. First, select the "ASCII data query and parser" plugin (fig.4a, pos.1) from a drop-down list. Then, enable a parsing option for data received (fig.4a, pos.2) and select the necessary data export plugins. The DDE server (fig.4b, pos.3) will help us to check that the data packet is parsed and exported. The "Local database" plugin will create Microsoft Excel files.

Fig.4a. Scales data logger. Data parser plugin.

Fig.4b. Scales data logger. Data export plugins.
Now, please open the ASCII parser and query configuration window by clicking the "Setup" button near a drop-down box (fig.4a, pos.1). The dialog window below will appear on the desktop (fig.5).

Fig.5. Scales data logger. The parser configuration window.
The configuration process should be straightforward if you have examined your data flow in the data logger window (fig.3). You should type in the same as in the data logger window in fields 1 and 2. Field #1 marks the beginning of the data block, and field #2 marks the end. In the example, our data block does not contain a start marker. Therefore, this field is left empty. The values to be typed in here are as underlined in red in fig.3 above.
The data flow on the fig.3 contains additional records that we should not process and export. These records look like:
Hour to 9:00 30-11-2007 4.2t
We should filter it. The next page allows you to specify filter rules. You can add new rules by clicking the "Add item" button. In our case, we are excluding all data packets that contain string "Hour" (characters case is important in the "Expression" field).
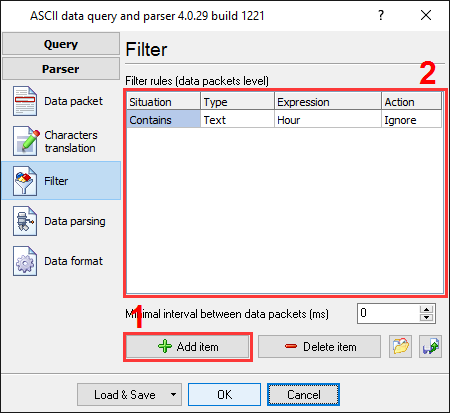
Fig.6. Scales data logger. Filter.
The next tab is a significant part of the parser configuration. The data parser uses this information for data extraction from the data block. In the example, the data block contains four data items (see fig.1), namely: date and time, number value, and weight, which should be separated out into different variables. Later, these variables will be used in the data export and will be placed in different columns of our Excel file.

Fig.7. Scales data logger. Parser items.
Any new items may be added by clicking the "Add item" button (fig.7, pos.7). Before adding an item, the program will ask you about an item description. You can type any characters here, which will help you to remember a variable's content. For this example, all four variables with their corresponding descriptions have been added.
Each parser item has several properties:
- Item name. This name will be bound to a column in the data export plugin. It is a limited text description that cannot contain spaces and a few other characters;
- Parser's type. It is a method which the program uses to extract data. Our parser has a few methods, from simple to the most powerful. In this example, where a comma is separating data, we can use the "Delimited" method. This method allows the extraction of any number of characters from any position, where the specified character delimits the data packet;
- Data type. It is the data type of the characters extracted. You can use a few data types here. If you specify a data type other than "string," the module will try to convert a value to this data type. The options from the "Data formats" page will be used at the conversion. Our "Weight" field has the Float data type, the "Number" field - the Integer data type, the "Date" field - the "Date" data type;
- Default value. The parser uses the default value when it cannot extract a data value from a data packet;
- Field delimiter. In this example, we should extract values, which are delimited by a comma;
- Ordinal number. All our values are delimited by a comma, but just the position of each item is different. You should specify the ordinal number of each value here.
All other items have the same parameters, except an ordinal number and a data type.
In the next tab, you can specify basic format options as per fig.8. In this example, two variables have "date" and "time" data types. Therefore, the first option allows you to convert the date string to a field with the "date" data type. We specified DD"/"MM"/"YY here, according to the specification above. For a detailed description of formatting characters, please see the help file. The second option allows you to convert the time string to a field with the "time" data type.

Fig.8. Scales data logger. Format of items.
Other options are unnecessary in our case because all our items do not have the "datetime" or "string" data type.
Click the "OK" button and close the parser configuration window. Then click the "OK" button in the options window.
Now that our parser is ready, it is time for testing it. Connect your device and power it on if necessary. Check to see if you can receive a data block from the specified serial port. If the parser had been correctly set up, then you should see all parser items and their values (fig.9) in the DDE server window below.

Fig.9. Scales data logger. DDE server window.
All parser items are now ready for export to an Excel spreadsheet. You can read about it in the second part.
Related articles: Parse data from the filling machine
Related topics: Advanced Serial Data Logger
hereSerial port interface | RS232 port logger | Com port logger | Data acquisition | RS232 data logger | Data Logger Software For Electricity Meter | Replace WinWedge | Replace TWedge | RS232 to SQL database | Barcode to Excel