Advanced Serial Data Logger

Trust In Confidence!

For Windows 2000 - Windows 11 (2022) (incl. Server, x86 and x64). Latest version: 4.7.6 build 306. March 6, 2024.


ASTM protocol: read data from laboratory equipment

Problem:

We need to collect data from laboratory equipment that supports the ASTM data interchange protocol and write them to a database. What do we need to do?

Terms of reference:

To solve this problem, we are going to use:
1. Advanced Serial Data Logger. License type: Professional, Enterprise, or a trial version .
2. ASTM Data Parser plugin.
3. SQL Database Pro, the full version (purchased separately), or the trial version.

Introduction

The ASTM (E1381 or E1394) protocol is widely used in laboratory equipment. It allows you to automatically collect measurement data and other relevant data (date, first name, and last name, the highest and the lowest values, measurement number, etc.).

Such equipment usually supports multiple data interchange protocols. You may need to configure your equipment to use the ASTM protocol.

The following popular laboratory facilities are supported, among others:

  • AXSYM
  • ELECSYS 2010
  • Hitachi 7600
  • DIAGNOSTICA STAGO - STR-R
  • Thermo Clinical Labsystems KoneLab
  • Diagnostic Products Corporation Immulite
  • Abbott Architect
  • Sysmex CA-6000, XN-350, XN-450, XN-1000 and others
  • Bayer CLINITEK 500
  • Synthesis (IL)
  • BECKMAN ACCESS
  • Hologic Panther System
  • i-SENS i-Smart Pro
  • Tokyo Boeki Prestige 24i

More vendors are added to the supported equipment list every year, and the ASTM standard is becoming even more widespread. It means that our program can work with other equipment, too. The list above is given just as an example.

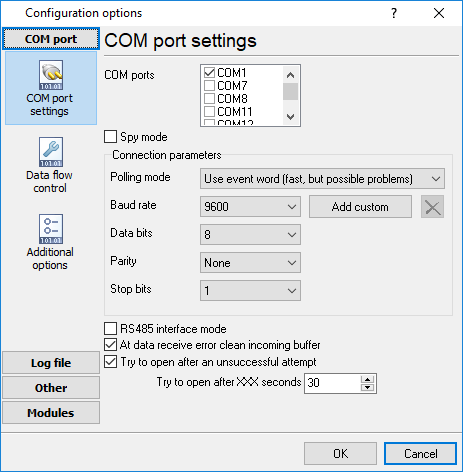
Step 1: Configure the equipment connection.

Typically, the serial port is used for connecting to the equipment. So you need to create a new configuration and configure the COM port settings (fig. 1a). The COM port can be either real or virtual. For example, you can obtain data via an RS232-to-USB adapter. The connection parameters depend on equipment settings.

COM port settings
Figure 1a. COM port settings

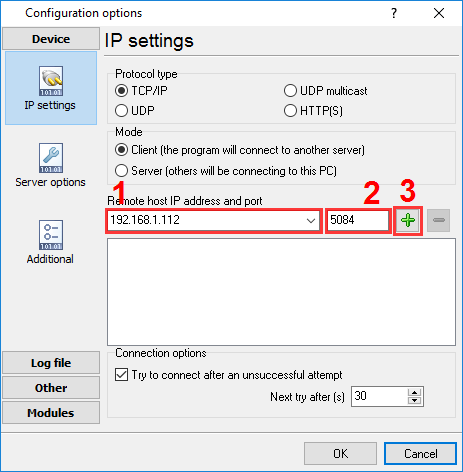
If you connect your instrument via TCP, there are two modes "Server" and "Client". You should configure our software as a client (fig. 1b) if your instrument works as a host (you cannot configure a destination IP address). If you cannot configure the TCP port number in your instrument settings, it should be specified in a device's manual.

TCP client settings
Figure 1b. TCP client settings

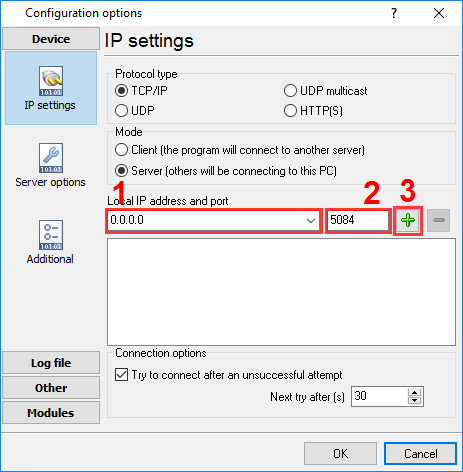
You should configure our software as a server (fig. 1c) if you can configure a destination IP address to send ASTM data in your instrument. In this mode, your instrument initiates a connection and the logger listens for incoming data.

TCP server settings
Figure 1c. TCP server settings

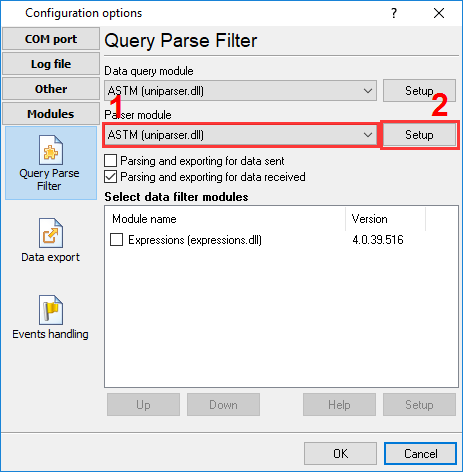
Step 2: Select a parser.

You need to select the ASTM module as a parser (figure 2). You may download the ASTM parser here if it does not exist in the list. You don't need to configure any additional settings for the parser.

Moreover, we offer the special version for TCP connections named "ASTM [TCP]". You can try it if the standard ASTM parser does not work for you.

COM port settings
Figure 2. Select a parser

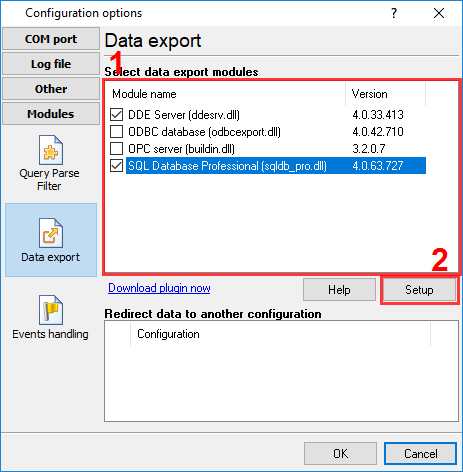
Step 3: Select and configure the data export module.

For example, here, you can see how you can export data to an MS SQL database running on the same computer.

Before you can do that, you need to use a database management utility to create a database table. Possibly, you will also want to create a separate database.

  • Microsoft SQL Server - SQL Server Management Studio.
  • MySQL - MySQL Workbench.
  • PostgreSQL - pgAdmin.
  • Oracle - Quest Toad, SQL Detective, MyOra, etc.

You can download a sample SQL script for creating a database table from here.

Note: The script creates a table with primary columns only, but the program extracts more values, and you can the necessary columns yourself.

CREATE TABLE dbo.TEST_DATA (
  ID decimal(10,0)  IDENTITY(1,1) NOT NULL,
  TIMESTAMP datetime NULL default getdate(),
  DATE_TIME_STAMP datetime NULL default getdate(),
  DATA_SOURCE_NAME nvarchar(64) NULL,
  DEVICE_ID nvarchar(128) NULL,
  PATIENT_SEQ_NUM nvarchar(32) NULL,
  PATIENT_ID nvarchar(32) NULL,
  PATIENT_NAME nvarchar(128) NULL,
  PATIENT_NAME_LAST nvarchar(128) NULL,
  PATIENT_NAME_MIDDLE nvarchar(128) NULL,
  PATIENT_NAME_FIRST nvarchar(128) NULL,
  PATIENT_NAME_SEX nvarchar(12) NULL,
  PATIENT_ADDRESS nvarchar(128) NULL,
  PATIENT_PHONE nvarchar(128) NULL,
  PATIENT_RACE nvarchar(32) NULL,
  RESULT_SEQ_NUM nvarchar(12) NULL,
  RESULT_TEST_ID nvarchar(32) NULL,
  RESULT_TEST_ID1 nvarchar(32) NULL,
  RESULT_TEST_ID2 nvarchar(32) NULL,
  RESULT_TEST_ID3 nvarchar(32) NULL,
  RESULT_TEST_ID4 nvarchar(32) NULL,
  RESULT_VALUE nvarchar(32) NULL,
  RESULT_UNIT nvarchar(32) NULL,
  RESULT_ABNORMAL nvarchar(32) NULL,
  RESULT_STATUS nvarchar(32) NULL,
  RESULT_OPERATOR_ID nvarchar(32) NULL,
  CONSTRAINT [PK_TEST_DATA] PRIMARY KEY
  (
     [ID] ASC
  )WITH (IGNORE_DUP_KEY = OFF) ON [PRIMARY]
) ON [PRIMARY]

/**** split line *****/GO 
CREATE INDEX [TEST_DATA_DEVICE_ID_IDX] ON TEST_DATA ([DEVICE_ID]);

/**** split line *****/GO 
CREATE INDEX [TEST_DATA_TIMESTAMP_IDX] ON TEST_DATA ([TIMESTAMP]);

create table TEST_DATA (
  ID int(11) not null auto_increment,
  TIMESTAMP timestamp null default current_timestamp(),
  DATE_TIME_STAMP timestamp null default current_timestamp(),
  DATA_SOURCE_NAME varchar(64) null,
  DEVICE_ID varchar(128) null,
  PATIENT_SEQ_NUM varchar(32) null,
  PATIENT_ID varchar(32) null,
  PATIENT_NAME varchar(128) null,
  PATIENT_NAME_LAST varchar(128) null,
  PATIENT_NAME_MIDDLE varchar(128) null,
  PATIENT_NAME_FIRST varchar(128) null,
  PATIENT_NAME_SEX varchar(12) null,
  PATIENT_ADDRESS varchar(128) null,
  PATIENT_PHONE varchar(128) null,
  PATIENT_RACE varchar(32) null,
  RESULT_SEQ_NUM varchar(12) null,
  RESULT_TEST_ID varchar(32) null,
  RESULT_TEST_ID1 varchar(32) null,
  RESULT_TEST_ID2 varchar(32) null,
  RESULT_TEST_ID3 varchar(32) null,
  RESULT_TEST_ID4 varchar(32) null,
  RESULT_VALUE varchar(32) null,
  RESULT_UNIT varchar(32) null,
  RESULT_ABNORMAL varchar(32) null,
  RESULT_STATUS varchar(32) null,
  RESULT_OPERATOR_ID varchar(32) null,
  PRIMARY KEY  (ID)
);
create index `TEST_DATA_DEVICE_ID_IDX` on TEST_DATA(`DEVICE_ID`);
create index `TEST_DATA_TIMESTAMP_IDX` on TEST_DATA(`TIMESTAMP`);

create table dbo.TEST_DATA (
  ID serial4 not null,
  TIMESTAMP timestamp null default current_timestamp,
  DATE_TIME_STAMP timestamp null default current_timestamp,
  DATA_SOURCE_NAME varchar(64) null,
  DEVICE_ID varchar(128) null,
  PATIENT_SEQ_NUM varchar(32) null,
  PATIENT_ID varchar(32) null,
  PATIENT_NAME varchar(128) null,
  PATIENT_NAME_LAST varchar(128) null,
  PATIENT_NAME_MIDDLE varchar(128) null,
  PATIENT_NAME_FIRST varchar(128) null,
  PATIENT_NAME_SEX varchar(12) null,
  PATIENT_ADDRESS varchar(128) null,
  PATIENT_PHONE varchar(128) null,
  PATIENT_RACE varchar(32) null,
  RESULT_SEQ_NUM varchar(12) null,
  RESULT_TEST_ID varchar(32) null,
  RESULT_TEST_ID1 varchar(32) null,
  RESULT_TEST_ID2 varchar(32) null,
  RESULT_TEST_ID3 varchar(32) null,
  RESULT_TEST_ID4 varchar(32) null,
  RESULT_VALUE varchar(32) null,
  RESULT_UNIT varchar(32) null,
  RESULT_ABNORMAL varchar(32) null,
  RESULT_STATUS varchar(32) null,
  RESULT_OPERATOR_ID varchar(32) null,
  PRIMARY KEY  (ID)
);
create index "TEST_DATA_DEVICE_ID_IDX" on TEST_DATA("DEVICE_ID");
create index "TEST_DATA_TIMESTAMP_IDX" on TEST_DATA("TIMESTAMP");

create table dbo.TEST_DATA (
  ID decimal(10) generated by default as identity(start with 1) not null,
  TIMESTAMP timestamp default current_timestamp null,
  DATE_TIME_STAMP timestamp default current_timestamp null,
  DATA_SOURCE_NAME nvarchar2(64) null,
  DEVICE_ID nvarchar2(128) null,
  PATIENT_SEQ_NUM nvarchar2(32) null,
  PATIENT_ID nvarchar2(32) null,
  PATIENT_NAME nvarchar2(128) null,
  PATIENT_NAME_LAST nvarchar2(128) null,
  PATIENT_NAME_MIDDLE nvarchar2(128) null,
  PATIENT_NAME_FIRST nvarchar2(128) null,
  PATIENT_NAME_SEX nvarchar2(12) null,
  PATIENT_ADDRESS nvarchar2(128) null,
  PATIENT_PHONE nvarchar2(128) null,
  PATIENT_RACE nvarchar2(32) null,
  RESULT_SEQ_NUM nvarchar2(12) null,
  RESULT_TEST_ID nvarchar2(32) null,
  RESULT_TEST_ID1 nvarchar2(32) null,
  RESULT_TEST_ID2 nvarchar2(32) null,
  RESULT_TEST_ID3 nvarchar2(32) null,
  RESULT_TEST_ID4 nvarchar2(32) null,
  RESULT_VALUE nvarchar2(32) null,
  RESULT_UNIT nvarchar2(32) null,
  RESULT_ABNORMAL nvarchar2(32) null,
  RESULT_STATUS nvarchar2(32) null,
  RESULT_OPERATOR_ID nvarchar2(32) null
);
create index "TEST_DATA_DEVICE_ID_IDX" on TEST_DATA("DEVICE_ID");
create index "TEST_DATA_TIMESTAMP_IDX" on TEST_DATA("TIMESTAMP");

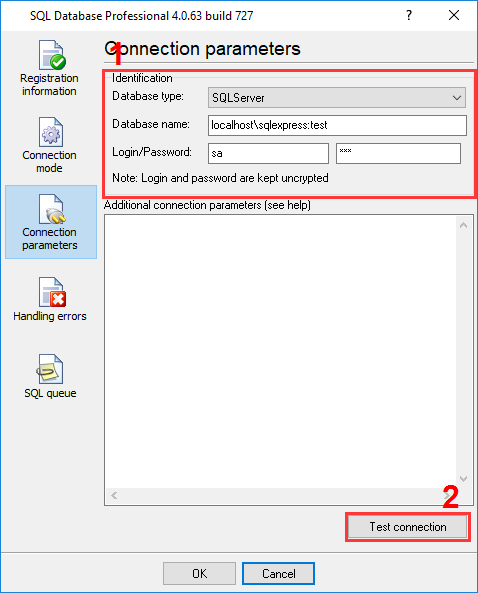
Then you need to enable the SQL Database Pro data export module (figure 3) and configure the database connection (figure 4).

The connection string will look like:

  • Microsoft SQL Server: IpAddress\Instance:DatabaseName or IpAddress:DatabaseName. Hint: you can start SQL Server Management Studio and find the connection string in the login window.
  • MySQL: IpAddress:DatabaseName
  • PostgreSQL: IpAddress:DatabaseName
  • Oracle: IpAddress:DatabaseName

The data export module
Figure 3. The data export module

Connection settings
Figure 4. Connection settings

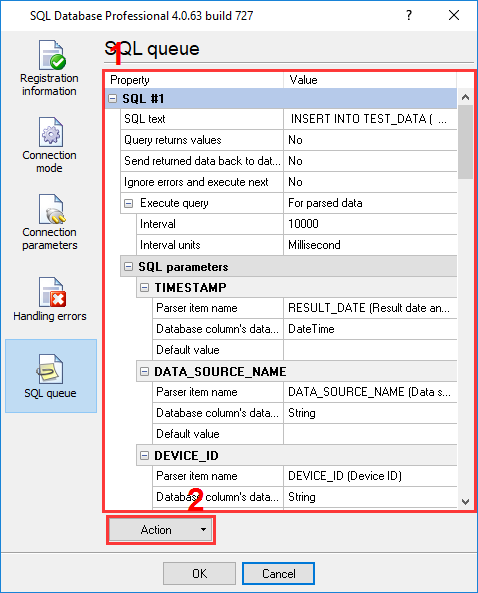
After that, add an SQL query for writing data to the queue and bind parser variables to the SQL query parameters (figure 5):

  1. Click the "Action → Add SQL" button.
  2. Specify any name.
  3. Click on the "SQL text" field in the SQL queue.
  4. Click on the button with "...".
  5. Copy and paste SQL script below or specify your variant.
  6. Click the "OK" button.
  7. Go through all SQL parameters and assign a parser variable in the "Parser item name" field (look at the configuration example at the bottom).

You can download a sample SQL script for inserting data from here or load a preconfigured queue from the file.

 INSERT INTO TEST_DATA (
   TIMESTAMP,
  DATA_SOURCE_NAME,
  DEVICE_ID,
  PATIENT_SEQ_NUM,
  PATIENT_ID,
  PATIENT_NAME,
  PATIENT_NAME_LAST,
  PATIENT_NAME_MIDDLE,
  PATIENT_NAME_FIRST,
  PATIENT_NAME_SEX,
  PATIENT_ADDRESS,
  PATIENT_PHONE,
  PATIENT_RACE,
  RESULT_SEQ_NUM,
  RESULT_TEST_ID,
  RESULT_TEST_ID1,
  RESULT_TEST_ID2,
  RESULT_TEST_ID3,
  RESULT_TEST_ID4,
  RESULT_VALUE,
  RESULT_UNIT,
  RESULT_ABNORMAL,          
  RESULT_STATUS,
  RESULT_OPERATOR_ID
 )
 VALUES (
  :TIMESTAMP,
  :DATA_SOURCE_NAME,
  :DEVICE_ID,
  :PATIENT_SEQ_NUM,
  :PATIENT_ID,
  :PATIENT_NAME,
  :PATIENT_NAME_LAST,
  :PATIENT_NAME_MIDDLE,
  :PATIENT_NAME_FIRST,
  :PATIENT_NAME_SEX,
  :PATIENT_ADDRESS,
  :PATIENT_PHONE,
  :PATIENT_RACE,
  :RESULT_SEQ_NUM,
  :RESULT_TEST_ID,
  :RESULT_TEST_ID1,
  :RESULT_TEST_ID2,
  :RESULT_TEST_ID3,
  :RESULT_TEST_ID4,
  :RESULT_VALUE,
  :RESULT_UNIT,
  :RESULT_ABNORMAL,
  :RESULT_STATUS,
  :RESULT_OPERATOR_ID 
 )

SQL queue
Figure 5. SQL queue

Then save all the changes (click "OK" in each settings window, which will also close the window).

You may download the backup copy of this configuration here and restore it from the "File" menu in the main window.

Related articles: