
Advanced OPC Data Logger - Online help | Advanced OPC Data Logger
About Advanced OPC Data Logger
OPC technologies
OPC (OLE for Process Control) is a set of universally accepted specifications providing a universal data exchange mechanism in control and management systems. The OPC technology ensures that consumers are independent of the availability of unavailability of drivers or protocols, which makes it possible to choose hardware and software that most completely meets business requirements.
There are two components defined for data exchange in the OPC specification - an OPC client and an OPC server.
An OPC server is a program receiving data in the internal format of a device or a system and converting this data into the OPC format. An OPC server is a source of data for OPC clients.
An OPC client is a program receiving data in the OPC format from OPC servers and converting it into the internal format of a device or a system.
An OPC client interacts with an OPC server using interfaces strictly defined in the specification, which allows any OPC client interact with any OPC server. An OPC server created once allows the device to be connected to a wide range of software (SCADA systems, HMI, etc.) supporting the OPC specification.
The following specifications are currently the most widespread ones:
•OPC Data Access (OPC DA) is the most widespread OPC specification providing real-time data exchange. This module works only with this OPC interface;
•OPC Alarms and Events is a specification allowing you to log process failures, the operator's actions, informational messages;
•OPC Historical Data Access (OPC HDA) provides access to historical data. It is possible to use this specification to represent archived data in a universal format, both in simple visualization systems and in complex SCADA systems.
The program is designed to send/receive data between an OPC server and the program. Data exchange is carried out by server groups and their items specified in the configuration. After data is received, it is processed and grouped depending on the specified configuration and is sent for future processing and export.
Advanced OPC Data Logger custom processes the data to your needs, aggregates and writes real-time data to a text or binary file, MSSQL, MySQL, Access, Oracle or ODBC compatible database, DDE, Excel or to other targets.
What problems can be solved with Advanced OPC Data Logger?
The program creates "a bridge" between OPC servers and databases, Excel and other applications. Our OPC Data Logger is a advanced data collection system that will connect to any industry standard OPC Server and export data as you want. The program can be integrated to your control system and/or work together with your SCADA software.
Key features of Advanced OPC Data Logger are:
•Capability to log data from multiple OPC servers at the same time. Our data logger can collect data from multiple OPC servers simultaneously. Each OPC server may have fully different connection and data export settings;
•Universal. Supports DA1, DA2 OPC interfaces. Automatic tag import capabilities;
•Fast & . Fast multi-threaded, optimized and efficient architecture;
•Variable data receive. Support all data types of OPC servers tags;
•Recovery functions. The program can automatically restore broken connections with an OPC server;
•No limits. The program doesn't have OPC server connection limits or tag limits;
•Extended logging features. Outputs received data a comma separated (CSV) log file. Supports date/time stamping;
•Visualization. The program allows you to display all received data in the program window. You can customize data view options;
•Data filters. Allow you filter, format, aggregate your data. You may define simple rules or use powerful regular expressions;
•MS Excel. Data export to ready-to-use MS Excel files;
•Databases support. Exporting data to MSSQL, MySQL, ODBC-compatible database (MS SQL, Oracle, MS Access, dBase and others);
•Real-time export capabilities. Advanced OPC Data Logger can run as a DDE server export OPC data to old applications;
•Program messages logging Writing to a file all program messages, so you may diagnose errors and warnings;
•Plugins. Many free plugin modules that are extending program features;
•Simple, dialog-driven step by step set-up Programming is not required to configure the software to collect data;
•It supports various operating systems. The logger runs on all versions starting from Windows 2000, including 32 and 64-bit systems.
•Windows service mode. Unlike most other serial logging applications, Advanced OPC Data Logger can run as a service so that it starts as soon as the operating system starts and doesn't require a user to log in and run it. It will continue to run even as a user logon and logoff the workstation.
It is extremely easy to use! The configuration process is fully menu-driven and has complete, context-sensitive, online help. You can easily customize all input to your exact specifications. Once you see how easy it is to use Advanced OPC Data Logger, you will never again take data readings by hand!
Company home page: https://www.aggsoft.com/
Software home page: https://www.aggsoft.com/opc-data-logger.htm
Glossary
ASCII - An acronym for American Standard Code for Information Interchange. ASCII files are plain, unformatted text files that are understood by virtually any computer. Windows Notepad and virtually any word processor can read and create ASCII files. ASCII files usually have the ".TXT" extension (e.g., README.TXT).
Binary File - A file that contains data or program instructions written in ASCII and extended ASCII characters.
Bit - A binary digit in the binary numbering system. Its value can be 0 or 1. In an 8-bit character scheme, it takes 8 bits to make a byte (character) of data.
Bytes - A collection of eight bits that represent a character, letter or punctuation mark.
Cable - Transmission medium of copper wire or optical fiber wrapped in a protective cover.
Client/Server - A networking system in which one or more file servers (Server) provide services; such as network management, application, and centralized data storage for workstations (Clients).
DA - data access.
DNS (Domain Name System) - A DNS server lets you locate computers on a network or the Internet (TCP/IP network) by the domain name. The DNS server maintains a database of domain names (hostnames) and their corresponding IP addresses. The IP address "8.8.8.8", corresponds to the DNS name www.google.com.
Internet - A global network of networks used to exchange information using the TCP/IP protocol. It allows for electronic mail and the accessing ad retrieval of information from remote sources.
IP, Internet Protocol - The Internet Protocol, usually referred to as the TCP/IP protocol stack, allows computers residing on different networks to connect across gateways on wide-area networks. Each node on an IP network is assigned an IP address, typically expressed as 'xx.xx.xx.xx'.
IP address (Internet Protocol address) - The address of a computer attached to a TCP/IP network. Every client and server station must have a unique IP address. Client workstations have either a permanent address or one that is dynamically assigned to them each dial-up session. IP addresses are written as four sets of numbers separated by periods; for example, 198.63.211.24.
LAN (Local Area Network) - A network, connecting computers in a relatively small area such as a building.
NIC, Network Interface Card - A card containing the circuitry necessary to connect a computer to a particular network media. Typically, the NIC plugs into the computer's accessory bus, (PCI, USB, etc.) and provides a network connection such as 10baseFL (fiber Ethernet), thin-net, AUI, etc.
OPC (OLE for Process Control) - a set of universally accepted specifications providing a universal data exchange mechanism in control and management systems.
OPC Alarms and Events - the OPC interface for access to alarm and event data.
OPC Data Access - the OPC interface for access to real-time data.
OPC DA - see OPC Data Access.
OPC Historical Data Access - the OPC interface for access to archived data.
OPC HDA - see OPC Historical Data Access.
PC - abbreviation for a Personal Computer.
Ports - is a connection point for a cable.
Protocol - is a formal description of a set of rules and conventions that govern how devices on a network exchange information.
TCP/IP, Transport Control Protocol / Internet Protocol - TCP and IP are communications protocols, that is, structured languages in which data is communicated between one process and another, and between one network and another. TCP/IP is implemented in a multi-level layered structure.
TCP/IP is the 'glue' that ties together the many heterogeneous networks that make up the Internet.
System requirements
Windows 2000 Professional - Windows 10 (2019), including x64 and x86 OS, Workstation, and Server OS.
Installation process
If any beta-version was installed on your computer, remove it.
Quit of the working Advanced OPC Data Logger on installation time.
Run an installation file.
By default, the installation wizard installs Advanced OPC Data Logger in the "C:\Programs Files\Advanced OPC Data Logger" or "C:\Programs Files (x86)\Advanced OPC Data Logger" directory of your system disk, but you can change this path.
In the standard distributive of Advanced OPC Data Logger are no additional modules files, which you can download from our site.
Getting started
After you have successfully installed Advanced OPC Data Logger, use the following simple steps to configure and run it.
Open the Advanced OPC Data Logger program from the Start Menu.
At program run, you get into the main program window (fig. 1), main elements of which are the main menu, the data window, the program messages list, and the status bar.
-The data window shows incoming data before or after processing. You can configure the data view mode in the settings
-The drop-down box at the bottom shows all logged program info, warning, and error messages.
-The status bar shows the current state of the selected data source, errors on the data interface, and how many bytes were sent or received.
-The toolbar above the data window provides fast access to the configuration.
-The main menu above the toolbar allows you to edit the program settings ("Options - Program settings..."), manage configurations, open the current logfile from the "File" menu (fig. 2).

Fig. 1. Main program window

Fig. 2. "File" menu item
By default (after installation), the program has not any data sources configured. If the list of data sources on the toolbar is empty, then the program will ask you to add a new configuration. Otherwise, the program will fill in the list of data sources and try to start logging of data sources configured. Yes, of course, all your settings are being saved while exiting from the program and loaded during the program start.
Set-Up is as Easy as 1-2-3
Step 1. Configure one or more data sources.
Click the "Add configuration" button on the toolbar with a big green plus and choose . The tab of the "Configuration options" dialog lets you configure your settings.
Step 2. Configure log file.
Select the "Log file" header in the configuration dialog window and enable logging for a necessary data direction.
Step 3. Define how you want the OPC data to be filtered and exported .
The "Plugin" button on the toolbar in the main window or "Modules" tab in the dialog window lets you specify how to parse, filter and format your data to the fit the exact format required by your application. It also lets you pre-define automatic output strings to be sent to an external device.
Now, the program process and exports data from one or multiple data sources.
Introduction
Advanced OPC Data Logger can save data to a log file(s) without any changes (i.e., create raw binary log files) or write to log files depending on the parser module selected. In the first case, you can view the log file with any hex editor and use this data for further analysis and remaking. In the second case, you can view data with any text editor. You can find more information about log files in the "Log rotation" chapter.
You can watch the data in the data window (fig. 1). The data view is fully customizable. You can watch data in decimal, hexadecimal, or your format. How to customize data view you can read in the "Data view" chapter and how to customize program view you can read in the "Window view" chapter.
The data can be exported or transferred to one or more targets. The simplest way is to configure the log file rotation. However, it is small a part of all features of Advanced OPC Data Logger. Advanced OPC Data Logger has many additional modules (so-called plugins) that are appreciably extending possibilities of the logging software. You can download and install any module supported. Most modules are free of charge for our customers. How to install and configure modules you can read in the "Modules" chapter.
The program and their plugins generate many messages and write them to the list in the main window (fig. 1) and a protocol file that you can use for administration of the software. You can also configure types of system messages. More information about it you can read in the "Protocol and errors handling" chapter.
Data flow diagram
This diagram may help you to understand the flow of data within our software and a place of each module. The following chapters describe all plugin types.

Fig. 3. Data flow diagram
History:
- The flow of binary data (RAW, unformatted data).
- The parsed data (formatted data). The data flow is separated into data packets and variables. Each data packet can be interpreted as a row, and each variable can be interpreted as a column.
Wires with other colors mark other relations with the unstructured data flow.
Work complete
The program saves all settings to the Windows registry when it stops working. All opened data sources will be automatically closed (unlocked, unallocated, or fried).
Useful advices
1. Look through hint helps on all window elements - it may help you to get a picture of this element's function.
2. You can change all program settings without restarting the program. To transfer settings to another computer, you can do the following:
1.Create a configuration backup from the "File" menu and restore it using the same menu.
2.Alternatively, export the registry node with all program settings. Start regedit.exe and export the following registry node:
on Windows x64
HKEY_LOCAL_MACHINE\SOFTWARE\Wow6432Node\AGG Software\Advanced OPC Data Logger
on Windows x32
HKEY_LOCAL_MACHINE\SOFTWARE\AGG Software\Advanced OPC Data Logger
3. On another computer import settings to the Windows registry.
Many main window elements have "hot" keys for quick access to its functions.
•Ctrl+S - analogs to click on "Start/Pause" button on the toolbar.
•Ctrl+C - analogs to click on "Clear" button on the toolbar.
•Ctrl+P - opens the window with the configuration settings.
•Ctrl+L - opens the window with the log file settings.
•Ctrl+W - allows you to configure the data view mode.
•Ctrl+R - shows the window with the program settings.
•Ctrl+E - shows the Windows 2000+ service settings.
•Ctrl+M - here you can configure data query plugins, data parser, and other plugins.
4. You can look at the summary statistic that contains summary about sent and received data, created files, etc. (View - Statistics)
5. You can save program settings to an INI file. It may help to install and use several copies of the program. You can make your choice from the "Options" menu.
6. The program window can display only the last 10 messages. The full program log file (if activated) you can open using the "File - View program protocol file" menu item.
OPC settings
How it works
After the program is loaded, it analyzes the configuration tree, and items are added to the internal structures of the data program during this analysis. The existence of items on the server is also checked during this analysis. This process may take from several seconds to several minutes, depending on the OPC server. If an item does not exist, the corresponding message is added to the log, and this item will be highlighted in red when you open the configuration. If the OPC server is sending data, the program will immediately start receiving data from it provided that the configuration tree is not empty. Also, the program will send data received from the core to OPC servers for the corresponding items.
The following happens when data is being received from an OPC server:
1.If the "Wait till all items are updated" checkbox is selected in the group parameters, the item update flag is set first and the value of the item is changed. Then the items of the group the item (whose data is received) belong to are checked for value updates. If all items in the group have been updated, the data is sent to a data export module. The "Export valid values only" and "Don't export NULL values" checkboxes are taken into account during export, i.e., if an item has a valid value and the checkbox is selected or if it is not selected. The following check is performed: if the value of the item is different from NULL and the checkbox is selected or if the checkbox is not selected, the item is exported into the core provided it exists. After the data is exported, the item update flag is cleared.
2.If the "Wait till all items are updated" checkbox is not selected in the group parameters, items are exported. The "Export valid values only" and "Don't export NULL values" checkboxes are taken into account during export, i.e., if an item has a valid value and the checkbox is selected or if it is not selected. The following check is performed: if the value of the item is different from NULL and the checkbox is selected or if the checkbox is not selected, the item is exported into the core provided it exists.
When data is received, the server name will be added to the item name if the "Add server name to item name" checkbox is selected in the group properties. The <;>, <">, <['>, <]> characters in server and item names are replaced with the <_> character. If an item is of the string type, the <\>, <"> characters are replaced with <\\>, <\">, if a character has a code within the range $00..$1F, <\x> characters are added before the character.
The following happens when data is being sent to an OPC server
(e.g., from a data query module):
1.The data is copied to the temporary buffer;
2.A line is singled out from the temporary buffer. Lines can be separated by the <CR> or <CR+LF> characters;
3.An item is singled out from the line. Items are separated by the <;> character;
4.The item is decoded and, as a result, you get the server name (may be absent), the item name, the item type (may be absent), the item value. If no item type is specified, it is determined automatically according to the following rules: if the value starts from quotation marks, the data type is "string", or if the value can be converted into an integer without any errors, the type is "integer", or of the value can be converted into a fraction without any errors, the type is "double". In all other cases, the program interprets the value as being the "string" data type;
5.The item is sent to the core. If no server name is specified, the value is sent to all items specified in the configuration and having the corresponding item name.
Groups, servers, and variables
Data can be sent and received at any time. The "OPC groups, servers, and variables" tree is used for that. For the program to be able to receive/send data, you should add at least one group with one item. The tree allows you to add, remove, edit, view, and assign other names to items and also move items and groups.
Select the "OPC settings" tab in the settings dialog box, and you will see the group and item tree on the screen. It is empty by default.
OPC Settings

Fig. 4. OPC settings
Data source name - the field contains any name that will denote the operations performed with OPC servers.
OPC groups, servers, and variables - the tree contains groups of servers and variables used to send/receive data.
Action - the button allows you to add groups and items from OPC servers to the configuration, remove groups and items, assign new names to items, view and edit data, move groups and items up/down the tree. You can right-click the tree instead of this button, and you will see the same menu that you see when you click the "Action" button.

Fig. 5. The action menu after a right-click on a group

Fig. 6. The action menu after a right-click on an item
Adding a group
Click the "Action" button or right-click the "OPC groups, servers, and variables" tree, and you will see the action menu (fig. 5 or 6). Select the "Add group..." item, and you will see the Group properties dialog box on the screen (fig. 7).

Fig. 7. Group properties
Name - the field contains the name of the group. The name may contain any characters. By default, it is Group XXX, where XXX is the number of the group.
Update rate (msec) - the field contains the update rate of items in the group when they are read from the OPC server. The value is specified in milliseconds. By default, 1000 milliseconds, i.e., 1 second.
Dead band (%) - the field contains the value of the dead band in percent. The default is 0 percent.
Active - the checkbox defines whether the group is active. If it is selected, items from this group will be exported (items will be read from servers), if it is not selected, they will not be exported (items will not be exported). By default, the checkbox is selected.
Export valid values only - the checkbox enabled/disabled exporting only valid values. If it is selected, only those items in the group whose value is OPC_QUALITY_GOOD will be exported, if it is not selected, the quality of the item value is not taken into account. By default, the checkbox is selected.
Export date/time stamp - the checkbox enabled/disabled exporting of update date and time of an OPC tag.
Export whole group - if this checkbox enabled then the program will export all tags in the group at once; otherwise each tag in the group will be export separately: one tag on a new line.
Timestamp in local time - if this checkbox enabled, then the program will export the timestamp in local time zone. Otherwise the "UTC" time zone will be used.
Export item name, Export item quality - these options are available if the "Export whole group" option is disabled. In this case the program will add two special items to the output that will contain the tag name and tag quality. For example:
ITEM_NAME[8]="opcserversim.Instance.1.T1";ITEM_VALUE[3]=1606521099;ITEM_QUALITY[3]=192
ITEM_NAME[8]="opcserversim.Instance.1.T2";ITEM_VALUE[3]=1170485188;ITEM_QUALITY[3]=192
ITEM_NAME[8]="opcserversim.Instance.1.Val1";ITEM_VALUE[5]=4958.32440443337;ITEM_QUALITY[3]=192
ITEM_NAME[8]="opcserversim.Instance.1.Val2";ITEM_VALUE[5]=4970.36790242419;ITEM_QUALITY[3]=192
Export at fixed interval - if this checkbox enabled then the program will export all tags in the group periodically, even if a tag value isn't changed. You may export data by fixed interval, at a fixed time or define a flexible schedule using the "Cron" time format.
Add server name to the item name - if this checkbox enabled then the program will append a server name before the tag name. It allows you to distinguish identical tags from different servers.
Don't export NULL value - the checkbox allows you not to export items with null values. If it is selected, items in the group that have a null value will not be exported, if it is not selected, the null value of an item is not taken into account. By default, the checkbox is selected.
Wait till all items are updated - the checkbox enables/disables waiting till all items in the group are updated. If it is selected, items in this group will be exported only when all items in the group are updated (the "Export valid values only" and "Don't export NULL values" checkboxes are taken into account during export), if it is not selected, all items will be exported taking into account the "Export valid values only" and "Don't export NULL values" checkboxes. By default, the checkbox is selected.
Note: See the paragraph "How it works" for more details about the export algorithm.
After you specify the group properties, click the "OK" button to save the properties or the "Cancel" button to cancel it. The dialog box will be closed, and a new group will appear in the tree.
Adding an item
Click the "Action" button or right-click the "OPC groups, servers, and variables" tree, and you will see the action menu. Select the "Add item..." item, and you will see the Item properties dialog box on the screen (fig. 8).

Fig. 8. Automatic mode item properties
Servers - the list contains the list of available OPC servers.
Info - the group shows brief information about the selected OPC server.
Prog ID - the field shows the program identifier (the name of the program).
Description - the field shows a brief description of the server.
DA support - the fields shows the supported DA.
Vendor - the field shows the name of the vendor.
Connect - the button connects the program to the server and after that items (if there are any on the server) appear in the "Items" list. It is also possible to connect to the server with a double click on the server selected in the "Servers" list.
Selecting items mode - the list allows you to select one of the modes for item selection/input. There are two modes available: Automatically retrieve items from a server and Manual mode.
Items - the list contains items available on the selected server. There is a checkbox next to each item. It enables/disables adding the corresponding item to the tree after you click the "OK" button and close the dialog box. Once a connection is established to the server, the checkboxes of all items are selected. You can select or clear a checkbox by clicking it. Also, you can use the menu (fig. 9) opened with a right-click on the list.

Fig. 9. Item menu
Select all - select the checkboxes of all items.
Clear all - clear the checkboxes of all items.
Invert selection - invert the checkboxes of all items.
Info - the group shows information about the selected item.
ID - the column shows the item identifier. It cannot be edited.
Description - the column shows a brief description of the item. It cannot be edited.
Type - the column shows the item type. It cannot be edited.
Value - the column shows the item value. It cannot be edited.

Fig. 10. Manual mode item properties
Items - the text field allows you to type items manually. The number of items is unlimited.
Removing an item:
Click the "Action" button or right-click the "OPC groups, servers and variables" tree, and you will see the action menu. Select the "Delete" menu item, and you will see the confirmation dialog box on the screen. Click the "Yes" button in this dialog box, and the group or the item will be removed from the tree after that. If you change your mind, click the "No" button. The "Delete" menu item is not available when the tree is empty.
Editing a group:
Click the "Action" button or right-click the "OPC groups, servers and variables" tree, and you will see the action menu. Select the "Edit..." menu item, and you will see the Group properties dialog box on the screen (see figure).
Note: Note that a group must be selected in the tree; otherwise, you will not see this menu item.
See "Adding groups:" for the description of group properties.
Note: See the paragraph "How it works" for more details about the export algorithm.
After you specify the group properties, click the "OK" button to save the properties or the "Cancel" button to cancel it.
Viewing information about an item:
Click the "Action" button or right-click the "OPC groups, servers, and variables" tree, and you will see the action menu. Select the "Info..." menu item, and you will see the Item properties dialog box on the screen
All item properties except the "Info" group will be unavailable. Click the "Close" button after you view the information.
Note: Note that an item must be selected in the tree; otherwise, you will not see this menu item.
See "Adding an item:" for the description of item properties.
Assigning another name to an item:
Click the "Action" button or right-click the "OPC groups, servers, and variables> tree, and you will see the action menu. Select the "Assign another name..." menu item, and you will see the dialog box where you can type a new name for the item. Type a new name for the item and click the "OK" button - the new name of the item will appear in the tree. Note that the name must differ from those already existing in the tree; otherwise, you will see the corresponding message on the screen and the item will not be renamed.
Note 1: It is this assigned item name that is used during export/import, not the one in the tree. By default, the assigned name has the same value as the value selected when the item was added.
Note 2: Note that an item must be selected in the tree; otherwise, you will not see this menu item.
Moving a group or an item up:
Click the "Action" button or right-click the "OPC groups, servers, and variables" tree, and you will see the action menu. Select the "Up" menu item, and the group or the item will move one position up. If a group or an item is the only one or if there are no groups and items at all, the menu item will be unavailable.
Moving a group or an item down:
Click the "Action" button or right-click the "OPC groups, servers, and variables" tree, and you will see the action menu. Select the "Down" menu item, and the group or the item will move one position down. If a group or an item is the only one or if there are no groups and items at all, the menu item will be unavailable.
Note: you can add any number of groups and items with different parameters.
OPC HDA specific
While working with OPC HDA data, the logger saves a timestamp of the read value. Therefore, it is important to use unique group names within the one configuration. Next time, the logger starts reading history data from the saved time. If the logger reads data the first time, it reads data for the last 10 days.
You may force (re)read archive values from the necessary date. Please, open the OPC settings (see figure), and execute the "Actions - (Re)read archive from date" command. Please, note, the logger does not check for previously read values. The logger receives and processes all data.
OPC AE specific
Some OPC AE servers do not support browsing for alarm categories and groups. Therefore, you should specify a mask of necessary events in the manual mode like:
Category name:Group name
You may specify one or more masks in the list. Also, you may use mask symbols:
* - one or more any characters in a name.
? - any one character in a name.
Examples:
Simulated Event:*
Simulated Item Creation Event:*
aaaa :: :*
*:*
If you want to receive events for all categories and groups, please, specify the following mask:
*:*
OPC UA DA specific
You should specify the server URL using the following format:
opc.tcp://login:password@127.0.0.1:10000/url
127.0.0.1 - the IP address, where the OPC server is installed. You may use a domain name instead of the IP address.
10000 - the IP port number.
login:password - an optional login and password, delimited by a colon.
Please, note, you should specify the link to an OPC server in the "Server URL" field. This field does accept links to an LDS or GDS server (Local/Global Discovery Server, generally, the IP port number is 4840). The IP address of this server you may use in the "Computer" field, then click the "Refresh" button (see figure).
Currently, the logger supports the following security policies:
•None.
•Sign.
•Sign&Encrypt.
Key types:
•Basic128Rsa15
•Basic256
•Basic256Sha256
You should trust our software key on your OPC server.
Cron time format
The CRON format is a simple yet powerful way to describe time and operation periodicity. The traditional (inherited from the Unix world) CRON format consists of five fields separated with spaces:
<Second> <Minutes> <Hours> <Month days> <Months> <Weekdays>
Any of the five fields can contain the * (asterisk) character as its value. It stands for the entire range of possible values. For example, every minute, every hour and so on. In the first four fields, you can also use the proprietary "?" (w/o quotes) character. See its description below.
Any field can contain a list of comma-separated values (for example, 1,3,7) or an interval (subrange) of values defined by a hyphen (for example, 1-5).
You can use the / character after the asterisk (*) or after an interval to specify the value increment. For example, you can use 0-23/2 in the "Hours" field to specify that the operation should be carried out every two hours (old version analog: 0,2,4,6,8,10,12,14,16,18,20,22). The value */4 in the "Minutes" field means that the operations must be carried out every four minutes. 1-30/3 is the same as 1,4,7,10,13,16,19,22,25,28.
You can use three-word abbreviations in the "Months" (Jan, Feb, ..., Dec) and "Weekdays" (Mon, Tue, ..., Sun) fields instead of numbers.
Examples
Note: the <Second> field equal 0 in all examples
Format | Description |
* * * * * | every minute |
59 23 31 12 5 | one minute before the end of the year if the last day in the year is Friday |
59 23 31 Dec Fri | one minute before the end of the year if the last day in the year is Friday (one more variant) |
45 17 7 6 * | every year on the 7th of June at 17:45 |
0,15,30,45 0,6,12,18 1,15,31 * 1-5 * | 00:00, 00:15, 00:30, 00:45, 06:00, 06:15, 06:30, 06:45, 12:00, 12:15, 12:30, 12:45, 18:00, 18:15, 18:30, 18:45, if it is the 1st, 15th or 31st of any month and only on workdays |
*/15 */6 1,15,31 * 1-5 | 00:00, 00:15, 00:30, 00:45, 06:00, 06:15, 06:30, 06:45, 12:00, 12:15, 12:30, 12:45, 18:00, 18:15, 18:30, 18:45, if it is the 1st, 15th or 31st of any month and only on workdays (one more variant) |
0 12 * * 1-5 (0 12 * * Mon-Fri) | at noon on workdays |
* * * 1,3,5,7,9,11 * | every minute in January, March, May, July, September, and November |
1,2,3,5,20-25,30-35,59 23 31 12 * | on the last day of the year at 23:01, 23:02, 23:03, 23:05, 23:20, 23:21, 23:22, 23:23, 23:24, 23:25, 23:30, 23:31, 23:32, 23:33, 23:34, 23:35, 23:59 |
0 9 1-7 * 1 | on the first Monday of every month at 9 in the morning |
0 0 1 * * | at midnight on the 1st of every month |
* 0-11 * * | every minute till noon |
* * * 1,2,3 * | every minute in January, February, and March |
* * * Jan,Feb,Mar * | every minute in January, February, and March |
0 0 * * * | every day at midnight |
0 0 * * 3 | every Wednesday at midnight |
You can use the proprietary "?" character in the first four fields of the CRON format. It stands for the start time, i.e., the question mark will be replaced with the start time during the field processing: minute for the minute field, hour for the "Hours" field, month day for the month day field, and month for the month field.
For example, if you specify:
? ? * * *
The task will be run at the moment of startup and will continue being run simultaneously (if the user does not restart the program again, of course) – the question marks are replaced with the time the program was started at. For example, if you start the program at 8:25, the questions marks will be replaced like this:
25 8 * * * *
Here are some more examples:
•? ? ? ? * - run _only_ at startup;
•? * * * * - run at startup (for example, at 10:15) and continue being run in exactly one hour: at 11:15, 12:15, 13:15 and so on;
•* ? * * * - run every minute during the startup hour;
•*/5 ? * * * - run on the next day (if CRON is not restarted) at the same hour every minute and so on every day, once in five minutes, during the startup hour.
Data view change
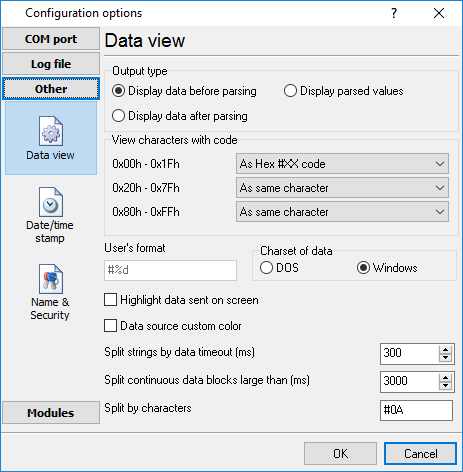
Fig. 11. Data view
Data view settings, that can be configured on the "Data view" tab:
1.View characters with code - the program can interpret and decode bytes as characters. You can select decoding mode for each range of character codes. If the range doesn't have the corresponding character, that's why these data can be displayed only in hexadecimal and decimal code.
2.You can set up the user's format to display a data byte. The directive %d shows to display a decimal code, the directive %x - hex code. You can set any framing characters before/after the user format.
3.Highlight data sent on screen - a string with sent data will be highlighted by the selected color.
4.Character set - allows you to define the character set of incoming data. Windows - Windows ANSI character set, DOS - OEM character set.
5.Data source custom color - if you've created several configurations then you can define a custom color for each data source that allows you to distinguish data flows on the "All data" page in the main window.
6.Split strings by data timeout - this option allows visually splitting data packets in the program window. Data packets that will be received after the specified interval will be shown on a new line. If this value is set to 0, then data packets will not be split.
7.Split continuous data blocks large than - this option allows visually splitting continuous data flow in the program window. The program will show data on a new line if continuous data is longer than the specified number of bytes.
8.Split by characters - this option allows to visually splitting continuous data flow in the program window using the specified symbols. For example (fig. 11), the program will use a character with the 0Ah hexadecimal code that is equal to the "LF" ASCII code.
Date/time configuration
This group of options (fig. 12) allows you to configure how timestamps appear in the log file and on the screen. You can configure the stamp format in the program options.

Fig. 12. Time stamp configuration
Add to display output for data sent - the time stamp will be added for the sent data displayed on the screen. The stamp will be added according to the timeout (if the data flow is uninterrupted) or when a data packet is sent.
Add to display output for data received - the same but for the received data.
Add if data direction has been changed - if the program is sending and receiving data, the time stamp will be also added when the data transfer direction changes (sending/receiving).
Add for data packets - if the data is displayed after it is processed, the stamp will be added to each processed data packet.
Add at begin of file - the stamp will be added at the beginning of every new log file.
Stamp timeout - if the data flow is uninterrupted, the stamp will be added regularly at the interval specified in milliseconds.
File prefix/postfix character(s) - the program will use these characters instead of those specified in the program options while writing data to a file. For example, it allows you to add the new line character or another sequence of characters before or after the stamp. Example: >#0D#0A
Name and security
This group of options (fig. 13) allows you to configure the following parameters:
Friendly name - this name will be added before the port number or the data source in the drop-down list in the main window of the program. It allows you to describe the data source.
Start logging automatically - if this option is enabled the program will start receiving and logging data automatically when it is launched.
The "Security" option group allows you to protect user operations in this particular configuration with a password. You can specify advanced security options applied to the entire program in the program options.
Ask password before start and stop - the password will be required when the user clicks the "Start/Pause" button in the main window of the program.
Ask password before configuration edit - the password will be required when the user tries to open the Configuration options dialog box.

Fig. 13. Name and security
Log rotation
The main function of Advanced OPC Data Logger is logging data to a file (so-called, log file). The "Log rotation" tab has a rich set of options for it. (fig. 14).

Fig. 14. Log-file forming modes
Set the "Create log file on disk" option to the checked state. Then you can set path to a folder, where files will be created with the help of a dialog window, which will be showed up after clicking a button with the "Folder" picture. You should select a necessary folder in the dialog window and click the "OK" button.
Log file path - the full path to a local or network folder, where the program will create new log files. The network path should be specified as: \\COMPUTER NAME\Folder\
Note: If the program works with network files, it greatly increases data flow through your network and decreases writing speed. Please, consider creating small log files. If your incoming data flow is fast, you may create log files locally. Later, you may sync a local folder with a remote folder using any 3rd party utility.
A log file name can be stamped with date and time. In this case, a new log file is created periodically. The format of a timestamp depends on the selected period. For instance, if the "File name prefix" field is set to "sample," the "File extension" field to "log," and the "File name format" option is "Daily," then each log file created will have the format "sampleYYYYMMDD.log". On March 21st, 2003, the log file will be "sample20030321.log". Please, note, that the final extension (after the final period), remains at the end of the file name.
Write to log - the option allows you to select when the program writes data to a log file. This feature is disabled in some loggers, and if the parser plugin is not available.
•Before parsing - the program saves all incoming data without any modifications. If an external device sends binary data, the logger will create binary files.
•After parsing - the program saves data after parsing. Generally, it is a parsed data packet.
•After filtering - the program saves data after all filter plugins. The logger saves the content of the "FULL_DATA_PACKET" variable. A filter plugin may transform or fully change the variable. If you do not use any filter plugin, then this mode works as the previous.
•Screen content - the program saves data to a log file as you see it in the main window. Generally, it is text content; therefore, the program creates a text log file.
The log rotation mode is defined by the following key parameters:
•File name prefix - the text string, which will be added at file name beginning. The prefix may contain special placeholders like {NAME}. If you create log files before parsing the NAME can be any date formatting values below. For example: "data{YYYY}_{MM}_{DD}" returns a prefix like "data2019_01_01". If you create log files after parsing or filtering, you may use any parser variable. Then the file name may depend on some value in your incoming data.
•File name extension - the text string, which will be a file extension (characters after the dot).
Limit size - the "Limit size" field specifies the maximum size in kilobytes of any log file. If you specify the zero file size, then the file size is not limited.
You may select from the following modes:
1.Clear file - if the log file size will exceed the limit specified, then the log file content will be deleted, and file filling will start from the beginning.
2.Rename old - if the log file size will exceed the limit specified, then the existing log file will be renamed.
3.Shift (no threshold) - the older data over the limit specified will be removed from the log file.
4.Shift (with threshold) - in this mode the program will wait when the file size will exceed the limit specified + the threshold value. After this, the older data over the limit specified will be removed from the log file.
If the program continuously works for a long time, it is possible that the log file will have a large size and this file will be inconvenient for looking and analyzing. Therefore, there is the possibility to create files in dependence with the time on a computer. You can select one variant predefined or set up a new one:
•Daily - the file will be created with a name containing a prefix, and date in format DDMMYYYY, where DD is two-digit day sign, MM is two-digit month sign, and YYYY is four digits of the current year. The filename extension will be added at the end of the file.
•Monthly - the file will be created with a name containing a prefix, and date in MMYYYY format. The filename extension will be added at the end of the file.
•Each data packet in different file - in this mode, the program splits data flow to a different file. In this mode you should configure the parser or the program will split a data by timeout about 300 milliseconds.
•Don't create new file - in this mode, the program will write all data to one file. It is recommended for a small data flow. Otherwise, your log file will be too big, and a performance of the program will fall down.
•User's format - a file will be created with a name containing a prefix and date in showed by you format (for example, DDMMYYYY). The filename extension will be added at the end of the file. The file may not contain format signs, then file name will be constant. You should not use characters, that the OS doesn't allow in a file name, such as "/,\.*,?" and some others.
•Weekly - create a new file every week. The file name will contain a week number.
•After data timeout - the program will create a new file if the program didn't receive any data at the specified interval.
•Hourly - the file will be created with a name containing a prefix, and date in format YYYYMMDDHH, where HH is two-digit hour sign, DD is two-digit day sign, MM is two-digit month sign and YYYY is four digits of the current year. The filename extension will be added at the end of the file.
•Constantly named file - the current log file will have a constant name. When creating a new file, the existing log file will be saved using the new file name that will contain a date and time stamp.
If you need to create a new log file under more complex conditions, then you can try the additional "Scheduler & Hotkeys" plugin. You should download and install it separately.
Date and time formatting codes:
D - a day number (1-31).
DD - a day number with a leading zero (01-31).
DDD - a day of the week in the text form (Mon-Sat), according to the regional settings on this computer.
DDDD - a day of the week in the full text form (Monday-Saturday), according to the regional settings on this computer.
M - a month number (1-12).
MM - a month with a leading zero (01-12).
MMM - a month name in the text form (Jan-Dec), according to the regional settings on this computer.
MMMM - the full month name (January- December).
YY - last two digits of the year (00-99).
YYYY - the full year number (0000-9999).
H - the hour number (0-23).
HH - the hour number with a leading zero (00-23).
N - minutes (0-59)
NN - minutes with a leading zero (00-59).
S - seconds (0-59).
SS - seconds with a leading zero (00-59).
W - ISO week number (Monday is the start of the week).
WW - week number (the start of the week is defined in System - Regional settings).
To insert arbitrary text or a symbol into a date or time format, and to prevent it from being accidentally replaced with some value, you need to use quotes:
YYYY"/"MM"/"DD - 2023/01/01
YYYY"/"MM"/"DD"T"HH:NN:SS - 2023/01/01THH:NN:SS
Addinal parameters
CLIENTID - the unique client or data source ID (in some data loggers).
CLIENTNAME - the unique client or data source name (in some data loggers).
Example: You want to create a log file every hour. It is desired that file name starts from "sample_log" and the file extension "txt".
Answer: set file prefix = sample_log_, file extension= txt (without dot!). In file name format show HHDDMMYYYY. Now the file will be created every hour. Naturally, you can set any formatting characters combination, described higher.
If you want to access to a log file while the program work, then you should configure access mode settings for the log file in the next chapter.
Add date/time stamp to file name - this option is available for modes #4 and #7 and allows adding date and time to the file name.
Add data source ID to file name - if this option is activated, then the program will append the data source name at the beginning of the file name, for example, COM1-sample20030321.log.
Write data/time stamp to file before writing data - if this option is activated, then the program will write a date/time stamp to a file before each data portion.
Overwrite existing files - this option is available for modes #4 and #7 and allows you to delete an existing log file before creating a new log file.
Log file access
During work can be such situations, when it is necessary to get access to a file with current data (current log file) from other applications (for example, for data processing). However, while you are accessing the current log file Advanced OPC Data Logger can't write data to a log file and all data at this moment will be lost. We recommend using a temporary file for data storage. It is the safest way. (fig. 15).

Fig. 15. File access mode.
You can select one from the following variants:
•Ignore and not write - in this mode, the program stop writing to a log file until it is locked. Therefore, data will be lost.
•Write to a temporary file, then append - a temporary file will be created, to which writing will be done. After access to the current file will be got, temporary file content will be added to the end of the main file. However, mind that if file has a timestamp in the name, there can be a situation when the program copies the content of a temporary file to a new log file, for the next time.
•Display a message and stop work - data will be lost until the dialog window is closed.
You can define your message text, which will be displayed at writing error to a log file. The sound signal can be on for an additional indication. You can also enable writing a message to a protocol file.
Log deletion
The deletion of files (fig. 16) will help you to avoid stuffing your hard disk with needless information. Log files can be deleted either depending on the time of storing or when the maximal number of files is exceeded.
When deleting files by the time of their storage, the files that were modified last time before the specified period are deleted.
When controlling the number of files, the files with the oldest modification dates are deleted first.
You can select both variants of file deletion. In that case, files will be deleted when either of the conditions is true.

Fig. 16. Log deletion
CSV file logging
By default, the program writes data to a text file that isn't compatible with the CSV format. However, you can create Excel compatible CSV files. Simply activate logging to a CSV file. Note: You should to activate the "Export all items at one time" option in the group properties in the OPC settings.

Fig. 17. CSV logging
When the "Advanced" button is pressed, a window with additional settings for the "CSV" file opens (see fig. 18).
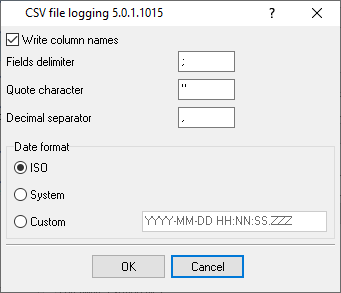
Fig. 18. CSV file settings
Write column names - at the beginning of each new file, the names of the recorded variables will be written in the first line.
Fields delimiter - the field delimiter for the CSV file. Depending on your operating system, either a comma or a semicolon may be used. To use a tab character, specify the sequence #09 as the delimiter.
Quote character - all string values and column names will be enclosed by this character.
Decimal separator - the separator between the integer and fractional parts of real numbers.
Date format:
•ISO - uses the format "YYYY-MM-DD HH:NN:SS".
•System - uses the format set in the operating system.
•Custom - you can specify your own date and time format.
Introduction & setup
To extend program functionality, we implemented plugin modules. The module structure lets you to reduce your program size and purchase costs (you pay only functionality, which you need).
Advanced OPC Data Logger supports a few types of modules (fig. 19 - 21):
•Data filter - data filters allow you to filter your data and modify a value of parser variables.
•Data export (fig. 21) - Advanced OPC Data Logger has many modules and method for passing data to other applications, for example, there are modules for various databases, file formats (CSV, XML), data interfaces (OPC, DDE, MQTT), and many others.
•Events handling (fig. 22) - these plugins are used to handle events generated by the Advanced OPC Data Logger software. Once an event occurs (for example, "Data source is opened" or "Configuration changed"), the plugin creates a text message using the specified template, sends a notification, does some actions, executes a program or a script, etc. The form of the notification or actions depends on the plugin settings.

Fig. 19. Activating plugins

Fig. 20. Activating data export plugins

Fig. 21. Activating events handling plugins
You can parse and export data sent and received. By default, only data received will be parsed.
Installation
You can easily install a new module. Usually, you should start the installation file and click the "Next" button for a few times. The installation wizard will detect a place of your Advanced OPC Data Logger software and place a plugin module and all distributive files to the "Plugins" folder, which is in the program folder (by default X:\\Program Files\Advanced OPC Data Logger\Plugins).
After the program restart, a module will be loaded and initialized. If the module is supported by our software, the module name will appear in the modules list. Most modules require additional settings. If you want to configure the plugin module, click the "Setup" button near it. If you selected the module and the "Setup" button is not active, then the module doesn't have additional settings and can work without additional settings. Please, read a user's manual of the corresponding plugin for additional information.
Configuration steps
1.Select and configure a query module. You may use a module of this type if you need to send some data to your device (for example, initialization strings or request strings).
2.Select and configure a parser module. This step is necessary because filter and export modules can use parsed data only. If you didn't select the parser module, then you can't configure the data filter and data export modules.
3.Activate and configure data export modules. You can select one or more modules simultaneously. The program will use selected modules simultaneously. Please, note, the program can' use the data export module, if you didn't configure the parser module.
4.Activate and configure event modules. You can select one or more modules simultaneously.
Window view
This tab in program options (fig. 22) allows you to customize the appearance of the main window of the program (fig.1). You can access this tab through the "Options → Program options" menu item in the main window.

Fig. 22. Window view setting
You can set the following parameters:
•Start in minimized state - at start Advanced OPC Data Logger will automatically minimize the program window to the taskbar or to the Systray (fig. 23).
•Minimize to Systray - while the main window of Advanced OPC Data Logger minimizes, the program will automatically put its icon to the system panel near the clock.
•Show data window - if you specify this option, then the program will display all data in the main window. You may disable this option if you log data from many ports on a slow computer. It reduces the computer's CPU usage.
•Output data on screen in minimized state - if you'll enable this option, then the program will display processed data in minimized state. If you are logging many data sources on a slow computer, then you can decrease computer central processor load rate with disabling of this option.
•Font type - the data will be displayed with this font type in the main window. We recommend using mono-spaced fonts in this field, such as Terminal, Courier, or System.
•Screen buffer - when the number of lines in the main window exceeds the specified value, the program deletes old lines from the screen buffer.
•Window view - this option group lets you configure data window view mode (a font color, a font type, a background color).
•Transparency - in modern OS, it lets you set the transparency of the main window. The most left position is the normal window view, and the most right position is maximum transparency.
•Wrap words - if you didn't configure a parser module or your data flow doesn't contain a blocks separator, then your data without this option enabled will be displayed as one long string in the data window.

Fig. 23. Systray - panel near clock
Date/time stamp view
This group of options (fig. 24) allows configuring the format of date/time stamps that will be used in the main program window and log files.

Fig. 24. Configuring data/stamp view
Prefix/Postfix characters for display output - these options allow you to define the beginning and ending characters of a date/time stamp that will be shown in the program window. When outputting data to a log file, the program uses individual characters for each configuration.
View mode - allows you to select the standard or define the custom format of the date/time stamp.
Font - this group allows you to define the color and font of date/time stamp.
Add data direction sign to a stamp - if this option is activated, then the program will append TX or RX to the end of the stamp.
Add data source ID to a stamp - if this option is activated then the program will data append data source ID at the beginning of the stamp, for example, COM1.
Protocol and errors handling
While the program is running, it may generate many messages about errors or events. All these messages are being registered in a protocol file. The protocol file may contain messages from the main program and all working plugins. On this tab, you can define the kind of messages, which you want to put a protocol file (fig. 25). Here you can set the maximum protocol file size and the formatting mode.
Usually, the protocol file is in the "AppData" folder and has the name of the program with the 'log' extension.
On Windows 7 and higher: c:\ProgramData\Advanced OPC Data Logger\
On old OS: c:\Document and Settings\All Users\Advanced OPC Data Logger\
You can also open the protocol file from the “File” menu in the main window.

Fig. 25. Protocol settings
Advanced OPC Data Logger works with three types of messages:
•Information messages - this type of messages informs you about current operations.
•Warnings - warns you about possible failures or errors. Immediately user reaction is not required.
•Errors - the program has detected an error which requires user attention.
There is the possibility to log the following events:
•Program messages - messages about start or stop of the program, etc.
•Data query - messages which are generated in a data query module.
•Data parser - messages from a data parser module.
•Data export - messages issued by a data export module.
•Other - other message types.
You can write each type of messages to a protocol file or/and to the list in the main window. Please, specify necessary options for each message type at "Window" and "File" fields.
If you don't want to allow growing a protocol file size to an unlimited size, then you can enable the "Clean protocol at program start" or limit protocol file size in the "Size" field.
Some exceptional (unhandled) messages may occur while the program is running. In most cases, these messages affect the program, and the safest way is to restart the program. Please, specify the "Restart program at exception" option and the program will be restarted automatically.
If you want to look all program messages, then you can disable the "Don't display messages at unhandled exceptions" checkbox, and the program will open the exception message window with detailed information.
Configuration
Windows 2000+ services let you:
•Control service on local and remote computers, including remote computers with Windows 2000+ system.
•Setup actions on emergency service restore in case of failure, for example, auto service or computer restart (only on computers with Windows 2000 or later).
•Create for services other names and descriptions, to find them easier (only on computers with system Windows 2000 or later).
•Run service before user login (password input).
•Service can be configured on automatic start after operation system load.
Note 1: you must be logged in as an administrator to change the configuration or control the service in any way (start, stop, pause, continue).
Note 2: On Windows Vista and later you should start the program with elevated administrator privileges.
If you want to use the program as a service application, then, please, go to the "Options → Program options → Windows service" tab (fig. 26), then enable the "Use program as a service" checkbox. Later, please, specify the start-up type of the service. There are the following variants:

Fig. 26. Service settings
1.Automatic - the service starts automatically with Windows, before user login.
2.Manual - you can start the service application from the "Services" control panel (fig. 29).
3.Disabled - the service is disabled, and does not start at all.
If you want to change the program settings while the program works in the service mode, you can start a second instance of the program on your desktop, make the necessary changes, and restart the service with the new settings.
Old Windows versions (before Windows Vista) allows you to use the service in the interactive mode. In this case, the program places an icon in the system area (fig. 27).
Fig. 27. Service icon in Systray
If the service should write data a database or use another service on your computer, they should be started before Advanced OPC Data Logger. You can configure a list of these services on the "Program depends on services" tab (fig. 28).

Fig. 28. Service settings #2
Sometimes, you may need to start Advanced OPC Data Logger before starting other services. In this case, you should:
•Switch the start mode of a target service to "Manual."
•Start Advanced OPC Data Logger.
•Select the necessary service on the "Depending services" tab.
•Select the mode when the logger will start the selected service.
•Restart Advanced OPC Data Logger.
After you configured Advanced OPC Data Logger to work in the service mode, you need to restart a computer or start the service manually from the "Services" control panel (fig. 29).
")
Fig. 29. Manual service run (in Windows 2000)
When the service is running, two processes should appear in the Task Manager: opcloggersrv.exe and opclogger.exe (fig. 30). The 'opcloggersrv.exe' application implements an interface between the service manager and the Advanced OPC Data Logger software. Unlike srvany.exe utility, our service stops safely.

Fig. 30. Process list
If you want to configure the program as a service, then you must be logged with administrator rights. The service application can be controlled, stopped, or removed with the help of a command-line. Run opcloggersrv.exe with the following parameters:
•/? - a short help.
•/I - install service for starting in then manual mode.
•/A - install service for starting in the automatic mode.
•/D - install service in the disabled state.
•/R - remove service from the computer.
Windows Vista+ notes
One of the ways Vista's security was improved was by separating system services and user applications into separate 'sessions'. Keeping the system services isolated helps to secure them better, but also makes any interactive interface unavailable to the user. That's where the Interactive Services Detection service comes in. When a service needs to interact with the user, Interactive Services Detection presents a dialog that will switch the user to the session where the service is running so they can interact with the service. For an excellent, detailed description of this, see next paragraph.
Many sites recommend disabling this service, but doing so will result in you not being able to interact with any services that require your attention. This service is run manually by default, so there is little point to disabling it unless you don't want to be bothered by important information from the software you may be trying to run.
•Display Name: Interactive Services Detection
•Service Name: UI0Detect
•Process Name: UI0Detect.exe
•Description: Enables user notification of user input for interactive services, which enables access to dialogs created by interactive services when they appear. If this service is stopped, notifications of new interactive service dialogs will no longer function, and there may no longer be access to interactive service dialogs. If this service is disabled, both notifications of and access to new interactive service dialogs will no longer function.
•Path to Executable: %windir%\system32\UI0Detect.exe
•Default Start-up:
1.Home Basic: Manual
2.Home Premium: Manual
3.Business: Manual
4.Enterprise: Manual
5.Ultimate: Manual
Restart & Security
Sometimes the program should be restarted. For example, if you've changed the program settings remotely and want to reload program automatically with the new settings. To do that, specify the time for restarting the program on the "Restart & Security" tab in program options "Options - Program options". Just specify the time of day, when the program should be being restarted.

Fig. 31. Program restart settings
On this tab, you can also protect some actions with the program by a password. To do that, activate the "Protect by password" option, define a password and select protectable actions.
Program doesn't run or work
It is necessary to make sure in proper time installation on your computer, so as if you put clock after program installation, protection from use after trial period works.
Also, the program will not work, if you use a software debugger in your environment like WinDbg. In any other case, please, contact us on support page.