
Weight data logger. Parse weight data from scales
Problem scenario:
I am taking a weight from a scale ever couple of seconds, and I want the software to take that weight via the serial port and load it directly into a database with a date and time stamp on each entry. I want this to be software that will start with Windows and hands-free to the operator. The database is located on a network drive, and it will not be open at the time unless the software can open Access.
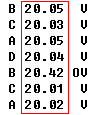
Fig.1. Serial data captured
Requirements:
- Advanced Serial Data Logger Professional, Enterprise, or a trial version;
- ASCII Data Query and Parser
It is assumed that:
You have configured all communication parameters (baud rate, the number of data bits, flow control, etc.) in the data logger, and you can receive all data without communication errors.
Solution:
The image (Fig.1) above shows a simple data flow. Each record has a fixed size and a fixed position for each item. As an example, for a single record, all non-printable characters with a code of less than 20 Hex are selected for display. The indicated radio buttons are set, as shown below.

Fig.2. Weight data logger. Serial data view setup
Click the "OK" button and attempt to receive data from a serial port. You should get something like the image below.
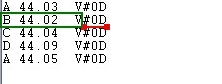
Fig.3. Weight data logger. Data received.
It is the other view of the data received. Notice that all non-printable characters were replaced with their code i.e., #0D. It is clear from the data screen above that the data block (within the green rectangle) ends with #0D (underlined by red).
We are now ready to configure the modules. First, select the "ASCII data query and parser" plugin (Fig.4a, pos. #1) from a drop-down list. Then, enable a parsing option for data received (Fig.4a, pos. #2) and select the necessary data export plugins. The DDE server (Fig.4b, pos. #3) will help to check the accuracy of the parser's configuration. The "ODBC database" plugin will write data to Microsoft Access (Fig.4b, pos. #4).

Fig.4a. Weight data logger. The data parser plugin setup.

Fig.4b. Weight data logger. Data export plugins setup.
Next, open the ASCII parser and query configuration window (click the "Setup" button near the drop-down box as indicated on pos. #1 on Fig.4a). A dialog window will appear on the screen (Fig.5) about the data packet.

Fig.5. Weight data logger. Parser configuration window.
The configuration process should be very simple if you have examined your data flow in the data logger window (Fig.3). You should type in the same as in the data logger window in fields 1 and 2. Field #1 marks the beginning of the data block, and field #2 marks the end. In the example, our data block does not contain a start marker. Therefore, this field is left empty. The values to be typed in here are as underlined in red in Fig.3 above.
The parser should ignore some records because they contain unstable weight data. Therefore, we should configure the filter to remove these records from parsing. These records contain "O" or "T" characters, and we should create corresponding filter rules (Fig.6).
You will be adding a new filter rule (Fig.6, pos. 1) by clicking the "Add item" button (Fig.6, pos. 2).

Fig.6. Weight data logger. Filter settings.
The next tab is a vital part of the parser configuration. The data parser uses this information for data extraction from the data block. In the example, the data block contains 2 data items (see Fig.1), namely: first character and weight, which should be separated out into different variables. Later, you may use these variables in the data export plugin to place data on our Access database columns.

Fig.7. Weight data logger. Parser items.
Any new items may be added by clicking the "Add item" button (Fig.7, pos. 7). Before adding an item, the program will ask you about an item description. You can type any characters here, which will help you to remember a variable's content. For this example, all two variables with their corresponding descriptions have been added.
Each parser item has several of properties:
- Item name. This name will be bound to a column in the data export plugin. It is a limited text description and cannot contain spaces and a few other characters;
- Parser's type. It is a method which the program will use for data extraction. Our parser has a few methods from simple to the most powerful. In this example, where data is being placed in a fixed place, we can use the simple method - fixed position. This method allows the extraction of any number of characters from any fixed position of the data record;
- Data type. It is the data type of the characters extracted. For example, you can specify FLOAT or STRING data types. The parser converts data to the selected data type using options from the "Data formats" tab. In the example, both fields have the "STRING" data type and do not require conversion;
- Default value. The value specified here is to be used when data cannot be extracted from a data record;
- Fixed position. It is the position of the first variable's character in our data record. The minimum value is 1;
- Fixed length. It is the number of characters, which will be transferred to a variable. The minimum value is 1.
It is necessary to adjust a position and length for the second parser item.
In the next tab, you can specify basic format options as per (Fig.8). If you had selected the data type "String" in the item's parameters, then the first two options allow you to remove blank spaces from a value. Other options are unnecessary because all our items do not have the date or time data type.

Fig.8. Weight data logger. Format of items.
Click the "OK" button and close the parser configuration window. Then click the "OK" button in the options window.
Now that our parser is ready, it is time for testing it. Connect your device and power it on if necessary. Check to see if you can receive a data block from the specified serial port. If the parser had been correctly set up, then you should see all parser items and their values (Fig.9) in the DDE server window below.
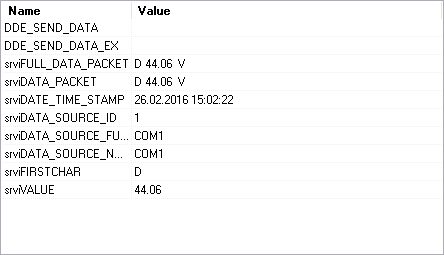
Fig.9. Weight data logger. DDE server window.
We are now ready to configure the ODBC database plugin, which will export data to Access. You can read about it in the second part.
Related articles: Weight data logger. Parse weight data from scales
Related topics: Advanced Serial Data Logger
hereSerial port interface | RS232 port logger | Com port logger | Data acquisition | RS232 data logger | Data Logger Software For Electricity Meter | Replace WinWedge | Replace TWedge | RS232 to SQL database | Barcode to Excel