Advanced Serial Data Logger

for Windows 9x/Me/NT/2000/XP x86,x64/2003 x86,x64/Vista x86,x64. Latest version: 3.6.1 build 1015. October 16, 2008.

Trust In Confidence!

Serial port data aggregation. Combine a data of two different com-ports to one MySQL table row

Problem scenario:

How can data of two different com-ports be combined in 1 file?

I have an application that requires the use of two devices. One will scan bar codes (EAN-13) using an RS232 port. We have some bar code scanner's connected, each one send when read, its identification number (four digits) and bar code information (thirteen 13 digits).

And the other is a Mettler Toledo scale that will output an ASCII string (Continuous Output – scales continually sends updates which are read from the port).

We need to take the scan and weight data and parse it and log all the data into a MySQL database. The data needs to be stored as a single record with time and date stamp.

Serial port data aggregation. Bar code scanner data

Fig.1. Serial port data aggregation. Bar code scanner data.

Serial port data aggregation. Mettler Toledo scale data

Fig.2. Serial port data aggregation. Mettler Toledo scale data.

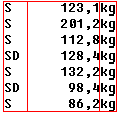
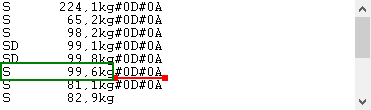
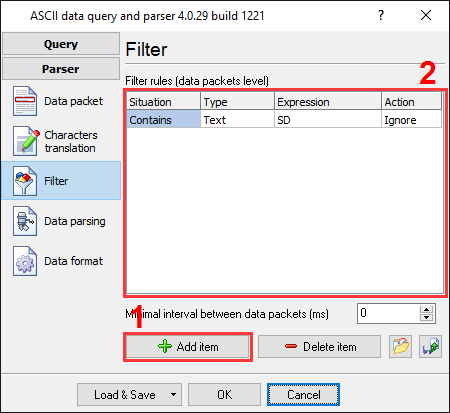
SD - deflection data; S - stable data.

Requirements:

  • Advanced Serial Data Logger (ASDL) Professional or a trial version;
  • ASCII data parser and query plug-in for the data logger;
  • DDE server plug-in for the data logger (optional);
  • Aggregator plug-in for the data logger;
  • ODBC database plug-in for Advanced Serial Data Logger.

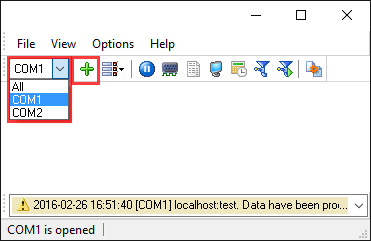
It is assumed that:

You've created two different configurations in the program by clicking the "Green plus" button twice (fig.3 pos.1). Each configuration will read a data from a different com-port and a device. After this action you should get the main program window like on the figure below (fig.3 pos.2).

Serial port data aggregation. Added configurations

Fig.3. Serial port data aggregation. Added configurations.

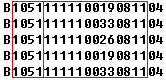
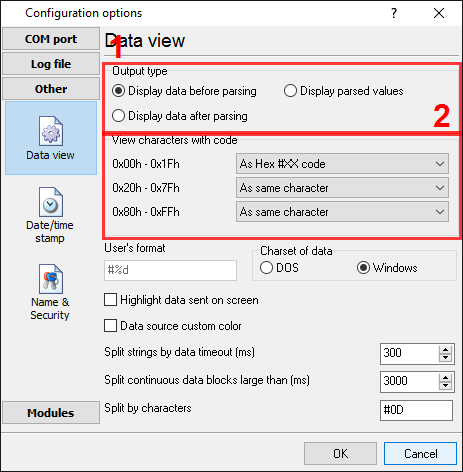
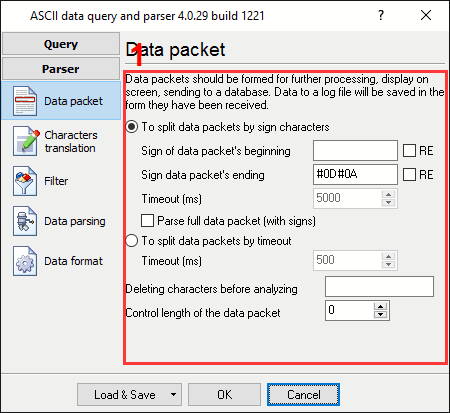
You may manage your configurations with help of the menu from the fig.4 pos.1, 2.

Serial port data aggregation. Manage configurations

Fig.4. Serial port data aggregation. Manage configurations.

You've configured communication parameters (baud rate, number of data bits, flow control etc) in the data logger and can receive the data from both port without communication errors.

The Mettler Toledo scale is configured for the “S.Cont” mode and data transmission occurs either continuously after each load change.

Solution:

Figures above show that data flows are very simple. Each record has a fixed size and a fixed position of each item. We need to recognize ending characters of an each data record. Please, enable display output for non-printable characters with a character code below than 0x20h in both configurations (for each port). Please, set the following options.

Serial port data aggregation. Data view setup

Fig.5. Serial port data aggregation. Data view setup.

Then click the "OK" button and try to receive data from ports. You should receive the data like on figures below.

Serial port data aggregation. COM1 (barcode scanner). Data received

Fig.6. Serial port data aggregation. COM1 (barcode scanner). Data received.

Serial port data aggregation. COM2 (scale). Data received

Fig.7. Serial port data aggregation. COM2 (scale). Data received.

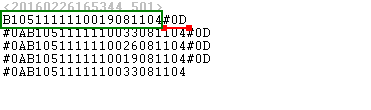
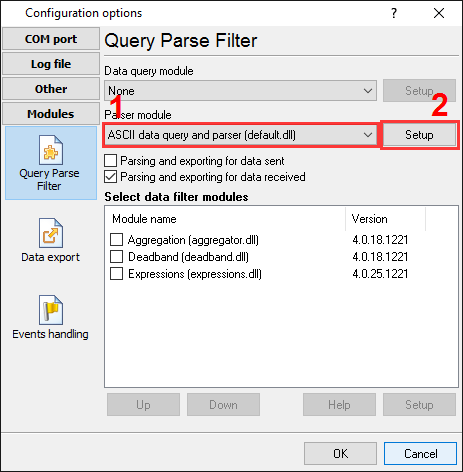
The combo-box at the pos.1 on fig.6 and 7 allows you to switch between ports.

This is another view of the received data. All non-printable characters were replaced with their code like #0D. Now, it is clear, that a data packets (in a green rectangle) end with #0D and #0D#0A (underlined by red).

Now, we are ready for configuring modules. First, please, select the "ASCII data parser and query" plug-in (fig.8, pos.1) from a drop-down list. Then, enable a parsing option for data received (fig. 8, pos. 2). Please, note that you should activate the parser module in both configurations and each parser will have fully different settings.

Barcode scanner data logger. Plugins setup

Fig.8. Serial port data aggregation. The data parser plug-in.

Now, please, open a configuration window of the ASCII parser and query plug-in (click the "Setup" button near a drop-down box fig.8, pos.1). The dialog window will appear on the desktop (fig.9 and 10).
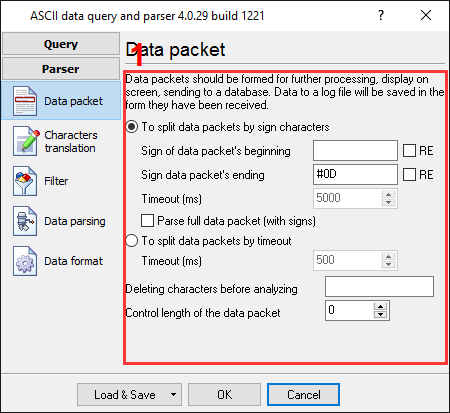
COM1 (barcode scanner). The configuration window of the parser

Fig.9. COM1 (barcode scanner). The configuration window of the parser.

COM2 (scale). The configuration window of the parser

Fig.10. COM2 (scale). The configuration window of the parser.

The configuration process will very simple if you've examined your data flow in the data logger window (fig.6 and 7). You should type in the same as in the data logger window in fields 1 and 2. Field #1 marks the beginning of the data block and the field #2 marks the end. In the example, our data block does not contain a start marker. You should type a value from the fig.3, which is underlined by red. The options #3 is activated, because we need to append our date/time stamp to each record.

Several records in the data flow from the scale should not be parsed, because contains an unstable weight data. Therefore we should configure the filter to remove these records from parsing. These records contain "SD" characters and we should create a corresponding filter rule (Fig.11).

You will be adding a new filter rule (Fig.11, pos. 1) by clicking the "Add item" button (Fig.11, pos. 2).
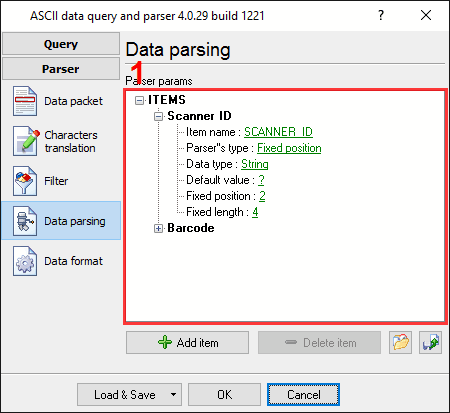
COM2 (scale). Filer rules

Fig.11. COM2 (scale). Filer rules.

Ok. We are going to the next page. This is a very important part of the parser configuration. The parser uses this information to extract parser items (variables) from a data packet. The data packet from the barcode scanner contains 2 data items, which should be placed to different variables. Later, these variables will be used in the data export and data filter plug-ins. In our case values from these variables will be placed to different columns of a target MySQL table.

COM1 (barcode scanner). Parser items

Fig.12. COM1 (barcode scanner). Parser items.

COM2 (scale). Parser items

Fig.13. COM2 (scale). Parser items.

You should add two and one new items by clicking the "Add item" button (fig.12, 13, pos.7). Before adding an item the program will ask you about an item description. You can type any characters here, which will help you to remember a variable's content. We've added all variables with corresponding descriptions on the fig.12, 13.

Each parser item has few properties:
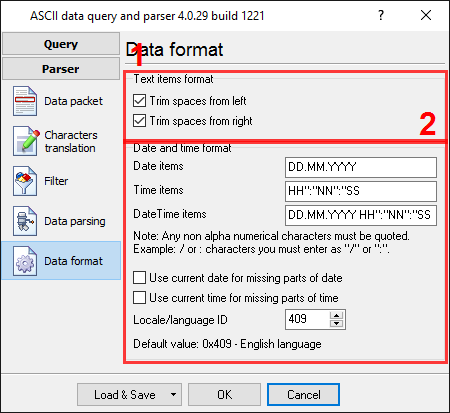
  1. Item name - this name will be bound to a column in the data export plug-in. It is a limited text description and cannot contain spaces and a few other characters;
  2. Parser's type - is a method, which the program will use for data extraction. Our parser has few methods from simple to most powerful. In our case, where data is placed in a fixed place, we can use the simple method - "fixed position". This method allows to extract any number of characters from any fixed position of the data packet;
  3. Data type - the data type. If you'll specify a data type other than the "STRING" data type, then the module will try to convert the string value to the specified data type. The module allows to configure several options that will be used at the conversion (see the "Data format" tab);
  4. Default value - this value will be used when data can't be extracted from a data packet (or can't be converted to the specified data type);
  5. Fixed position - is the position of the first variable's character in our data block. The minimum value is 1;
  6. Fixed length - is the number of characters, which will be transferred to a variable. The minimum value is 1.

The second item has same parameters, just the position and the length are different.

On the next page (fig.14) you can specify basic format options. Because we've specified the "String" data type for two parser variables, then first two options allow removing blank spaces from a value. Other options are not applicable in our case.

Serial port data aggregation. Format options

Fig.14. Serial port data aggregation. Format options.

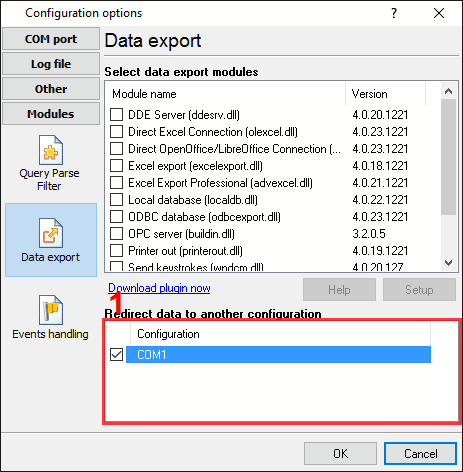
Please, click the "OK" button and close the configuration window of the parser.

Now, we should select a data export method for COM2 (scale). This configuration will redirect all parsed variables to other configuration and therefore will use data filter and data export plug-ins of this configuration. This method allows you to aggregate data from multiple heterogeneous data sources and exports it to one target. Please, set the following options. Please, note that you should create both configurations before this step.
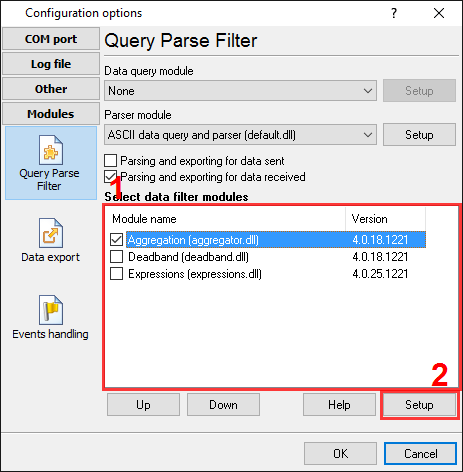
COM2 (scale). Redirection

Fig.15. COM2 (scale). Redirection.

Ok. We are going to the next stage. This is a very important part of this tutorial. We need to activate and configure the Aggregator plug-in that will combine data from both configurations to one database record (fig.16 pos.1). Please, note that this plug-in should be activated in one configuration only (COM1 in this example).

COM1 (barcode scanner). Aggregator plug-in

Fig.16. COM1 (barcode scanner). Aggregator plug-in.

Please, open the configuration window of the Aggregator plug-in (fig.17) by selecting the module in the list and clicking the "Setup" button on the "Query Parse Filter" tab.

COM1 (barcode scanner). The Aggregator plug-in window

Fig.17. COM1 (barcode scanner). The Aggregator plug-in window.

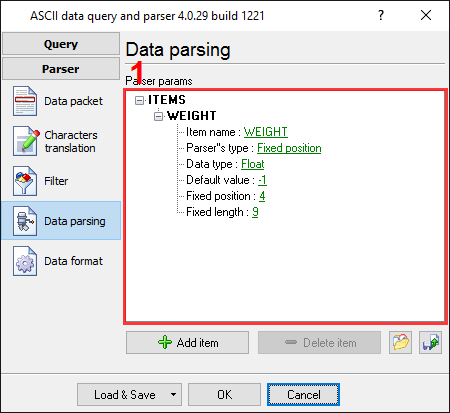
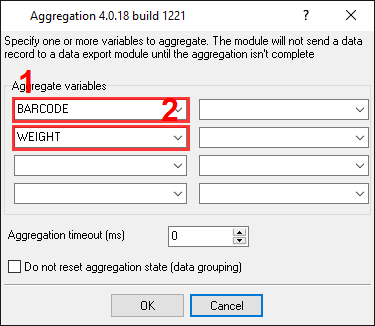
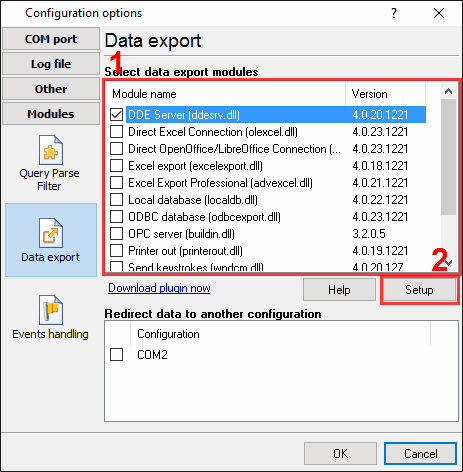
You should specify one variable from each configuration that should be aggregated. These names we are defined on fig.12 and 13. Please, note that the "WEIGHT" variable doesn't exist in the drop-down list with variables and you should type this name manually.

Please, click the "OK" button and close the configuration window of the Aggregator plug-in.

Now, we should select necessary data export plug-ins for COM1 (barcode scanner). The DDE server (fig.18, pos.1) will help us to check that the data packet is parsed and exported. The "SQL Database Professional" plug-in will write data to a MySQL database.

COM1 (barcode scanner). Data export plug-ins

Fig.18. COM1 (barcode scanner). Data export plug-ins.

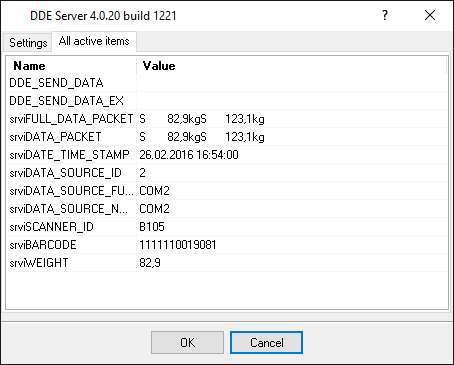
Then click the "OK" button again in the options window.

Now, our parsers are ready and we can test it. Connect your device and/or power it on and try to receive data packets from both ports. If parsers are configured properly, then the DDE server window in the configuration #1 (barcode scanner) will display our variables name and value from both configurations (fig.19).

COM1 (barcode scanner). The DDE server window

Fig.19. COM1 (barcode scanner). The DDE server window.

All the variables are now ready for export to the MySQL database.

If you want to export data to other destinations, please read the instructions by following the links below:

Weight data logger and Microsoft Access;
Capture a serial data to Microsoft Excel;
Log scales weight data to Microsoft Excel;
Combine a data of two different com-ports to one MySQL table row;
Real time charting in Microsoft Excel;
Send serial port data to Excel via DDE.

Export data to MySQL database

Note: This configuration process is complex and might prove to be difficult for the unskilled user.

It is assumed, that you have access to the database and can manage it. First of all, create a table in a database. Select any existing user database or create a new one. The simplest way is to use the MySQL Administrator of the MySQL Server. This software ships with a standard distribution and you can find it in the "MySQL" menu in the "Programs" group. In this example, we created a table called "DATA_LOG" in the test database "test". A structure of the table is shown in Fig.20 below.

Serial port data aggregation. MySQL table

Fig.20. Serial port data aggregation. MySQL table.

Note that 4 columns have been added to the table, for all variables from both parsers and one ID column, which will contain an auto incremental value. You can add more columns if you want or use tables with your structure.

Note: You should specify unique columns names. Names which are reserved words of ANSI92 SQL cannot be used. In this example, we could use the name “Datetime” for the last column. However, as it is a reserved word, the name "DATESTAMP", has been used.

Now that our table is ready, the security within MySQL has to be addressed. Within MySQL, each user may be configured for access to specific tables only. In our example a new user could be created, or access could be granted for the table above to an existing user account. It is also possible to connect using an administrator account, which has full access rights. However, it is suggested that the administrator account be used for testing only. We have created the user with the name of "uvt" (see Fig.21).

Serial port data aggregation. The new MySQL user

Fig.21. Serial port data aggregation. The new MySQL user.

By default, the user does not have any rights. Access should be granted for this use for writing to our table (Fig.22).

Serial port data aggregation. The

Fig.22. Serial port data aggregation. The "uvt" user rights.

The "SQL Database Professional" plug-in uses a direct access method, but the plug-in depends on the "libMySQL.dll" file. You can download this system library from the MySQL home page or from our site and place a file from the archive to your Windows\system32 folder. With the direct access method you should configure connection parameters with your database within this plug-in only.

Ok, the database and table are both ready. Next go to the "SQL Database Professional" plug-in configuration window and open it using the common option on the left of the window (Fig.23).

Serial port data aggregation. SQL Database Prof. Enabling connection

Fig.23. Serial port data aggregation. SQL Database Prof. Enabling connection.

The disabled state of the tick-box at pos. #1 enables writing to the database and the radio button at pos. #2 specifies that the database is to be kept open. This serves to minimize the writing time, at the same time may lock out other users from writing. The radio button at pos. #3 allows you to reconnect to a database, when a connection is lost.

On the second page "Connection parameters" (Fig.24) you can specify the parameters of your database. Here select your database type "MySQL" (pos.1), specify the host and database name (pos. 2), the user name and the password (pos.3). You should test the connection. Just click the "Test connection" button (pos.4).

Serial port data aggregation

Fig.24. Serial port data aggregation. SQL Database Prof. Connection parameters.

In our example no additional connection parameters are specified.

On the third page "Handling errors" of "SQL Database Professional" plug-in (Fig.25), specify how the software should react to errors which occur while writing to a database.

Serial port data aggregation. SQL Database Prof. Handling errors

Fig.25. Serial port data aggregation. SQL Database Prof. Handling errors.

In this example, 3rd option (pos. #1) was checked as the data is important and we require the program to operate regardless of the error. The other variants are normally used when testing the plug-in module with a new database. The option at the pos. #2 allows you to write a data for an invalid SQL query to a temporary file and restore it later, when problems with the configuration will be fixed. The options at the pos. #3 allows you specify the restoring mode. If your SQL queue (from the next page) contains more than one SQL query and one query depends on another, then you may select first radio item in this group.

The last page "SQL queue" (Fig.26) is very important. On this page the SQL query and the fields that you require to be bound to the variables names are specified. This plug-in allows you to use your own SQL statements and insert the data as you want. For example, you may use stored procedures or insert the data to multiple tables.

Serial port data aggregation. SQL Database Prof. SQL queue

Fig.26. Serial port data aggregation. SQL Database Prof. SQL queue.

You can create SQL query by SQL query on this page by selection the "Action - Add SQL in to queue " menu item (Fig.26, pos. #3). In this case the plug-in will create an item (Fig.26, pos. #1) and allow you to edit a SQL query (Fig.26 pos. #2). You can access the SQL editor (fig.27) by clicking a button with dots, which appears by clicking on a value field (Fig.26, pos. #5).

Serial port data aggregation. SQL Database Prof. SQL editor

Fig.27. Serial port data aggregation. SQL Database Prof. SQL editor.

You should create a valid SQL statement in the SQL editor. You may use any syntax and commands, which are supported by database engine. You may use parameters in your statements like ":P1". The plug-in will automatically bind variables from the parser to these parameters, before executing the SQL statement.

After clicking the "OK" button the SQL editor the module will create parameter items in the SQL queue (Fig.26 pos. #3).

Each parameter item in the SQL queue has a number of properties:

  1. Parser item name - is a parser variable name, which has been created in the parser configuration. Select the variable name from a drop-down list, which appears while clicking on a link for this property. In this example the "WEIGHT" name doesn't exist in the list because this variable is redirected from another configuration. Therefore you should type this name manually;
  2. Database column's data type - is a database column data type. The module will try to convert a variable's data type to a column data type, using standard system functions. If your variable has a data type other than "string", specify the variable data type here;
  3. Default value - this value is to be used when data does not contain a value for a column or the variable is empty.

Click the "OK" button to close the SQL Database Professional plug-in configuration window as well as the "OK" button in the options window.

Okay, all settings have been completed and we are ready to capture the data to the database.

If you configured the SQL Database Professional module correctly, then while accessing the database the data logger will display messages in the drop-down box, at the bottom of the main window.

Related articles:

Capture a serial data to a Microsoft Excel spreadsheet (features: ASCII data parser with regular expressions, Excel export);

GPS data logger (features: ASCII data parser, data at fixed positions);

Weight data logger to a Microsoft Access database (features: ASCII data parser, data filter, data at fixed positions, export to Microsoft Access via ODBC);

Barcode data logger. Capture a barcode data from a serial port (features: ASCII data parser, data at fixed positions, export to a CSV file);

Barcode data logger. Capture barcodes to a log file (features: ASCII data parser, splitting by timeout, date/time stamps, advanced log file hints);

PBX data logger. Capture a serial data from PBX systems (features: ASCII data parser, data at fixed positions, export to Microsoft SQLServer 2000 via ODBC);

Log weight from a scale to a Microsoft Excel spreadsheet (features: ASCII data parser, data filter, data is separated by comma, export to a Microsoft Excel file);

Pressure data logger. Log data from an intellectual pressure measuring device (features: data query, ASCII data parser, at fixed positions);

Serial data acquisition in the Checkweigher Management Information System (features: ASCII data parser with regular expressions);

Serial port data aggregation. Combine a data of two different com-ports to one MySQL table row (features: ASCII data parser, aggregation, MySQL);

Serial port data and Excel. Real time charting. (features: ASCII data parser with regular expressions, direct excel export, charting);

Send serial port data to Excel via DDE. (features: dde server, charting);

Aircraft engine monitor (example of an usage, custom data parser module is developed for a customer);

RS232 to Excel. Four methods to send data from RS232 to Excel.