
JOIA - Ophthalmic Examination Equipment data parser
Project Overview
We've created a parser module that can extract data from XML data with the "JOIA" standard. The standard specification covers ophthalmic examination equipment. It is possible to handle multiple data sources such as a refractometer, keratometer, tonometer, and lensmeter.
It allows you to export data to Excel or a database easily or use our other data export plugins.
Tested equipment
- SHIN-NIPPON Accuref K-900
- SHIN-NIPPON Accuref K-800
- OCULUS Optikgeraete GmbH Corvis ST
- KOWA VX-20
- TOPCON KR-800
We suppose that the parser can be successfully used with other similar equipment.
Configure your equipment
The figures below show how to configure Accuref K-900. This device requires a straight RS232 cable and the "Format B" in the settings.
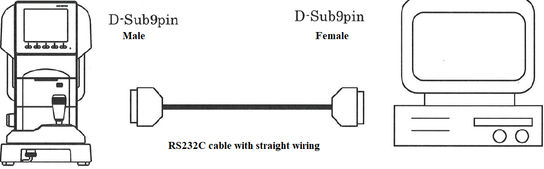
Figure.1. RS232 cable for Accuref K900
| DB9-1 | DB-2 | ||
|---|---|---|---|
| Receive Data | 2 | 2 | Receive Data |
| Transmit Data | 3 | 3 | Transmit Data |
| System Ground | 5 | 5 | System Ground |

Figure.2. Accuref K900 settings
Data example
The XML data example looks like
<Ophthalmology xmlns:xsi="http://www.w3.org/2001/XMLSchema-instance"
xmlns:nsCommon="http://www.joia.or.jp/standardized/namespaces/Common"
xmlns:nsREF="http://www.joia.or.jp/standardized/namespaces/REF"
xmlns:nsKM="http://www.joia.or.jp/standardized/namespaces/KM"
xsi:schemaLocation="http://www.joia.or.jp/standardized/namespaces/Common Common_schema.xsd
http://www.joia.or.jp/standardized/namespaces/REF REF_schema.xsd
http://www.joia.or.jp/standardized/namespaces/KM KM_schema.xsd">
<nsCommon:Common>
<nsCommon:Company>SHIN-NIPPON</nsCommon:Company>
<nsCommon:ModelName>ACCUREF K-900</nsCommon:ModelName>
<nsCommon:MachineNo></nsCommon:MachineNo>
<nsCommon:ROMVersion></nsCommon:ROMVersion>
<nsCommon:Version>1.2</nsCommon:Version>
<nsCommon:Date>2020-09-14</nsCommon:Date>
<nsCommon:Time>18:00:58</nsCommon:Time>
<nsCommon:Patient><nsCommon:No.>00002</nsCommon:No.>
<nsCommon:ID>0000000002</nsCommon:ID>
...
<nsKM:Average>
<nsKM:Radius unit="mm">8.01</nsKM:Radius>
<nsKM:Power unit="D">42.25</nsKM:Power>
</nsKM:Average>
<nsKM:Cylinder>
<nsKM:Power unit="D">-1.75</nsKM:Power>
<nsKM:Axis unit="deg">15</nsKM:Axis>
</nsKM:Cylinder>
</nsKM:Median>
</nsKM:L>
</nsKM:KM>
</nsKM:Measure>
</Ophthalmology>
Requirements
1. Log Monitor & Export. License type: Professional, Enterprise, or a trial version.
2. JOIA Data Parser plugin.
3. SQL Database Pro, the full version (purchased separately), or the trial version.
Step 1: Configure the equipment connection.
Typically, the serial port is used for connecting to the equipment. So you need to create a new configuration and configure the COM port settings (figure 3). The COM port can be either real or virtual. For example, you can obtain data via an RS232-to-USB adapter. The connection parameters depend on equipment settings.

Figure 3. COM port settings
Step 2: Select a parser.
You need to select the JOIA module as a parser (figure 4). You may download the JOIA parser here if it does not exist in the list. You don't need to configure any additional settings for the parser.

Figure 4. Select a parser
Step 3: Select and configure the data export module.
For example, here, you can see how you can export data to an MS SQL database running on the same computer.
Before you can do that, you need to use SQL Server Management Studio to create a database table. Possibly, you will also want to create a separate database. You can download a sample SQL script for creating a database table from here.
Then you need to enable the SQL Database Pro data export module (figure 5) and configure the database connection (figure 6).
After that, add an SQL query for writing data to the queue and bind parser variables to the SQL query parameters (figure 7). You can download a sample SQL script for inserting data from here or load a preconfigured queue from the file.

Figure 5. The data export module
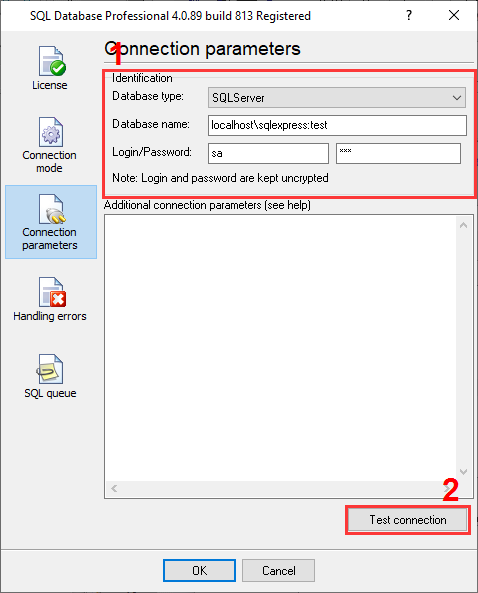
Figure 6. Connection settings

Figure 7. SQL queue
Then save all the changes (click "OK" in each settings window, which will also close the window).
You may download the backup copy of this configuration here and restore it from the "File" menu in the main window.
Related articles: JOIA - Ophthalmic Examination Equipment data parser
Related topics: Log Monitor & Export
hereLog monitor Log monitoring RS232 pinout and signals Cables and signals Data monitor cables