
Log RFID Reader Data to SQL Database: A Step-by-Step Guide
Configuring data writing to a Firebird database
Prerequisites
- The database engine has been installed (https://www.firebirdsql.org).
- ODBC drivers for the database have been installed (https://www.firebirdsql.org/en/odbc-driver/ , regardless if you have a 32-bit or 64-bit operating system, install the 32-bit version of the ODBC driver).
- A database file for storing data has been created.
- A user has been created in that database, who will be given the right to write data to a database table.
Creating a table for storing the data
Below you can see the recommended SQL script for creating a table, a trigger, and a sequence. The "SYSDBA" user should run this script.
CREATE GENERATOR TAG_DATA_ID_SEQ;
SET GENERATOR TAG_DATA_ID_SEQ TO 0;

CREATE TABLE TAG_DATA
(
    ID int  primary key,
    TAG_ID varchar(32) not null,
    DATE_TIME_STAMP timestamp default current_timestamp,
    TAG_ANTENNA_ID int,
    TAG_FIRST_SEEN timestamp,
    TAG_LAST_SEEN timestamp,
    TAG_SEEN_COUNT int,
    TAG_OUT_OF_FOV int
);

set term !! ;
CREATE TRIGGER TAG_DATA_BI FOR TAG_DATA
ACTIVE BEFORE INSERT POSITION 0
AS
BEGIN
 	if (NEW.ID is NULL) then NEW.ID =  GEN_ID(TAG_DATA_ID_SEQ, 1);
END!!
set term ; !!
Selecting and configuring the data export module
To write data to the Firebird database, use the "ODBC database" module. You can select it on the "Data export" tab (Figure 6).

Figure 6: Selecting the data export module
To configure the module, select it in the list, and click the "Configure" button below the module list.
Enable writing to the database when a window appears (Figure 7).

Figure 7: Enabling writing to the database
On the "Connection" tab (Figure 8), click the "Configure" button and add the System ODBC data source (Fig. 9 and 10).

Figure 8: Configuring the connection
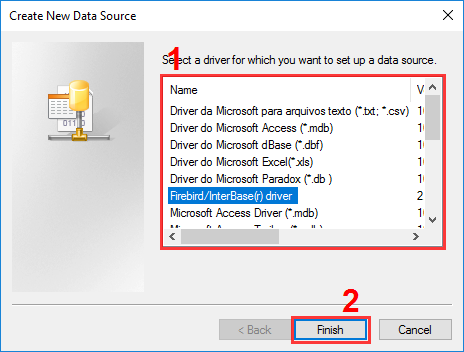
Figure 9: Adding a data source
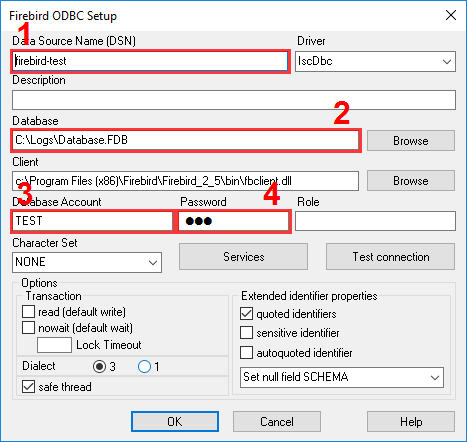
Figure 10: An example of configuring a connection with the local copy of the Firebird database
After closing the ODBC connections administrator window, click the "Update" button and select the newly created connection in the drop-down list.
Switch to the "Linking" tab (Figure 11) or click the "Import" button. If the connection to the database was configured correctly, the application would prompt you to import the table structure from the database (Figure 12).
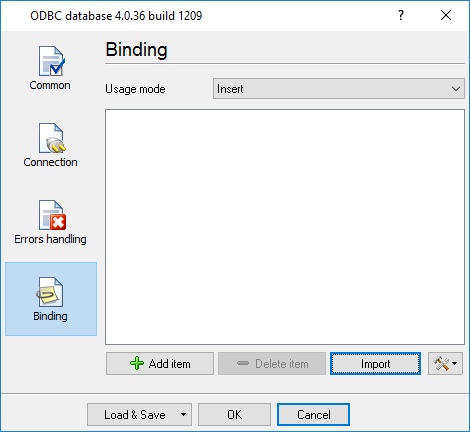
Figure 11: Configuring linking
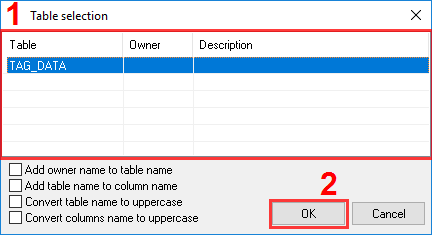
Figure 12: Importing the table structure
After importing the table structure, link table columns, and parser variables (Figure 13).

Figure 13: Importing the table structure
The trigger automatically fills the "ID" column in the test table, so you can safely delete that column from the list of linked columns and variables.
Save all settings of the module by clicking the "OK" button.
Now, when new data are received from the reader, the application will automatically write them to the database. If the write is successful, the application’s event log will display a message about that (Figure 14).

Figure 14: The message about successful write
Tip: To display values and variables in the application’s main window (see Figure 14), you may want to set the data view, as shown in Figure 15.

Figure 15: Configuring the data view
Related articles: Log RFID Reader Data to SQL Database: A Step-by-Step Guide
RFID
Related topics: Advanced TCP/IP Data Logger
hereSerial port interface RS232 pinout and signals Cables and signals Data monitor cables