
Connecting MODBUS Devices to SQL Databases with Datatag Link
Step-by-Step Tutorial: Connecting a MODBUS Slave Device to an SQL Database Using Datatag Link
This tutorial will guide you through the process of connecting a MODBUS slave device to an SQL database (e.g., MySQL, MariaDB, PostgreSQL, MS SQL Server) using the Datatag Link software utility. By the end of this tutorial, you will be able to read data from a MODBUS device and store it in an SQL database in real-time.
Why Connect a MODBUS Slave Device to an SQL Database?
Connecting a MODBUS slave device to an SQL database can be essential in various industrial and data management scenarios. Here are some key reasons:
- Data logging: Store historical data from MODBUS devices for analysis and reporting.
- Centralized data management: Centralize data from multiple MODBUS devices into a single SQL database for easier access and management.
- Integration with business systems: Facilitate integration with business intelligence (BI) tools, dashboards, and other enterprise systems.
- Scalability: SQL databases are highly scalable, making them ideal for storing large volumes of industrial data.
- Automation: Automate data storage processes, reducing manual intervention and improving efficiency.
Connecting a MODBUS slave device to an SQL database can make data more accessible, improve system interoperability, and enable advanced analytics and automation.

How It Works
In this tutorial, Datatag Link acts as a bridge between a MODBUS slave device and an SQL database, enabling real-time data storage. Here's how it works:
- MODBUS communication: Datatag Link polls data from the MODBUS slave device at the specified interval.
- SQL communication: The program writes the polled data to the specified table and column in the SQL database.
- Tag linking: By creating a tag link, Datatag Link ensures that any change in the MODBUS register value is automatically written to the SQL database.
- Real-time logging: All data transactions are logged in real-time, allowing you to monitor the communication and troubleshoot any issues.
The Setup Steps
Step 1: Install and launch Datatag Link
- Download and install: If you haven't already, download Datatag Link from our website. During installation, select the necessary connectors on both sides (left side: MODBUS, right side: SQL).
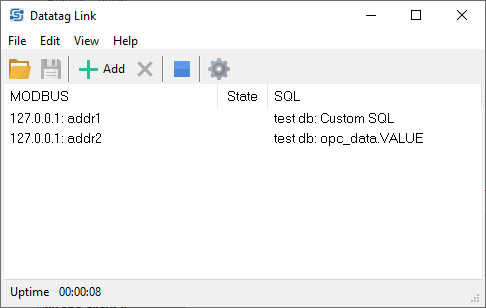
- Launch the program: After installation, launch Datatag Link. The main window will open, displaying the Tag list, Toolbar, and Status panel.
Step 2: Configure the MODBUS slave device
- Add a new connection:
- Click the Add button on the toolbar.
- Click Add under the Connection section in the appeared dialog window to configure a connection to your MODBUS slave device.
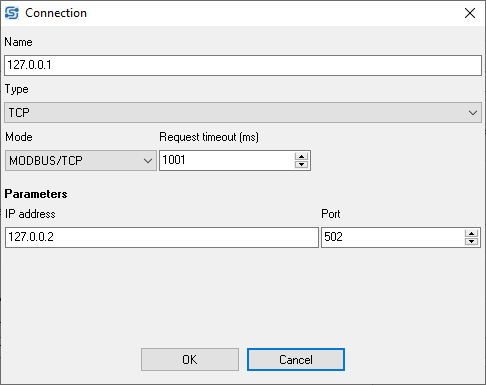
- Name: Type a display name for your connection (e.g., "PLC1").
- Type: Choose MODBUS RTU or MODBUS TCP, depending on your device's connection type.
- Device address: Enter the address of the MODBUS slave device (e.g., 1).
- For a connection via COM port: You should select the COM port number, specify baud rate, number of data bits, stop bits related to your MODBUS device.
- For a connection via TCP: You should specify the IP address and port (usually, 502).
- Click OK to save the MODBUS connection settings.
- The new connection will appear in the Connections list. Later, you can reuse this connection for other links.
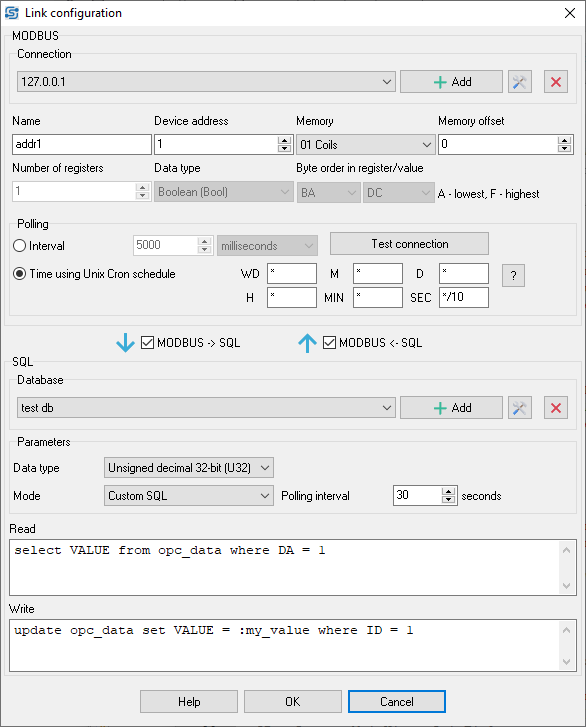
- Set MODBUS value parameters:
- Name: Enter a descriptive name for the single value (e.g., "Analog input 1").
- Memory area: Select the memory area (e.g., Holding Registers).
- Memory offset: Enter the offset for the register you want to read (e.g., 0). Please check the registers map for your device in the device documentation.
- Data type: Specify the data type (e.g., Unsigned decimal 16 bit).
- Polling interval: Set the interval for polling data from the device (e.g., 1000 ms).
Step 3: Configure the SQL database connection
- Add a new connection:
- Click the Add button in on the "SQL connection" bottom panel.
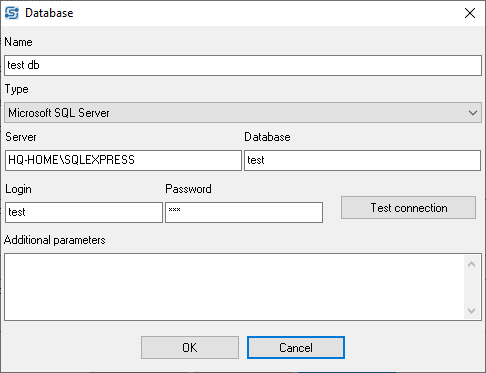
- Name: Enter a descriptive name for the database connection (e.g., "MySQL Database").
- Type: Select the type of SQL database (e.g., MySQL, MariaDB, PostgreSQL, MS SQL Server).
- Server: Enter the IP address or hostname of the SQL server.
- Database: Enter the name of the database.
- Login and Password: Provide the credentials for accessing the database.
- Test Connection: Click this button to verify that Datatag Link can connect to the database.
- Click OK to save the SQL database settings.
- After this, the new database connection will appear in the list. You can also reuse it later. Moreover, you can mix different MODBUS connection with different SQL database connections (e.g., PLC1 - Database 2).
- SQL data value:
- Table and Column modes: Specify the table name and column where the MODBUS data will be stored.
- Row ID field: Enter the column name that acts as the primary key (e.g., `id`).
- Data type: Ensure the data type matches the MODBUS register's data type.
- Interval: Set the interval for checking and writing new data to the database (e.g., 1000 ms).
- Data transfer direction: You can select the allowed data transfer directions. For example, you can prohibit transfers from SQL to MODBUS.
- Click OK to save the settings for your link.
- The new link will appear in the Tag list in the main window.
Step 4: Save and test the configuration
Save the configuration
- Go to File → Save to save the current configuration.
- This ensures that the settings are loaded automatically the next time you launch the program.
Step 5. Verify the connection
:In the Status Panel, check for the symbols "<" or ">" to confirm data transmission from the MODBUS device to the SQL database.
Test the connection
- Monitor the Status Panel for any errors or warnings.
- Use the Transactions File option under the View Menu to check the data exchange logs.
- Verify that data from the MODBUS device is being written to the SQL database by querying the database.
FAQ
For more detailed instructions, check out the full Datatag Link manual.
Q1: Can I connect multiple MODBUS devices to a single SQL database?
A: We've shortly mentioned this above. Yes, Datatag Link supports connecting multiple MODBUS devices to a single SQL database. You can configure each device individually and link them to different tables or columns in the database.
Q2: What if my MODBUS data type doesn't match the SQL column type?
A: Datatag Link automatically handles data type conversion between MODBUS and SQL. You can also manually specify the data type for each tag to ensure compatibility.
Q3: How do I troubleshoot connection issues with the MODBUS device or SQL database?
A: If you encounter any problems, firstly, check the following:
- Check the Message log in Main windows → Menu → File for any error messages.
- Ensure that the MODBUS device and SQL database are running and accessible.
- Use the Test Connection feature to confirm that Datatag Link can communicate with both the MODBUS device and SQL database.
- Verify the MODBUS device address, memory area, and SQL database credentials.
- Use 3rd party tools to check connection with the MODBUS device and your database.
Connecting Two OPC Servers: From OPC DA Server to OPC UA Server
OPC Tag Grouping From Different OPC DA Servers To OPC UA
Connecting an OPC Client/Server to an SQL Database Using Datatag Link
Connecting an OPC Client to an MQTT Broker In Real-Time
Linking Tags In Two MODBUS Slave Devices In Real-Time
How to Connect a MODBUS Slave Device to an SQL Database
Log OPC DA, UA, HDA, AE data to SQL or Excel
Log Data From Various Data Sources In One Application
Related topics: Datatag Link
hereData Logger Suite | Logger for OPC DA UA HDA AE | Connect OPC servers | OPC Tags Grouping