OPC-ODBC Bridge: Insert OPC Data into MS Access via ODBC
Objective:
Several OPC tags are to be controlled and recorded to a database. Each variable is to be put in its own column.
A table in the MS Access database has the following structure:

Fig.1. OPC ODBC. Table structure
This table structure is convenient with a small number of variables that are to correspond with a certain timestamp.
Requirements:
- Advanced OPC Data Logger Professional, Enterprise, or a trial version;
- DDE Server module for OPC logger (optionally, for testing purposes);
- ODBC Database module for OPC logger.
Assumptions:
You have worked with OPC servers already. You can establish a connection between an OPC client and an OPC. You know how to browse the server's address space and select OPC tags.
Solution:
We need to add our variables to our OPC logger. We need to add the configuration to the application if you haven't done that earlier. To create a configuration, use the button with the plus in the application's main window. In the dialog window that appears, go to the "OPC Settings" tab (Fig.2).
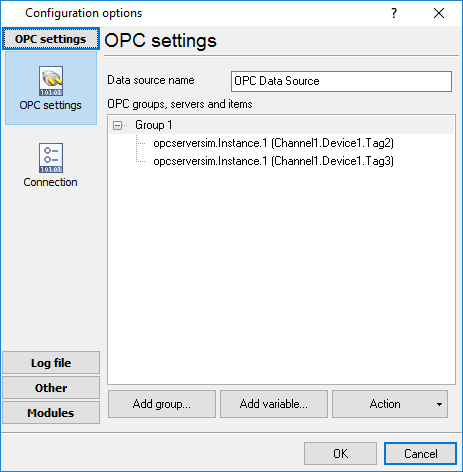
Fig.2. OPC ODBC. OPC Settings
On this tab, we need to create:
- An OPC tag group and define its properties (Fig.3.);
- Add necessary OPC tags (Fig.4.).
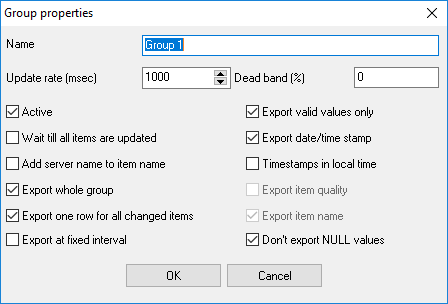
Fig.3. OPC ODBC. Group properties
If the "Active" option is enabled, data is gathered from the OPC server and exported.
If the "Export whole group" option is enabled, data from the entire group is exported simultaneously. If the value of the variable has changed, exported is the new value; otherwise, exported is the previous value from the internal buffer. That means that each column in the database will have its own value. If this option is disabled, the data can be recorded in the database as four columns (which are selected with additional options):
- Variable name
- Variable value
- Variable quality
- Variable timestamp
Example of data in the application's main window if the option is enabled:
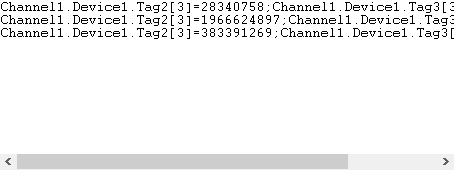
Each variable has a unique name. This is the name the variable will be exported with (Fig.5).
Example of data in the application's main window if the option is disabled:
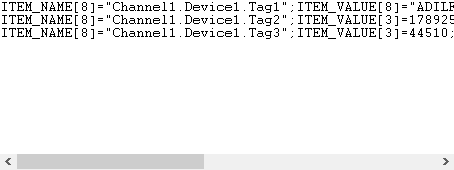
All variables have the same name:
- ITEM_NAME - variable that contains the name of the modified OPC tag.
- ITEM_VALUE - variable that contains the value of the modified OPC tag.
- UPDATE_DATE_TIME - variable that contains the timestamp of the modified OPC tag.
- ITEM_QUALITY - variable that contains the quality of the modified OPC tag.
In this example, we need to export each OPC variable to its own column. Therefore, the "Export whole group" option must be enabled. As a result, after the variables have been updated, we will see the data to be exported in the application's main window (Fig.5).
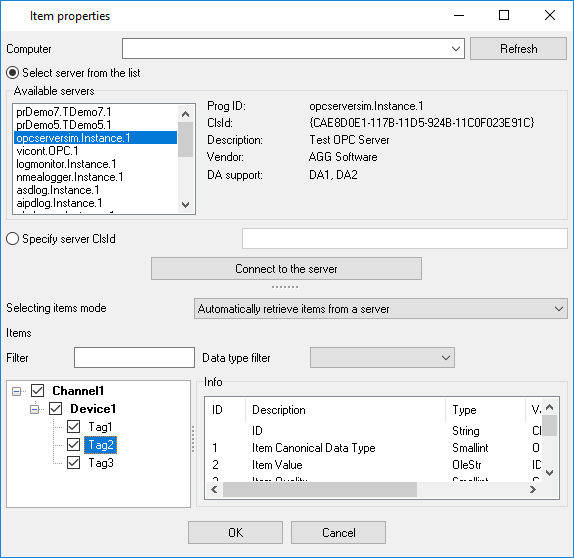
Fig.4. OPC ODBC. Adding OPC variables
- Enter the name of the computer that runs the OPC server and then click the "Refresh" button. If the server runs on the local computer, leave this field blank or enter LOCALHOST in it. To enable accessing remote servers, you need to install the OPC Core Components Redistributable suite, which you can freely download from the opcfoundation.org website. Then configure DCOM for accessing remote servers.
- Select the server name from the list. If the server is not on the list, you have not properly configured DCOM or have not installed OPC Core Components Redistributable. In this case, you can enter the server's unique ID in the "ClsID" field. Once the server is selected, click the "Connect" button.
- On the list of variables that appears, select the tags you want to add. If the list is empty, the server doesn't support receiving variable lists. Then enter the variable list manually.
- Click "OK" to add the variables to the selected group (Fig.2).
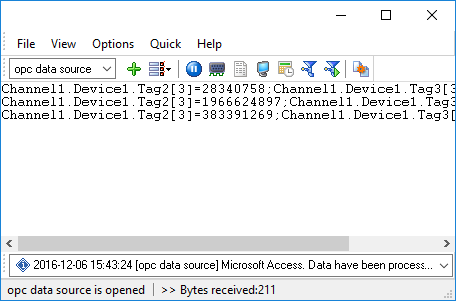
Fig.5. OPC ODBC. Application's main window.
Figure 5 shows the structure of the data being exported. Each value contains three parts:
- The variable name is before square brackets. This name is to be used in data export modules.
- The data type code is in square brackets. The application uses this parameter during exporting to covert data between source and destination data types.
- Value (after the "=" character).
If the "Export one row for all changed item" option on figure 3 is enabled, the data will be exported as a single line, as shown in figure 5. This option is mandatory when exporting to a database. If this option is disabled, the data will look as follows:

I.e., only changed values are exported; each variable is exported as a single line, which is convenient for reading and writing to a log file.
Now we need to configure exporting data to a database. For that, go to the "Modules-Data Export" page (Fig.6)
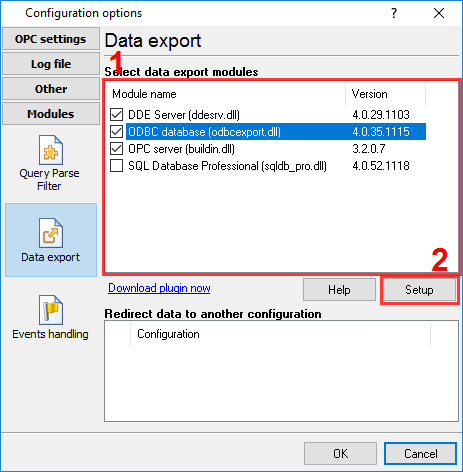
Fig.6. OPC ODBC. Selecting data export modules.
Here you can activate the DDE server module to make sure that the data is ready for exporting. Activate the module on the list and then click "OK" to apply changes. Then open this page again and select the DDE server module on the list and then click the "Configure" button. In the window that appears, the "Active items" tab should display the variables that were added earlier (Fig.7).
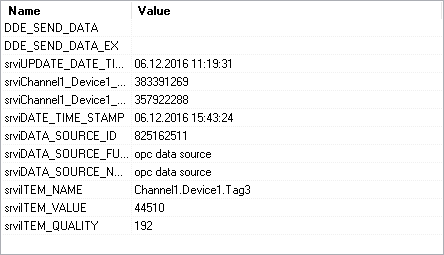
Fig.7. OPC ODBC. Active variable.
Now we need to configure the "ODBC database" data export module for inserting data to a Microsoft Access database. Activate this module on the list (Fig.6) and then click the "Configure" button.
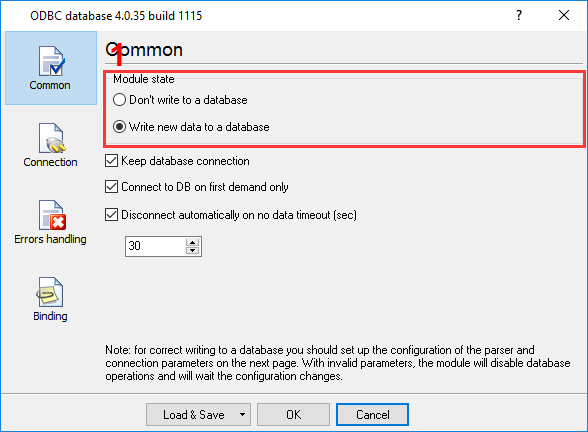
Fig.8. OPC ODBC. Configuring export to a database.
Activate the options shown in figure 8. These options include writing to a database; with that, the connection with the database will be permanent and will be established only during the first time it is necessary.
On the first page (Fig.9) do the following:
- Select the name for the ODBC connection. If no existing ODBC connection is available, you can create one in the ODBC connections system manager by clicking on the "Options" button and then clicking "Refresh";
- Enter the path and name to the existing Microsoft Access database.
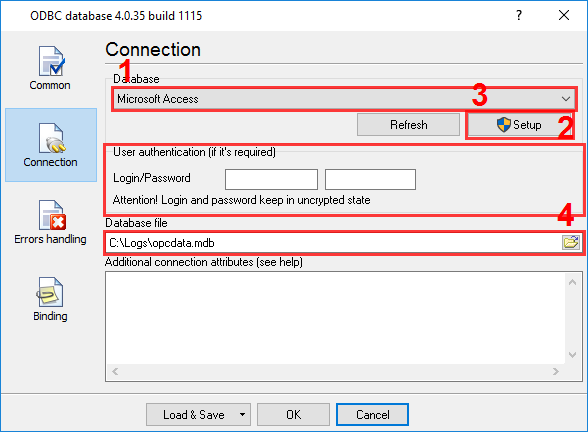
Fig.9. OPC ODBC. Configuring connection to a database.
Next, you need to "bind" the name of the OPC variable with the column's name in the table. You can do that on the "Binding" tab (Fig. 10).
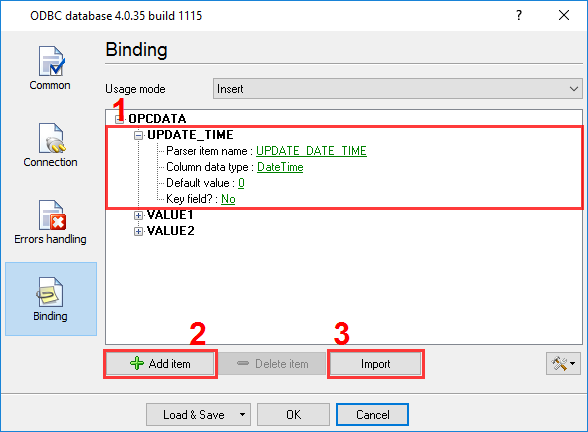
Fig.10. OPC ODBC. Binding variables with table columns.
Before you "bind" the variables and the columns, you will need to import the description of the table from the database or compose it manually by clicking on the "Add" button for each necessary column. But it is much simpler to import a description by clicking "Import" (Fig.11).
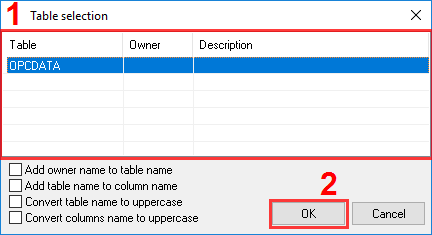
Fig.11. OPC ODBC. Importing table description.
To import a table description:
- Click Import and accept clearing the variable list.
- Select the table from the list and then click OK.
- The description of the columns will be copied to the "Binding" tab. You can delete unnecessary columns (e.g., in this example, the ID column contains a counter, which increases automatically) and enter the variable name in the "Parser variable name" field. Ensure that the data type of the variable matches the column's data type; otherwise, errors will occur during the data export process.
Click "OK" in all dialog windows to apply changes. If everything is configured correctly, the application's main window will show the messages on the successful export of data (Fig.12) (if the protocol is activated in the application's settings), and the data will be inserted into the table (Fig.13).

Fig.12. OPC ODBC. Messages protocol.
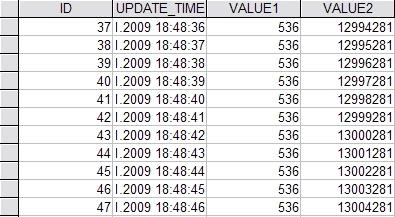
Fig.13. OPC ODBC. Inserted data.
An archive with a test OPC server, database and software configuration can be downloaded here. To use the files from the archive:
- Launch the OPC server once before using the prepared configuration.
- Import the configuration (the file with the *.ini extension) (File - Restore from backup).
- Edit the path to a database in the properties of the data export module.
Related articles: OPC-ODBC Bridge: Insert OPC Data into MS Access via ODBC
- Inserting OPC data to MS Access database through ODBC (features: adding groups and items, inserting to an ODBC database)
- Adding a timestamp in the CSV file (features: OPC groups)
- How to log OPC data to a SQL database.
- OPC to MSSQL: Writing a lot of OPC tags to MS SQL 2008 database
- OPC to MSSQL: Writing several OPC tags to separate columns
- OPC to MySQL: Writing OPC tags to MySQL 5 database
- OPC to a database: Writing OPC tags to a database
- OPC to Excel: Writing OPC data to Excel
- Filtering data by a tag value and write data to a database only when the value will change
- Filtering data out if an OPC tag value is not equal to a specified value
- Processing or storing OPC data by an event from the OPC server
- Aggregating data from multiple servers to one OPC server
Related topics: Advanced OPC Data Logger
hereOPC Logger RS232 pinout and signals Cables and signals Data monitor cables