
Connect modern IP PBX to CheckInn and PhoneMon using PBX Logger
This tutorial explains how to connect a modern IP PBX to the proven CheckInn system and its PhoneMon module by InnSoft using PBX Data Logger and TCP COM Bridge.
Of course, this method will also work for other PBXs and PMS systems (CmPBX CMS, Holidex PMS, Micros PMS, InnForm XL PMS).
When and why to connect a modern IP PBX to CheckInn:
- You already use CheckInn/PhoneMon for workflow, billing, or front-desk operations.
- Replacing CheckInn isn't feasible, but you're upgrading to an IP PBX.
- You need to keep existing reports, automations, and staff processes while adopting SIP/IP features.
Pain points and main issues:
- CheckInn/PhoneMon expects serial (COM) style data, not TCP/IP packets.
- Message formats, encoding, and timing differ between PBX models.
How PBX Data Logger helps as middleware:
- Listens to the IP PBX over TCP/UDP and captures raw messages reliably.
- Splits raw messages into standard CDR values like timestamps, caller and called numbers, duration, etc.
- Combines a new data packet in the necessary format (Mitel SX 200 EL).
- Sends a new data packet to a destination.
How TCP COM Bridge helps:
- Converts TCP/IP data from the PBX (or PBX Logger) into a virtual COM port stream.
- Presents data in the serial format that PhoneMon expects, so CheckInn can read it.
- Handles port configuration (baud, parity, flow) related to the PhoneMon settigns.
- Lets you keep the modern IP PBX while feeding CheckInn/PhoneMon as if it were a serial PBX.
By the end, you'll have a stable path: IP PBX → PBX Data Logger (capture/normalize) → TCP COM Bridge (TCP to COM) → PhoneMon/CheckInn, with raw logs available for troubleshooting and audits.
Prerequisites
- Grandstream UCM6304A reachable over the network.
- PBX Data Logger installed on a Windows host with network access to the UCM.
- TCP COM Bridge for COM port integration with PhoneMon.
- Admin access to both UCM6304A and CheckInn/PhoneMon.
Network and UCM6304A preparation
- Decide on a transport and port:
- Grandstream UCM can send CDR/call detail data over TCP/UDP. For stable framing, use TCP.
- Choose a dedicated port (for example, 5100) on the PBX Data Logger host.
- Configure UCM6304A to send events:
- Log in to the UCM web UI.
- Go to System Events or CDR Export (depending on the exact firmware and event source you want).
- Set the destination to the PBX Data Logger host IP and the chosen TCP port (e.g., 192.168.1.50:5100).
- Select the CDR format.
- Apply and save settings.
Step 1 - Configure a TCP connection in PBX Data Logger
- Create a new data source:
- Open PBX Data Logger.
- Add a new data parser/source (click the "Plus" button in the main window).
- In the "Port" or "Server" settings, select TCP Server mode.
- Set Listen IP to the logger host IP (or 0.0.0.0 to listen on all interfaces).
- Set Listen Port to the chosen port (e.g., 5100).
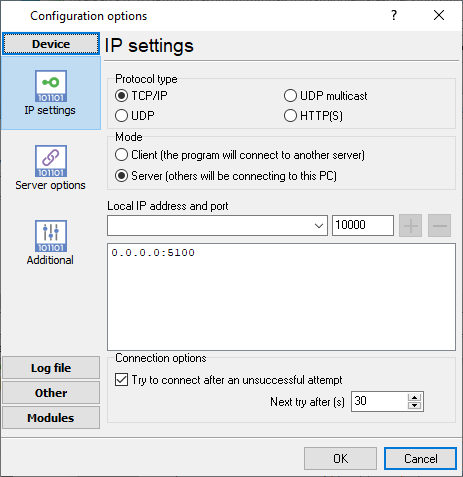
Figure 1. TCP settings for incoming CDR data
- Save and start the source:
- Click the "OK" button to apply the settings.
- Start listening. Confirm the TCP port accepts incoming connections using PuTTY or Telnet as a test client.
Step 2 - Configure logging of incoming raw data
- Enable raw capture:
- In the data source, enable "Write to log received data".
- Choose a mode: Write to log before parsing.
- Choose a folder (e.g., C:\Logs).
- Filename prefix: ucm6304a.
- Filename mode: Daily.
- Filename extension: log.
- Add logger-side timestamps for each received frame (optional).
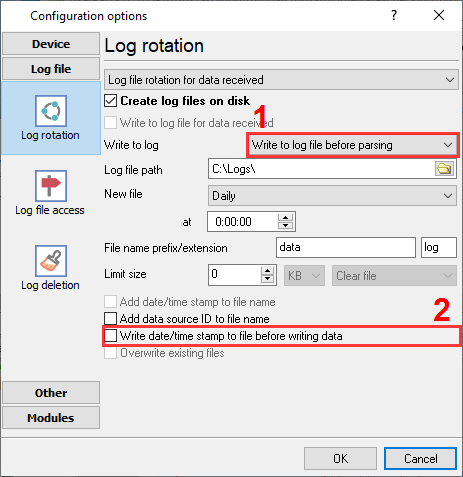
Figure 2. Log file settings for incoming data
- Verify:
- Generate a test call on the UCM.
- Confirm lines appear in the main window.
- Confirm lines appear in the raw log exactly as received.
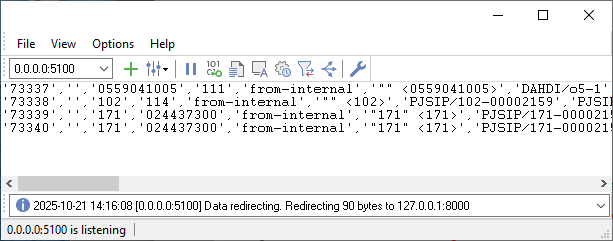
Figure 3. Grandstream incoming data example
Step 3 - Configure data parsing for Grandstream UCM6304A
- PBX Data Logger includes the ready-to-use parser for "Grandstream UCM6300". You should select it in "Configuration → Modules → Query Parse Filter → Data parser → Grandstream UCM6300 [Real-time]".
- Configure the logger to show parsed values ("Configuration → Other → Data view → Display parsed value").
- Click the "OK" button to apply the settings.
- Place several calls (inbound, outbound, missed, answered).
- Inspect parsed records in PBX Data Logger's main window.
- Compare against raw logs to ensure accuracy.
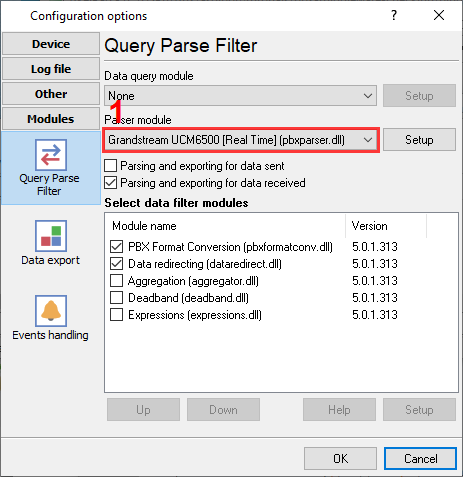
Figure 4. Grandstream data parser
Step 4 - Configure PBX format conversion using the corresponding filter plugin
- Select the "PBX Data Conversion" filter plugin in "Configuration → Modules → Query Parse Filter → Filters":
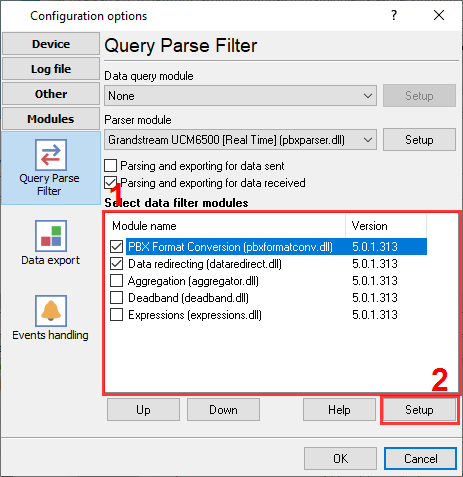
Figure 5. Enabling data conversion plugin
- The plugin implements the necessary field mapping between the source data and a record that PhoneMon expects.
- Trims spaces, normalizes CRLF.
- Normalizes and formats all text fields.
- Stores the prepared new data packet in the "NEW_DATA_PACKET" variable for further processing.
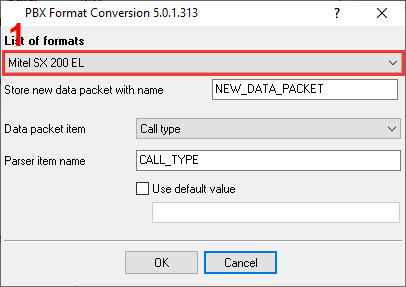
Figure 6. Configuring data conversion plugin
- Enable data redirecting to another configuration using the "Data redirection" plugin.
- Specify the destination address like 127.0.0.1:8000.
- Specify the "NEW_DATA_PACKET" variable name as a source of redirected data (defined in step 4.1).
- Place this plugin below the "PBX Data Conversion" plugin in the list of filter plugins.
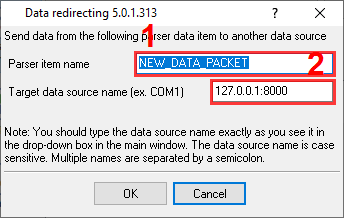
Figure 7. PBX Data Redirection
Step 5 - Configure data redirection to another TCP connection
- Create an outbound TCP connection in PBX Data Logger:
- Add a new configuration in the main window by clicking the "Plus" button.
- Configure the TCP port connection as "TCP Client".
- Set the target host and port to the next hop (e.g., TCP COM Bridge on 127.0.0.1:8000 or another system). This address and port should match the address in step 4.2.
- Choose reconnect behavior: auto-reconnect after 1 second.
- Click the "OK" button to apply the settings.

Figure 8. Outgoing connection settings
Step 6 - Configure a connection in TCP COM Bridge
- Start TCP COM Bridge.
- Create a new connection by selecting the "Devices - Add" menu item.
- Select "COM9" in the COM port settings and tick the "Create virtual COM port" box.
- In the TCP settings, select the TCP server mode and listen on 127.0.0.1:8000.
- Leave other settings by default.
- Click the "OK" button to apply the settings.

Figure 9. Virtual COM port settings

Figure 10. Local TCP link settings
Step 6 - Test the redirection:
- Point PhoneMon to the new virtual COM9 with appropriate serial settings (baud/parity can be defaults if virtualized).

Figure 11. PhoneMon port settings
- Place test calls; verify records reach PhoneMon via the COM port.
Monitoring and troubleshooting
- PBX Data Logger allows you to switch between incoming and outgoing data views in the main window to watch connection status and message throughput.
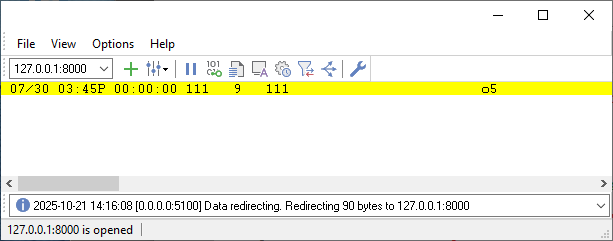
Figure 12. Transformed and redirected data
- TCP COM Bridge shows incrementing byte counters in the main window for incoming and outgoing data.
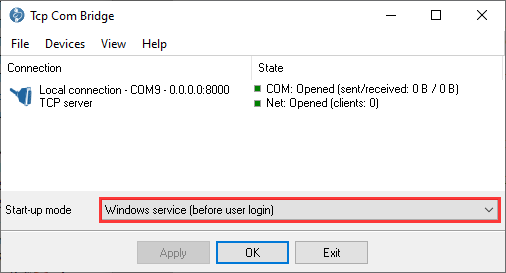
Figure 13. Byte counters in TCP COM Bridge main window
- Check raw logs for any parsing mismatches; adjust filters accordingly.
- If you see framing or other COM errors in PhoneMon, compare the COM port settings on both sides (TCP COM Bridge and PhoneMon).
- For missing events, confirm UCM6304A is sending the right event types and destination.
- Keep daily raw logs for audit; rotate and archive automatically.
Configuration template
Please download the example configuration and use it as a starting point:
- Download it to your computer.
- Load the configuration file using the "File → Restore configuration backup" menu.
- Adjust the necessary communication settings.
Related articles: Connect modern IP PBX to CheckInn and PhoneMon using PBX Logger
- How to install PBX Logger with ODBC Database (required for PBX Reports).
- How to configure logging to the database using the ODBC Database module (manually, for new connections).
- How to configure logging to the database using the SQL Database Pro module.
- How to create an ODBC data source.
- Check the parser's operation.
- Log additional data from your PBX.
- How to view data in PBX Reports.
- Possible problems when the program is running as a service.
- Use Advanced PBX Data Logger as middleware between a PBX and another information system (PMS or CRM).
- Connect modern IP PBX to CheckInn and PhoneMon using PBX Logger.
- How to configure logging to a file before parsing.
Related topics: Advanced PBX Data Logger
hereCall logging Call accounting SMDR to SQL SMDR Listener Cables and signals