How to configure logging to the database using the ODBC Database module
Preliminary requirements
If you are going to use an MS SQL Server, MySQL, or Oracle database, create a database with tables for storing data. You may find the corresponding SQL script or MS Access database file in "C:\ProgramData\Advanced PBX Data Logger\data" or in the "program folder\data" (for example, C:\Program Files (x86)\Advanced PBX Data Logger\data\). Note: the logger cannot automatically create a database for you. Maybe, you prefer to re-install the program. The installation wizard can create a database for you.
For MySQL or Oracle, you need to install the latest 32-bit version of ODBC drivers separately.
Download links:
MySQL ODBC Driver 32 bit
Oracle Basic Instant Client Library 32 bit
Solution
You need a database you want to use our PBX Reports utility. The logger writes all incoming data to a database in real-time, and PBX Reports works with the prepared data.
If you have already installed our software, the following tutorial describes how to configure a connection with a database.
1. Create a new configuration (if you haven't done it yet)
- If you do not have any configurations yet, you may click the "Green Plus" button in the program's main window and configure everything manually. But please consider to re-install the program from scratch and select the necessary options. The installation wizard will prepare all the required settings.
- If you have a working configuration already, then clone the working configuration "Main menu → Options → Manage configuration → Clone."
2. Configure a connection to your PBX.
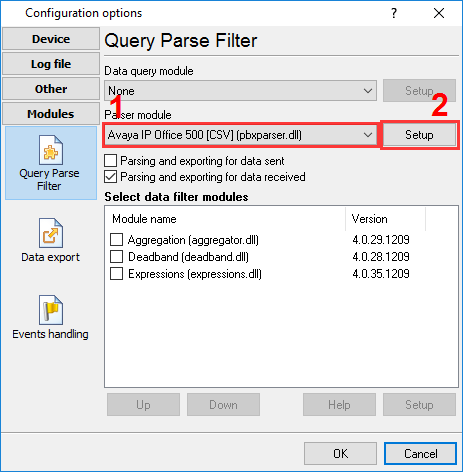
3. Switch to the "Modules → Query Parse Filter" tab and select a parser for your PBX (Figure 1).
Note: A lack or incorrect operation of the parser may prevent data from being written to the database. The next section describes how to check the parser's operation.

Figure 1. Selecting a parser
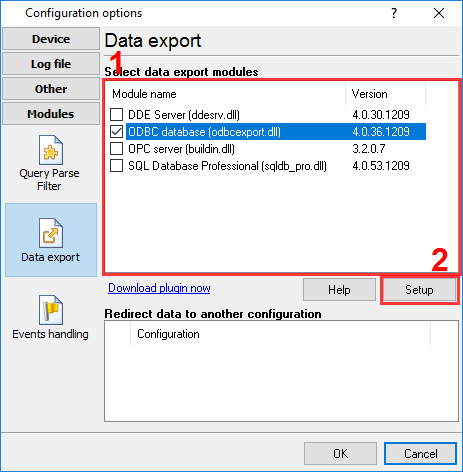
4. Switch to the "Modules → Data export" tab and check the "ODBC database" checkbox (Figure 2).

Figure 2. Selecting a data export module
5. Open the data export module's settings by double-clicking the module's name.
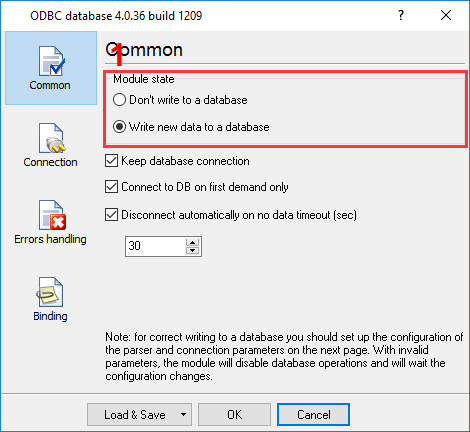
6. Click the "Load & Save" button (Figure 3), and select:
- "PBX-Logger-ODBC-Items" - if you are going to write data to a MySQL, MS SQL Server, or Oracle database.
- "PBX-Logger-ODBC-Access" - if you are going to write data to an MS Access database.
7. Switch to the "Common" tab (Figure 3) and enable data logging to the database.

Figure 3. Enabling logging to the database
8. Switch to the "Connection" tab.
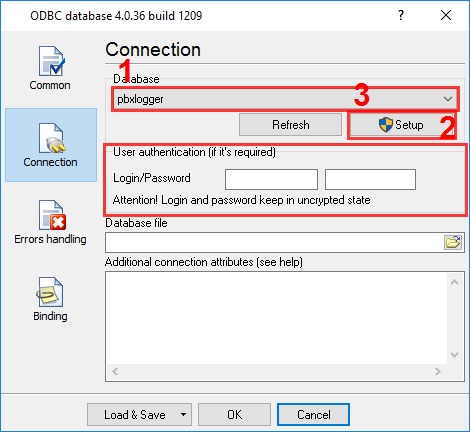
8.1. If you already have an ODBC data source, select it from the list (Figure 4).
8.2. If you do not have any ODBC data source yet, click the "Setup" button and create a system ODBC data source. For more details, see the next section. After creating the data source, click the "Refresh" button and select the newly created data source in the list.
8.3. If you use the MS Access database, you should specify or select the database file (*.mdb) in the "Database file" field. You can find the empty database template in "C:\ProgramData\Advanced PBX Data Logger\data" or "program folder\data\". Then you should copy it to an accessible folder like "C:\Logs\pbxdata.mdb", and after this, select the copied database in the plugin settings.

Figure 4. Selecting an ODBC data source
9. Switch to the "Binding" tab and check that the list contains a description of database columns. If the item list on that tab is empty, go to step 6.
10. Click "OK" and save all changes both in the ODBC database settings window and in the module selection window.
Now each time new data are received, the program will write them to the database in real-time. If you use the "PBX Reports" utility, you need to click the "Refresh" button on the "SMDR data" tab. Reports use real-time data without clicking the "Refresh" button.
Related articles: How to configure logging to the database using the ODBC Database module
- How to install PBX Logger with ODBC Database (required for PBX Reports).
- How to configure logging to the database using the ODBC Database module (manually, for new connections).
- How to configure logging to the database using the SQL Database Pro module.
- How to create an ODBC data source.
- Check the parser's operation.
- Log additional data from your PBX.
- How to view data in PBX Reports.
- Possible problems when the program is running as a service.
- Use Advanced PBX Data Logger as middleware between a PBX and another information system (PMS or CRM).
- Connect modern IP PBX to CheckInn and PhoneMon using PBX Logger.
- How to configure logging to a file before parsing.
Related topics: Advanced PBX Data Logger
hereCall logging Call accounting SMDR to SQL SMDR Listener Cables and signals