
Export data to Microsoft SQL Server 2015-2022
Problem scenario:
I have installed the ODBC plugin and have tested the ODBC connection through the ODBC administrator, and everything seems to be working. Now, I wish to parse and write a log of the data to my database.
Requirements:
- Advanced Serial Data Logger Professional, Enterprise, or a trial version;
- ODBC Database
It is assumed that:
You've prepared parser items for export.
For this tutorial, all items were prepared in the previous part.
Also, you could look at some other examples of data parsing (different parser types).
- Process data from a barcode scanner
- Parse data with the help of regular expressions
- Parse data from the filling machine
- Log and parse data from an intellectual pressure measuring device
Solution:
It is assumed that you have access to the database and can manage it. First of all, create a database table. Select an existing user database or create a new one. The simplest way is to use the SQL Server Management Studio for Microsoft SQL Server. In this example, we created a table called "PBX_LOG_DATA" in the "Test" database. The corresponding SQL script is shown below.
USE [test]
GO

CREATE TABLE [dbo].[PBX_LOG_DATA] (
	[ID] [decimal](10, 0) IDENTITY(1,1) NOT NULL,
	[CALL_TIME] [datetime] NULL,
	[DURATION_S] [int] NULL,
	[CALLER_PHONE] [nvarchar](40) NULL,
	[DIALED_PHONE] [nvarchar](40) NULL,
CONSTRAINT [PBX_LOG_DATA_PK] PRIMARY KEY ([ID] ASC)
) ON [PRIMARY]

GO
Fig.1. SQL script
Note that four columns have been added to the table, for all variables from the parser. You can add more columns if you want or use tables with your structure.
Note: You should specify unique columns names. You cannot use names, which are reserved words of the ANSI92 SQL standard.
Now that our table is ready, the security within SQL Server has to be addressed. Within SQL, each user may be configured for access to specific tables only. In our example, a new user could be created, or access could be granted for the table above to an existing user account. It is also possible to connect using an administrator account, which has full access rights. However, it is suggested that the administrator account be used for testing only. We have created the user with the name of "test", and set up "test" as the default database for it (see Fig.2 below).
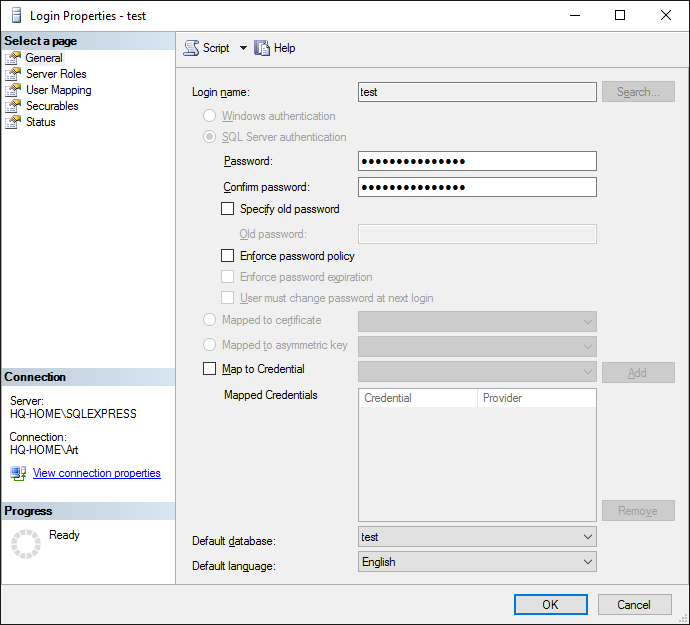
Fig.2. MS SQL export. The new user.
By default, the user belongs to the "public" role only. Therefore, you should grant "write" access rights to the test table for the "public" role (Fig.3). Or execute the corresponding SQL script.
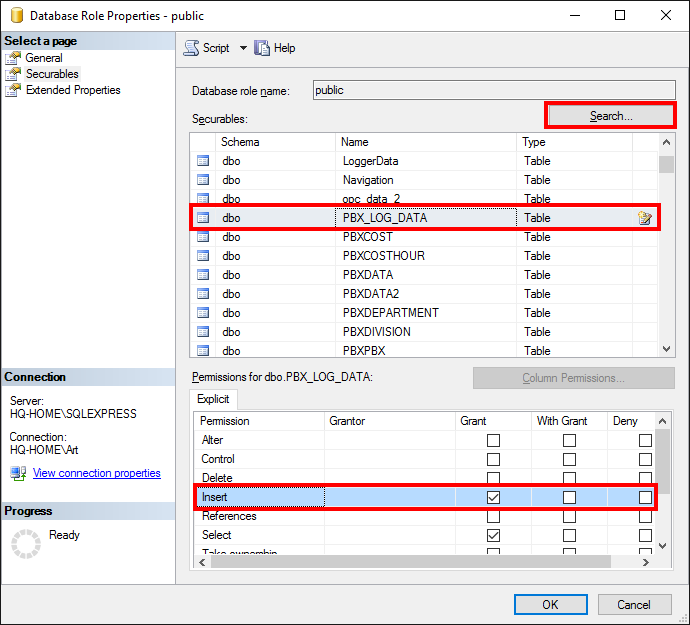
USE [test]
GO

GRANT SELECT,INSERT ON [dbo].[PBX_LOG_DATA] TO your_user_name
GO
Fig.3. MS SQL 2014 export. Granting role rights.
The "ODBC database" plugin uses an ODBC alias for accessing the SQL Server 2014 database. You can create and configure the ODBC alias using the "ODBC data source administrator" control panel. You can find this applet in the "Control panel" under the "Administration" group. Once you have located this group, click the "Setup" button on the "Connection" tab (Fig.11 pos. #3 ). In the "ODBC data source administrator," you should create a user or system ODBC alias. System ODBC aliases (select the tab at the pos. #1 on Fig.4) can be used in the service mode. We will add a new user alias that is available for the current user only. You can do this by clicking the "Add" button (pos. #2 on Fig.4).
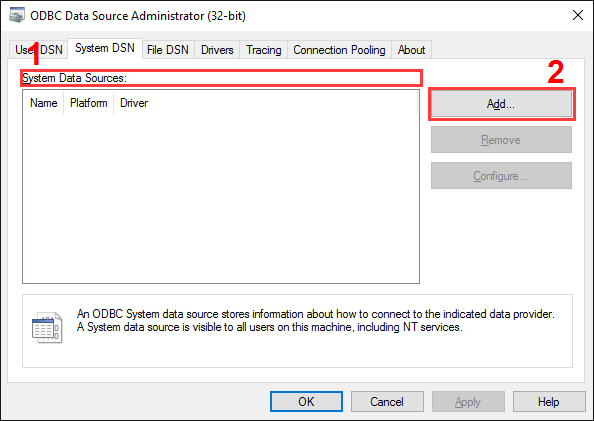
Fig.4. MS SQL 2014 export. ODBC data source administrator
The configuration wizard window will appear (Fig.5). On the first page, you should select an SQL server driver (pos. #1 on Fig.5) and click the "Next" button. If the drivers' list does not contain the SQL Server driver, you should install Microsoft SQL Server client applications from the SQL Server installation package or CD.
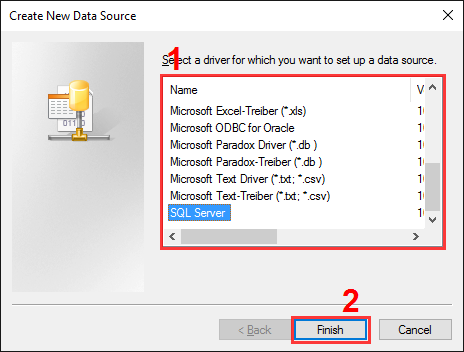
Fig.5. The SQL Server alias setup. Step #1.
On the next page (Fig.6), specify an ODBC alias name (MSSQL-TEST in our case), a short text description, and select your SQL server from the drop-down list. If a server does not exist in the list, then check that the server has been started, and it is available over a network. After filling out all the options, click the "Next" button.
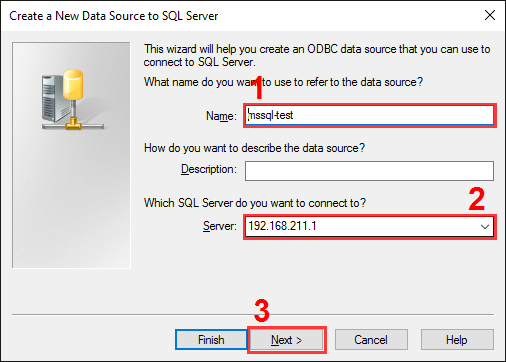
Fig.6. The SQL Server alias setup. Step #2.
On the next page (Fig.7), we have selected the "SQL Server authentication" option (pos. #1), because a new user has been added. Next, enter the username and password (pos. #2).
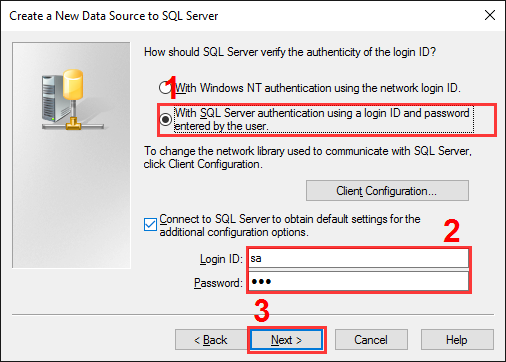
Fig.7. The SQL Server alias setup. Step #3.
In the following page (Fig.8), we have selected our test database - "Test" and have left the other options without any changes.
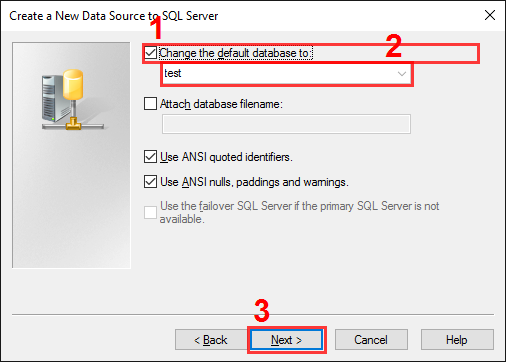
Fig.8. The SQL Server alias setup. Step #4.
On the final page (Fig.9), you should test the connection. Just click the "Test data source" button.
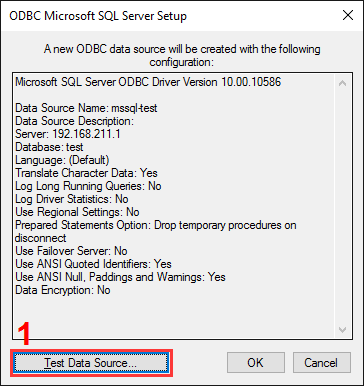
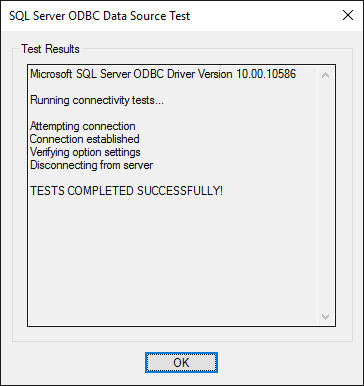
Fig.9. The SQL Server alias setup. The final step.
OK, the database and table are both ready. Next, go to the "ODBC database" plugin configuration window and click the "Common" button on the left of the window (Fig.10).

Fig.10. MS SQL 2014 export. ODBC database. Enabling connection.
The radio button at pos. #1 enables writing to the database and the tick-box at pos. #2 specifies that the database is to be kept open. These options help to minimize the writing time, at the same time, locking out other users from writing.
On the second page "Connection" (Fig.11), you can specify your database's parameters. Here select your ODBC alias name, which you created above at pos. #1. Note that if you configured an ODBC alias after opening the configuration window, please close it first, re-open it, and then retype your login and password at pos. #2.

Fig.11. MS SQL 2014 export. ODBC database. Connection options.
In our example, no additional attributes are specified.
On the "Errors handling" page of the "ODBC database" plugin (Fig.12), specify how the software should react to errors that occur while writing to a database.
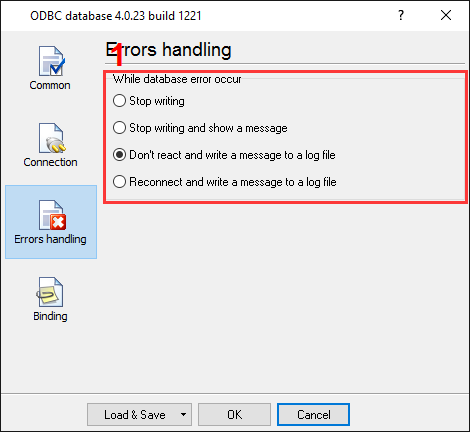
Fig.12. MS SQL 2014 export. ODBC database data logger. Error handling.
In this example, the last option (pos. #1) was checked as the data is important, and we should continue to operate regardless of the error. You may use other variants when you configure a new database connection or test the plugin.
The last "Binding" page (Fig.13) is significant. You should bind a parser variable to the necessary table column.

Fig.13. MS SQL 2014 export. ODBC database data logger. Binding.
You can create item by item on this page by pressing the "Add item" button (Fig.13, pos.#2). In this case, before adding an item, the program will ask you for the table name (Fig.13, pos.#1) and then the column name. The name of a table column should be the same as that specified while designing the database. Manually adding each item is a tedious and lengthy process. It is simpler to add all items at once by clicking the "Import" button (Fig.13, pos.#3).
However, before clicking the "Import" button, you should configure a database connection, as described before. In this case, a dialog window will appear (Fig.14), and you can select the necessary table name (Fig.14, pos.#1) and click the "OK" button.
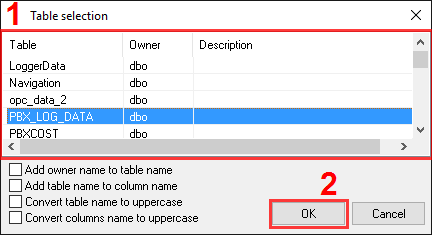
Fig.14. MS SQL 2014 export. ODBC database. Selecting the table.
Each item on the binding page has few properties:
- Parser item name. It is a parser variable name, which has been created in the parser configuration. Select the variable name from a drop-down list, which appears while clicking on a link for this property;
- Column data type. It is a database column data type. The module will try to convert a variable's data type to a column data type, using standard system functions. If your variable has a data type other than "string", specify the variable data type here;
- Default value. It is a value to be used when data does not contain a value for a column, or the variable is empty.
Click the "OK" button to close the ODBC database plugin configuration window and the "OK" button in the options window.
Okay, all settings have been completed, and we are ready to capture PBX data to the database.
If you configured the ODBC module correctly, then the data logger will display messages in the drop-down box at the bottom of the main window while accessing the database.
Related articles: Export data to Microsoft SQL Server 2015-2022
Related topics: Advanced Serial Data Logger
hereSerial port interface | RS232 port logger | Com port logger | Data acquisition | RS232 data logger | Data Logger Software For Electricity Meter | Replace WinWedge | Replace TWedge | RS232 to SQL database | Barcode to Excel