Write data to Microsoft AccessDownload a Free Trial Version.It allows you to try all features! Data logger plugins can be downloaded separately.
Problem scenario: I am taking a weight from a scale ever couple of seconds, and I want the software to take that weight via the serial port and load it directly into a database with a date and time stamp on each entry. I want this to be software that will start with Windows and hands-free to the operator. The database is located on a network drive, and it will not be open at the time unless the software can open Access. Requirements:
It is assumed that: You've prepared parser items for export. For this tutorial, all items were prepared in the previous part. Also, you may read other examples:
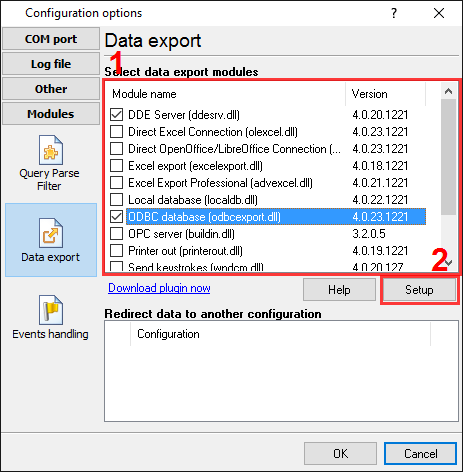
Solution: We are now ready to configure the ODBC database plugin, that will export data to Access. This configuration process is not complex and might not be difficult for the unskilled user. It is assumed that you can access the database and manage it. First of all, create a table in a database. Next, select the "ODBC database" plugin from a list and open the configuration window of the ODBC database plugin by clicking the "Setup" button below the list. A dialog window will appear on the screen (Fig.1).
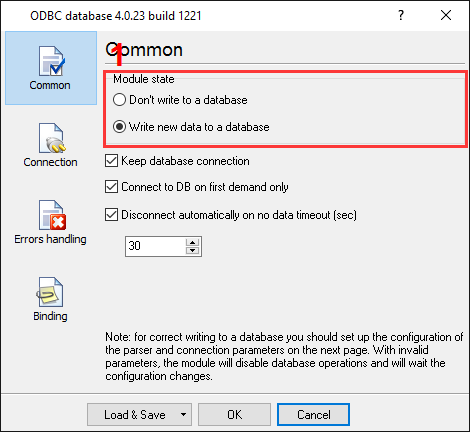
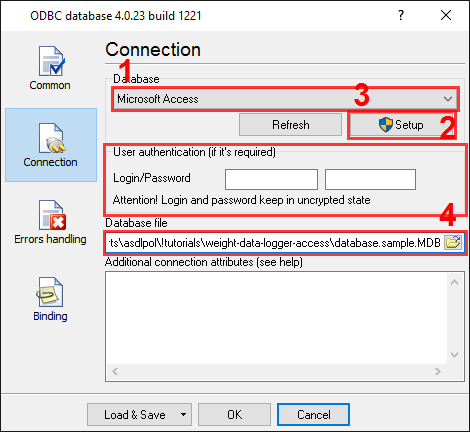
The radio button at pos. #1 enables writing to the database and the tick-box at pos. #2 specifies that the database is to be kept open. This option serves to minimize the writing time and unblocks the table for other users as soon as possible. On the second "Connection" page (Fig.2), you can specify the parameters of your database. Here select your ODBC alias name for a Microsoft Access database (pos. #1). Note: If you have configured an ODBC alias after opening the configuration window, please click the "Refresh" button.
You may configure the connection with your database like that:
Click the "Refresh" button after adding a new data source in the ODBC manager. Note 1: You should add the 32-bit ODBC alias because our software is 32-bit. Note 2: If you would like to write data to an ACCDB database, but the corresponding driver is absent (you cannot find a driver supporting files with the *.accdb extension), you should install the Microsoft Access Database Engine Redistributable package (32-bit version). In this example, we've selected the second method because this is most quick and easy and no additional attributes are specified, except the database file. Because an Access database is placed in a file, then you should select this file in the corresponding field (Fig.2, pos.2). You should specify the full path and name here. A few words about a database: it would be best if you created a database and a table in the database yourself with the help of Microsoft Access. If you don't have Microsoft Access on your PC or create Access databases before, you can download a database sample here. We've created a database with the "database.sample.mdb" name for this tutorial. The database contains a table with the "SERIAL_DATA" name. The table contains the following fields:
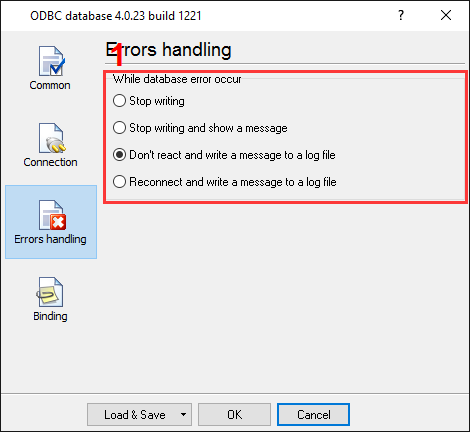
For items #2 and #3, we had assigned functions "Date()" and "Time()" as a default value, and we had got a date time stamp for each new record. On the third "Errors handling" page of the "ODBC database" plugin (Fig.3), specify how the software should react at a moment of errors.
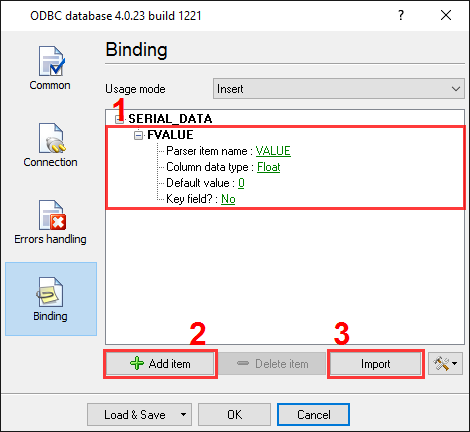
In this example, the last option (pos. #1) was checked as the data is important, and we require the program to operate regardless of the error. The other variants are normally used when testing the plugin module with a new database. The last "Binding" page (Fig.4) is significant. On this page, you should assign parser's variables to table columns.
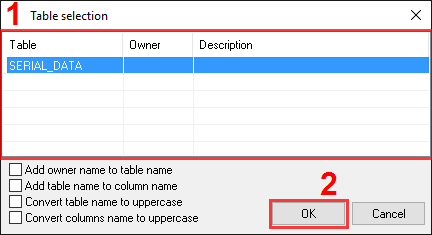
Because we've created the table with a date time stamp, then we should bind one column only: the "FVALUE" column in the table with the "VALUE" variable. You can create item by item on this page by pressing the "Add item" button (Fig.4, pos.#2). In this case, before adding an item, the program will ask you for the table name (Fig.4, pos.#1) and then the column name. The name of a table column should be the same as that specified while designing the database. Adding each item one-by-one is a tedious and lengthy process. It is simpler to add all items at once by clicking the "Import" button (Fig.4, pos.#3). However, before clicking the "Import" button, you should configure a database connection, as described above. In this case, a dialog window will appear (Fig.5), and you should select the necessary table name (Fig.5, pos.#1) and click the "OK" button.
Each item on the binding page has few properties:
Click the "OK" button to close the ODBC database plugin configuration window, as well as the "OK" button in the options window. Okay, all settings have been completed, and we are ready to capture weight data from scales to the database. If you configured the ODBC module correctly, then while accessing the database, the data logger will display messages in the drop-down box at the bottom of the main window. Related articles: Write data to Microsoft Access
Advanced Serial Data Logger - Read more about:Serial port interface RS232 port logger Com port logger RS232 data logger Data Logger Software For Electricity Meter RS232 to ODBC RS232 to MySQL RS232 to MS SQL Server RS232 to database Barcode to Excel |
|