
VKT-7 Teplocom Data Logger: Automatic Data Retrieval & OPC Server
Preliminary requirements
Typically, the VKT-7 device is connected to the computer via an RS-232 serial port (COM port) and sends data using a nonstandard version of the Modbus RTU protocol.
You can also connect it to the computer via an RS232-to-Ethernet convertor. In that case, you can access the heat calculator unit remotely over a network.
If you are using a GSM modem with the device, make sure that the modem can automatically connect to the Internet.
Setup
You also need to install the "Binary parsers" module, which enables the logger to work with VKT-7. The module will send data requests to the heat calculator unit on a schedule, process its responses, and prepare data for exporting.
Communication settings
1. Configure the heat calculator unit connection, that is, COM port or TCP connection parameters (figures 1 and 2).
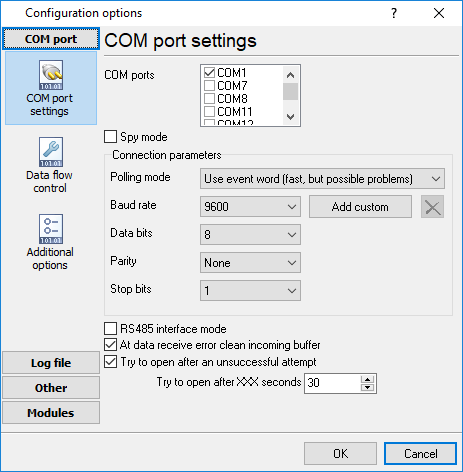
Figure 5.1
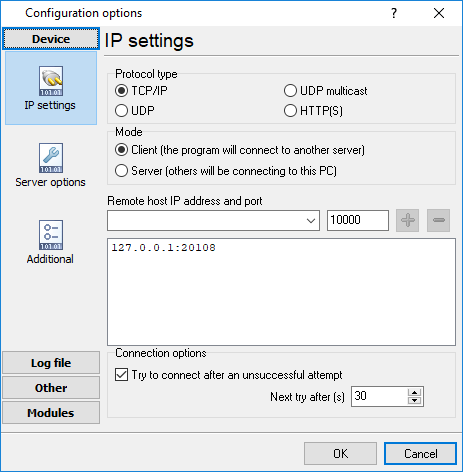
Figure 5.2
2. Select the parser module for the VKT-7 device in the program's settings. If the heat calculator unit is connected to the computer via a COM port, you also need to select the respective data request module (figure 3; the module is not shown).
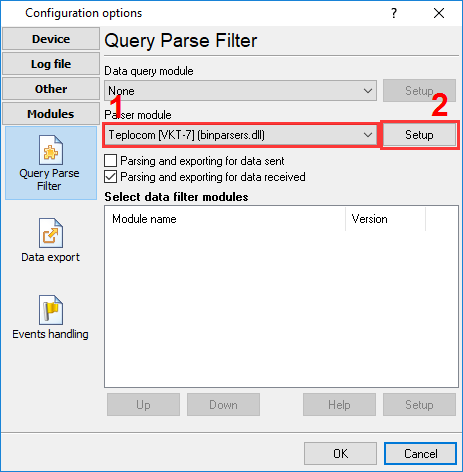
Figure 5.3 Selecting a parser module for VKT-7
Data reading settings
You can specify the heat calculator unit's port number and device ID, which can be used when exporting data or writing data to a database (figure 1).
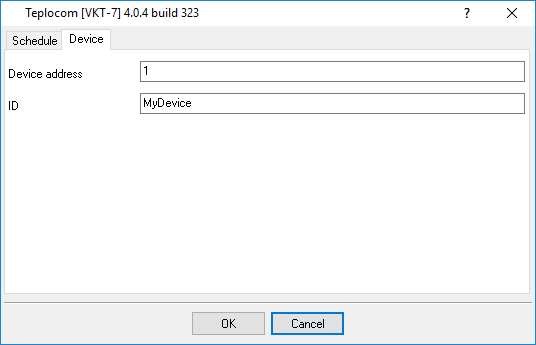
Figure 2.1
Set up a data reading schedule in the parser module's settings (figures 2 and 3). You can set up a separate schedule for each data type (current, hourly, daily, or accumulated data).
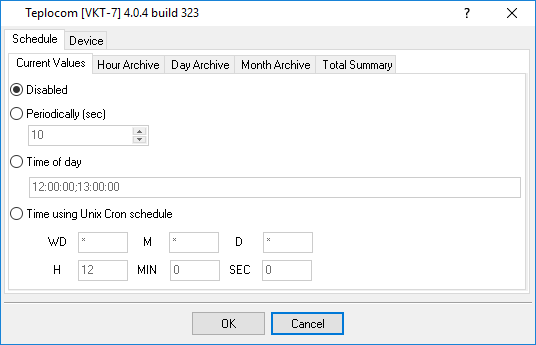
Figure 2.2 VKT-7. Current data

Figure 2.3 VKT-7. Accumulated data
Writing data to a database
You can use the "ODBC Database" data export module to write data to a database. The module can write data to almost any database, provided that there is a respective ODBC driver.
You can write data from multiple heat calculator units to a single database table. In that case, each row will contain a unique device ID and a port number.
1. Manually create a table with the necessary rows and columns (fields) in your database. Below you can find some table-creating scripts that we recommend to use.
CREATE TABLE dbo.[DATA] (
   [ID] decimal(10,0)  IDENTITY(1,1) NOT NULL,
   [DATE_TIME_STAMP] datetime NULL,
   [DATA_SOURCE_NAME] nvarchar(32) NULL,
   [DEVICE_ID] nvarchar(32) NULL,
   [DEVICE_NAME] nvarchar(32) NULL,
   [DEVICE_DESC] nvarchar(32) NULL,
   [TIMESTAMP] datetime NULL,
   [TIMESTAMP_UTC] datetime NULL,
   [SERIAL_NO] nvarchar(32) NULL,
   [DATA_TYPE] int NULL,
   [EVENT_ID] int NULL,
   [DATABASE_NO] int NULL,
   [SYSTEM_NO] int NULL,
   [T1] real NULL,
   [T2] real NULL,
   [T3] real NULL,
   [V1] real NULL,
   [V2] real NULL,
   [V3] real NULL,
   [M1] real NULL,
   [M2] real NULL,
   [M3] real NULL,
   [P1] real NULL,
   [P2] real NULL,
   [Mg] real NULL,
   [QO] real NULL,
   [QG] real NULL,
   [DT] real NULL,
   [TX] real NULL,
   [TA] real NULL,
   [BHP] real NULL,
   [G1] real NULL,
   [G2] real NULL,
   [G3] real NULL,
   [EVENT] real NULL,
   [EVENT_TIME] real NULL,
   [DI] real NULL,
CONSTRAINT [PK_DATA] PRIMARY KEY ([ID] ASC)
WITH (IGNORE_DUP_KEY = OFF) ON [PRIMARY]
) ON [PRIMARY]
CREATE TABLE `DATA` (
   `ID` int(11) NOT NULL auto_increment,
   `DATE_TIME_STAMP` DATETIME NULL,
   `DATA_SOURCE_NAME` VARCHAR(32) NULL,
   `DEVICE_ID` VARCHAR(32) NULL,
   `DEVICE_NAME` VARCHAR(32) NULL,
   `DEVICE_DESC` VARCHAR(32) NULL,
   `TIMESTAMP` DATETIME NULL,
   `TIMESTAMP_UTC` DATETIME NULL,
   `SERIAL_NO` VARCHAR(32) NULL,
   `DATA_TYPE` INTEGER NULL,
   `EVENT_ID` INTEGER NULL,
   `DATABASE_NO` INTEGER NULL,
   `SYSTEM_NO` INTEGER NULL,
   `T1` DOUBLE NULL,
   `T2` DOUBLE NULL,
   `T3` DOUBLE NULL,
   `V1` DOUBLE NULL,
   `V2` DOUBLE NULL,
   `V3` DOUBLE NULL,
   `M1` DOUBLE NULL,
   `M2` DOUBLE NULL,
   `M3` DOUBLE NULL,
   `P1` DOUBLE NULL,
   `P2` DOUBLE NULL,
   `Mg` DOUBLE NULL,
   `QO` DOUBLE NULL,
   `QG` DOUBLE NULL,
   `DT` DOUBLE NULL,
   `TX` DOUBLE NULL,
   `TA` DOUBLE NULL,
   `BHP` DOUBLE NULL,
   `G1` DOUBLE NULL,
   `G2` DOUBLE NULL,
   `G3` DOUBLE NULL,
   `EVENT` DOUBLE NULL,
   `EVENT_TIME` DOUBLE NULL,
   `DI` DOUBLE NULL,
PRIMARY KEY  (`ID`)
) ENGINE=InnoDB;
CREATE TABLE "DATA" (
   "ID" SERIAL,
   "DATE_TIME_STAMP" timestamp DEFAULT NULL,
   "DATA_SOURCE_NAME" varchar(32) DEFAULT NULL,
   "DEVICE_ID" varchar(32) DEFAULT NULL,
   "DEVICE_NAME" varchar(32) DEFAULT NULL,
   "DEVICE_DESC" varchar(32) DEFAULT NULL,
   "TIMESTAMP" timestamp DEFAULT NULL,
   "TIMESTAMP_UTC" timestamp DEFAULT NULL,
   "SERIAL_NO" varchar(32) DEFAULT NULL,
   "DATA_TYPE" integer DEFAULT NULL,
   "EVENT_ID" integer DEFAULT NULL,
   "DATABASE_NO" integer DEFAULT NULL,
   "SYSTEM_NO" integer DEFAULT NULL,
   "T1" real DEFAULT NULL,
   "T2" real DEFAULT NULL,
   "T3" real DEFAULT NULL,
   "V1" real DEFAULT NULL,
   "V2" real DEFAULT NULL,
   "V3" real DEFAULT NULL,
   "M1" real DEFAULT NULL,
   "M2" real DEFAULT NULL,
   "M3" real DEFAULT NULL,
   "P1" real DEFAULT NULL,
   "P2" real DEFAULT NULL,
   "Mg" real DEFAULT NULL,
   "QO" real DEFAULT NULL,
   "QG" real DEFAULT NULL,
   "DT" real DEFAULT NULL,
   "TX" real DEFAULT NULL,
   "TA" real DEFAULT NULL,
   "BHP" real DEFAULT NULL,
   "G1" real DEFAULT NULL,
   "G2" real DEFAULT NULL,
   "G3" real DEFAULT NULL,
   "EVENT" real DEFAULT NULL,
   "EVENT_TIME" real DEFAULT NULL,
   "DI" real DEFAULT NULL,
PRIMARY KEY (ID)
);
You can download the "database.mdb" database file from here.
2. Open the data export module's settings and enable writing to the database. Then switch to the "Connection" tab, click the "Configure" button, and create a connection to your database (figures 1 - 3).
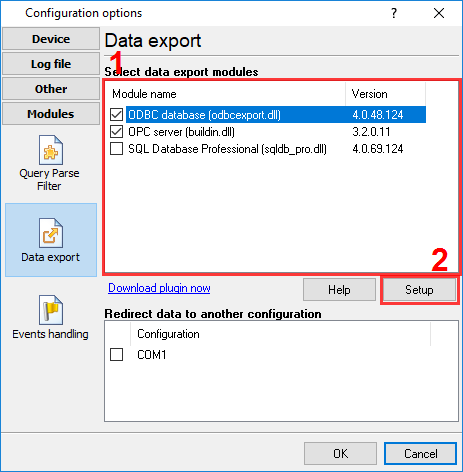
Figure 5.1
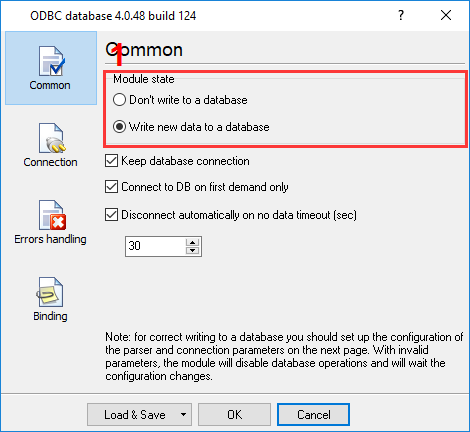
Figure 5.2

Figure 5.3
3. Switch to the "Binding" tab, import the table structure from the database, and bind the parser variables to the respective columns (fields). Then delete all the unbound columns for which there is a default value in the table-creating script (figures 4 and 5).
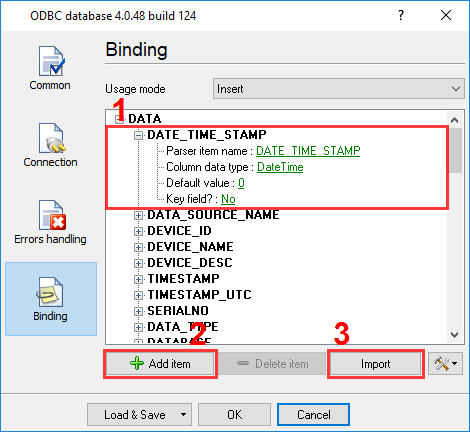
Figure 5.4
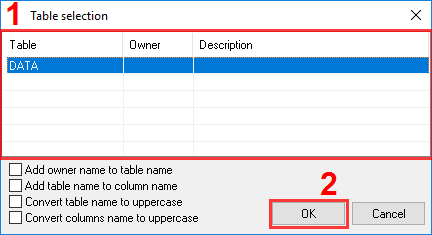
Figure 5.5
Logging data to a plain-text file
Our program can log all the collected and processed data to plain-text files in addition to writing data to a database. You can use such log files as backup copies or keep them for later analysis. Our program can automatically create a new log file every day, every week, or every month (figures 1 and 2).
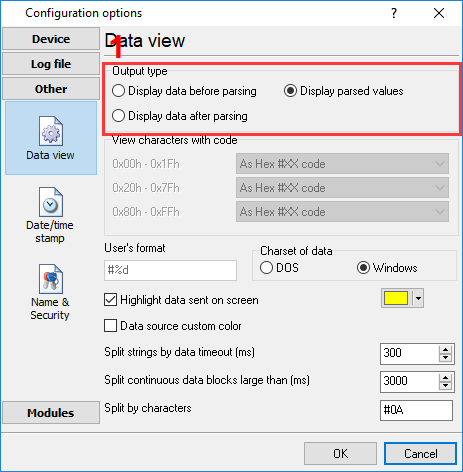
Figure 5.1 Data output settings for VKT-7
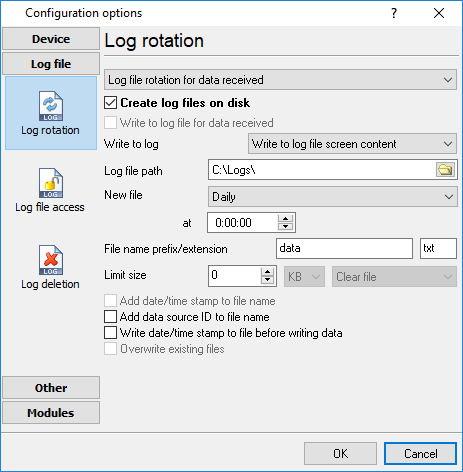
Figure 5.2 Data output settings for VKT-7
OPC server
Our program has a built-in OPC DA2 or OPC UA server that allows you to retrieve and view the last-read current or accumulated values at any time. The recommended OPC server settings are shown in figures 1 and 2.
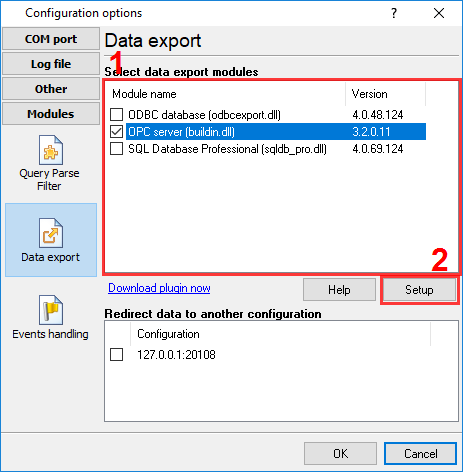
Figure5.1 Enabling the OPC server VKT-7
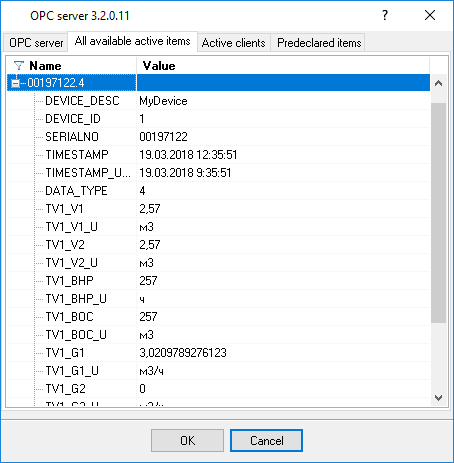
Figure5.2 VKT-7. An example of data received.
To make data viewing easier, you can use different tag groups for current data and accumulated data. To do it, you can specify a data grouping rule for the OPC server. In the example, the data are grouped by serial number and data type.

Figure 5.3 Data grouped by data type
Related articles: VKT-7 Teplocom Data Logger: Automatic Data Retrieval & OPC Server
Related topics: Advanced Serial Data Logger
hereSerial port interface | RS232 port logger | Com port logger | Data acquisition | RS232 data logger | Data Logger Software For Electricity Meter | Replace WinWedge | Replace TWedge | RS232 to SQL database | Barcode to Excel