Controlling PLC coil registers status using MODBUS TCP
Task
I need to control the status of three MODBUS TCP PLC controllers and make any signal when a state of a coil register changes from 0 to 1 or vice versa.
How to
Since you have three devices, you will have to create three identical configurations that will differ only in their IP addresses and the numbers of the devices. If the devices have the same MODBUS address and differ only in their IP addresses, you can create one configuration and add all three IP addresses.
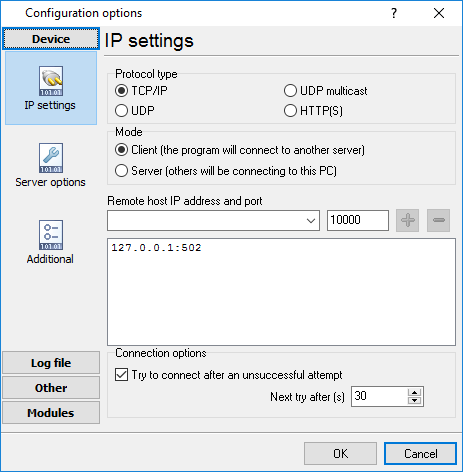
Configure a TCP connection with your devices
Most probably, it is the computer that will initiate a connection to the device. So the program will run in the client mode.
Selecting modules
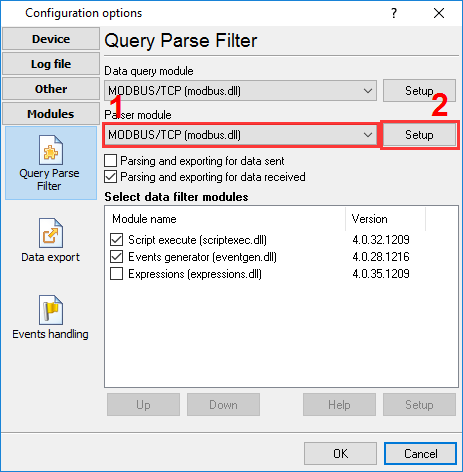
Note the order of the filter modules.
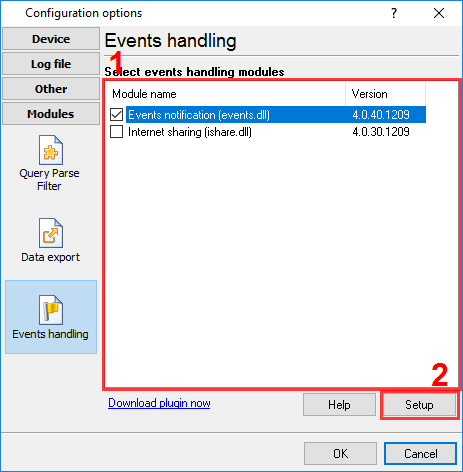
How it works:
- The data query module sends MODBUS queries to the device.
- The data parser module analyzes the device response, writes the values received from it to the VALUE1 and VALUE2 variables, and passes them to the filter modules.
- The "Script Execute" filter module analyzes the status of the VALUE1 and VALUE2 variables and compares them to their previous values (if there are any). If any value changes, this module adds a new variable named ALARM, whose value reflects the change of the signal (from 0 to 1 or vice versa).
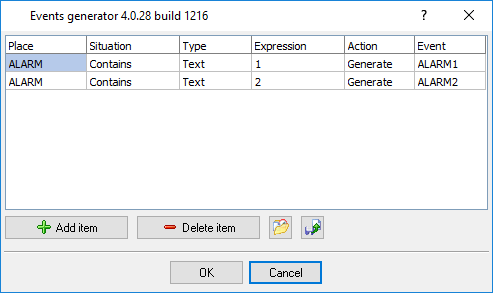
- The "Events generator" module waits for the moment when the ALARM variable appears and generates the ALARM1 or ALARM2 event depending on its value.
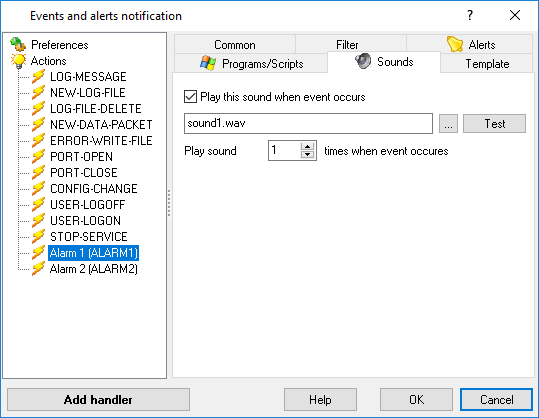
- The "Events notification" module on the Event handling tab executes the action specified for each of the events (for instance, plays a sound or shows a message).
Configuring the parameters of querying MODBUS devices
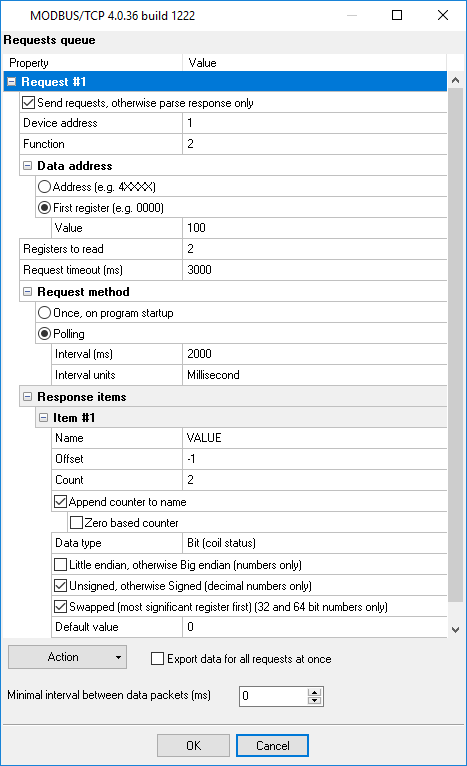
Click "Configure" next to the "Data Query Module" list and add a data query (Action –> Add).
Data processing script
Select the "Script Execute" module in the list and click "Configure" under the module. You should specify the script in the new dialog box.
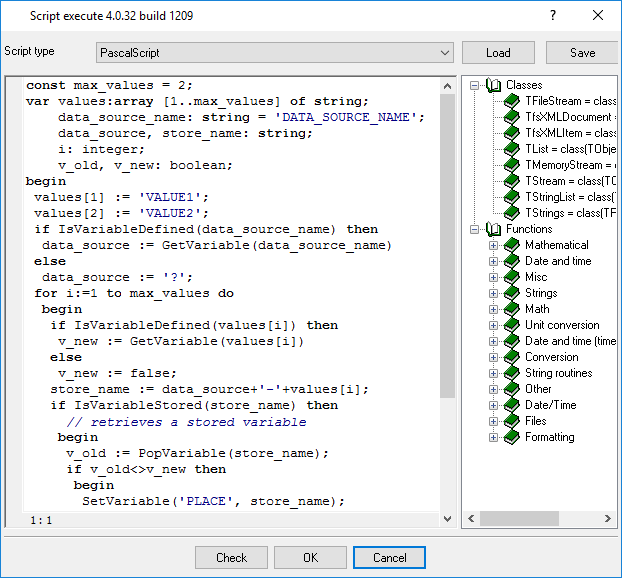
Script text:
const max_values = 2;
var values:array [1..max_values] of string;
    data_source_name: string = 'DATA_SOURCE_NAME';
    data_source, store_name: string;
    i: integer;
    v_old, v_new: boolean;
begin
 values[1] := 'VALUE1';
 values[2] := 'VALUE2';
 if IsVariableDefined(data_source_name) then
  data_source := GetVariable(data_source_name)
 else
  data_source := '?';
 for i:=1 to max_values do
  begin
   if IsVariableDefined(values[i]) then
    v_new := GetVariable(values[i])
   else
    v_new := false;
   store_name := data_source+'-'+values[i];
   if IsVariableStored(store_name) then
     // retrieves a stored variable
    begin
     v_old := PopVariable(store_name);
     if v_old<>v_new then
      begin
       SetVariable('PLACE', store_name);
       if v_new then
        SetVariable('ALARM', '1')
       else
        SetVariable('ALARM', '2')
      end;
    end;
   PushVariable(store_name, v_new);
  end;
end.
Generating events
Configuring event handlers
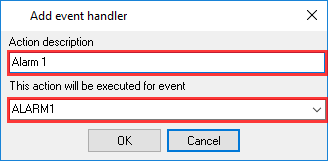
Open the "Events notification" module configuration dialog box. Click the New Handler button. Specify the event name and its descriptions. You need to specify two handlers for two events: ALARM1 and ALARM2.
These events will appear in the tree to the left. Select an event in the tree and configure the actions that will be executed when the event occurs. You can specify individual parameters for each event handler.
Ready-to-use configuration that you can restore from the "File" menu you can download here.
Related articles: Controlling PLC coil registers status using MODBUS TCP
MODBUS RTU, MODBUS ASCII, MODBUS/TCP
- MODBUS power meter data logging (easy method)
- Sunspec-compatible MODBUS power meters, inverters (easy method)
- MODBUS RTU/TCP polling: Configuring master station Tags: MODBUS RTU, MODBUS TCP, requests, response items.
- MODBUS poll: How to make sure that the application sends requests and receives responses?
- MODBUS poll: How to view register values, not raw MODBUS packets?
- MODBUS polling: How to make sure that the application correctly interprets the responses received from the device?
- MODBUS polling: How to view MODBUS register values in a more easy-to-grasp form (graphs, indicators, etc.)?
- MODBUS: How to combine the data of two requests?
- MODBUS: What is the right way to poll multiple devices?
- Copy settings from Simply MODBUS RTU Master to our Modbus Data Logger.
- Copy settings from the MODBUS Poll utility.
- Controlling PLC coil registers status using MODBUS TCP Tags: MODBUS data parser, custom scripts, events generating, and handling.
- MODBUS to MSSQL: Write MODBUS registers to separate columns
- MODBUS to MySQL: Write MODBUS values to the MySQL database
- MODBUS to a database: Writing MODBUS RTU/TCP values to a database
- MODBUS to a database: Write data to two different tables.
- MODBUS to a database: Write data to two different databases, making a complete copy.
- Sentron PAC 3200: MODBUS TCP Data Logging
- Write data to a MODBUS device
- SQL to MODBUS: Send data from a SQL database to MODBUS.
- MODBUS TCP ↔ MODBUS RTU real-time conversion.
IEC 62056-21
- IEC 62056-21 power meter data logging Tags: Iskra Emco, Satec, Landis+Gyr.
Related topics: Advanced Serial Data Logger
hereSerial port interface | RS232 port logger | Com port logger | Data acquisition | RS232 data logger | Data Logger Software For Electricity Meter | RS232 to ODBC | RS232 to MySQL | RS232 to MS SQL Server | RS232 to database | Barcode to Excel