
TCP COM Bridge Installation: Driver, Signature, First Connection
The installer of TCP COM Bridge puts two things on the computer: the program, and a kernel-mode driver that creates virtual COM ports. Because of the driver, the installation needs an administrator account, and Windows asks for permission twice, once for the program and once for the driver. The program runs on every Windows version from Windows 2000 to the current Windows and Windows Server releases, 32-bit and 64-bit. No reboot is needed: virtual ports are created and removed while the program runs.
Before you run the installer
- Close a running copy. If TCP COM Bridge runs as a Windows service, stop the "Tcp Com Bridge" service in the Services console first.
- Uninstall a beta version, if one is installed.
- Use an administrator account. A standard account cannot install or manage the driver.
- Pause the antivirus if the installer hangs at the driver step. Some free antivirus programs block driver installations; users reported Avast Free, NANO Antivirus and Antiy-AVL. An antivirus whose trial has expired is still active.
Video
The video from 2026 shows the installation of the program.
Installation
- Run the downloaded tcp-com-bridge.exe and confirm the User Account Control prompt.
- Follow the wizard. The default folder is "C:\Program Files (x86)\TCP COM Bridge" on 64-bit Windows and "C:\Program Files\TCP COM Bridge" on 32-bit Windows.
- When Windows asks "Would you like to install this device software?" for the virtual port driver, check "Always trust software from AGG Software" and click "Install". With the box checked, later virtual ports are created without another prompt.
- At the first start Windows Defender Firewall asks whether tcpcom.exe may accept connections. Allow it for the networks you use; otherwise nothing can reach a server connection.
The virtual port driver and its signature
The driver file is vsdevbus.sys in the "inf" folder of the program. It carries AGG Software's code signing signature, an SHA-1 and an SHA-256 signature with a trusted timestamp, and it is tested on the current Windows versions with Microsoft's Application Verifier. You can check the signature yourself in two places:
- In the program folder, right-click inf\vsdevbus.sys, choose "Properties", open the "Digital Signatures" page, select a signature and click "Details". The details say "This digital signature is OK" and name the signer.
- In Device Manager, open the properties of a virtual port and look at the "Driver" page: "Digital Signer: AGG Software".
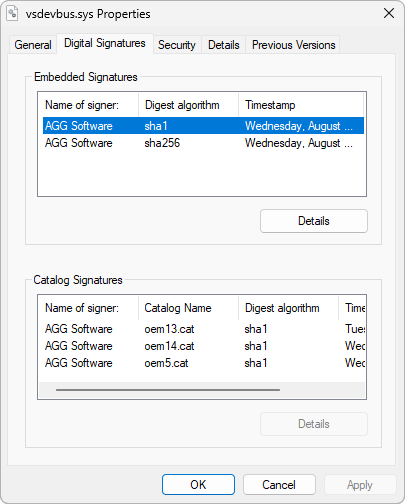
Fig. 1. The signatures of the driver file
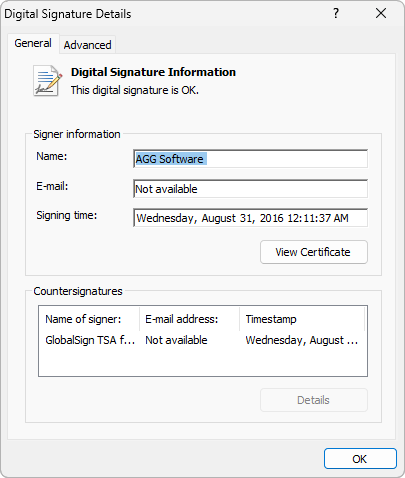
Fig. 2. The signature details
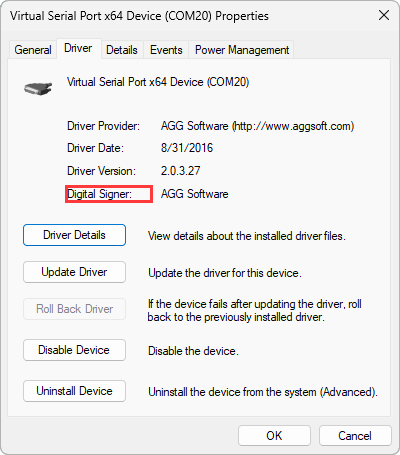
Fig. 3. The Driver page of a virtual port in Device Manager
Where the virtual ports appear
Device Manager lists the virtual ports in their own group, "Virtual Serial Port TCP COM", not under "Ports (COM & LPT)". A program that builds its port list from the "Ports" group alone does not show them; type the port name by hand in that case. A virtual port exists only while the connection that creates it is running.

Fig. 4. Real ports and virtual ports in Device Manager
First start
The main window opens with an empty list of connections. Choose "Devices → Add new" (Ctrl+N) and take the guide for your task:
- a program that knows only COM ports and a device on the network: COM port redirector;
- a device on this computer that should be reachable over the network: serial to TCP/IP;
- several programs on one computer and one device: serial port splitter;
- several computers and one device: COM port sharing;
- many devices on one computer: serial device server.
Two things about the main window that new users ask about: the "Start-up mode" list at the bottom decides whether the program starts by hand, with Windows, or as a Windows service before anyone logs on (Professional edition); and the X button of the window only minimizes the program to the notification area. To end it, click "Exit" and confirm that the active connections may be closed.

Fig. 5. Exit closes the connections and the virtual ports
When the driver does not install
- The installer hangs at the driver step. An antivirus blocks the installation; see above.
- The virtual port shows an exclamation mark in Device Manager. The number already exists. Use another number, COM20 for example. If it must be that number, free it first: in Device Manager open the properties of the existing port, "Port Settings → Advanced → COM Port Number", give it another number, and wait until Windows has applied the change (a reboot may be needed).
- No virtual port appears, or an unknown device appears. The driver was not installed. Work through these in order:
- Install and run the program with administrator rights.
- On an old Windows without Internet access and without updates, Windows cannot verify the signature. Install the certificate update rootsupd.exe from the "inf" folder of the program, or update Windows.
- A group policy may forbid the installation of new devices, on domain computers in particular. Run rsop.msc and look under "Computer Configuration → Administrative Templates → System → Device Installation → Device Installation Restrictions": "Prevent installation of removable devices" and "Prevent installation of devices not described by other policy settings" must be disabled while the driver is installed. Change them with gpedit.msc, or ask the domain administrator.
- Make sure that driver installation from Windows Update is allowed: "Advanced System Settings → Hardware → Device Installation Settings → Yes (recommended)".
- Choose "Devices → Reinstall all drivers" in the main window and wait until the installation has finished, then create the virtual ports again.
- If nothing helps, Windows itself may be damaged: run
sfc /scannowfrom an elevated command prompt, thenDism /Online /Cleanup-Image /ScanHealthandDism /Online /Cleanup-Image /RestoreHealth.
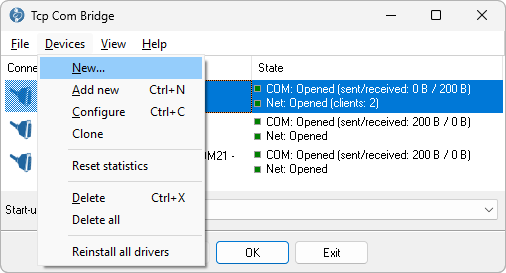
Fig. 6. Reinstall all drivers from the Devices menu
Trial and licence
The trial works for 21 days with three connections; each work session is limited to 128 KB of data or two hours. It is the full program otherwise, so every guide above can be tried. After the purchase the licence key arrives by e-mail with instructions; the registered version has no limits. The Standard edition allows two connections; the Professional edition has no connection limit and adds the Windows service mode, UDP, the keep-alive mode and encryption. Compare editions.
Updating and removing
- Update: download the new version, close the program (or stop the service), run the installer over the existing installation. The connections and the licence key live in the Windows registry, not in the program folder, so they survive an update.
- Remove: stop the service if the program runs as one, then uninstall "TCP COM Bridge" from the Windows list of installed apps.
See also
Install TCP COM Bridge: setup, driver, first connection
Serial port splitter: one COM port for two or more programs
Serial device server: many COM ports on one Windows PC
Share a COM port over the network
COM port redirector: a virtual COM port to a TCP/IP address
Redirect COM ports to a terminal Windows server
Serial over Ethernet: how it works
Connect two COM ports on the same computer
Printing on one receipt, POS or fiscal printer from two computers
Fix slow receipt printing from remote accounting software
Serial to TCP/IP converter software
Best serial over Ethernet tools by situation
TCP COM Bridge vs tcp2com: when the free tool is enough
TCP COM Bridge troubleshooting
Related topics: TCP COM Bridge
hereSerial over Ethernet | Serial to TCP/IP converter | COM port redirector | Serial port splitter | COM port sharing | Serial device server | Serial port monitor | RS232 pinout and signals | Virtual Null Modem | COM Port Emulation