
Automated Hardware Validation: Using the Test Sequence Plugin
What is the Test Sequence Plugin?
In the Advanced Serial Port Monitor, the Test Sequence plugin is a module that automates tasks through logical rules. As this tool functions differently from simple macros that transmit data, it acts as a "state machine" It is programmed to transmit a specific request and pause until it receives a predetermined response before it continues to the following action. If the hardware transmits data that does not match the requirements or does not transmit at all, the sequence ceases to operate. By using this method, a user can determine the specific location where the hardware does not function. To verify that a device adheres to a set of rules for communication, hardware developers and engineers who ensure quality find this tool necessary.
This is an essential tool for Quality Assurance (QA) engineers and hardware developers who need to verify that a device follows a specific communication protocol correctly.
Comparison: ASPM Test Sequence vs. Docklight
When choosing an automation tool, engineers often compare Advanced Serial Port Monitor (ASPM) with Docklight. Here is a breakdown of the pros and cons regarding their sequencing capabilities:
| Feature / Tool | Advanced Serial Port Monitor (ASPM) | Docklight |
|---|---|---|
| Logic Handling | Strict "Wait-for-Answer" logic ensures data integrity before proceeding. | Good visual list of sequences for quick manual firing. |
| Integration | Plugin works seamlessly in the background. | Strong support for checksum (CRC) definitions in packets. |
| Error Detection | Allow to configure different actions for failed and success responses for every request. | Allows for "Action on Receive" for basic automation. |
| Speed | Highly optimized for high baud rates without UI lag. | User-friendly interface for beginners. |
| Setup | The plugin is built-in. | Advanced branching logic requires the "Scripting" version (higher cost). |
| Visualization | More focused on technical logs than graphical sequence flows. | Can become cluttered when managing hundreds of sequences. |
| Flexibility | Best for linear or simple loops; complex logic can be implemented using the main Scripting engine. | Running multiple sequences simultaneously can be complex to manage. |
| Pricing | The feature is included in the license price. | One-size-fits-all pricing may include features you don't use. |
Tutorial: Making Your First Test Sequence
Follow these steps to start testing your serial device automatically:
Step 1: Open the Test Sequence Module
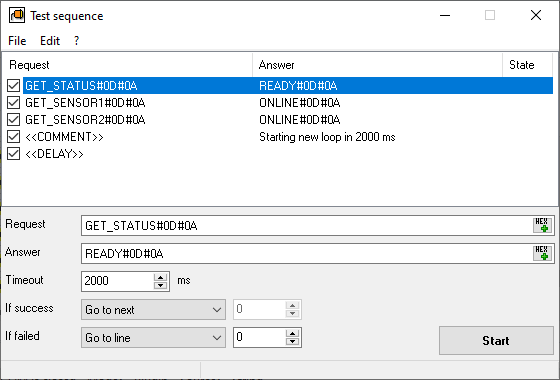
In the Advanced Serial Port Monitor main window, navigate to the Plugins menu. Click on the "Test Sequence" plugin. The configuration editor will be opened.
Step 2: Add a Request
Click the "Edit - Add" menu. In the "Request" field, enter the string your computer needs to send. You can use ASCII text (e.g., HELO) or HEX values (e.g., #01 #02 #03).
Step 3: Define the Expected Answer
In the "Expected Answer" field, enter exactly what the device should return.
- Example: If you send
GET_STATUS, the device should returnREADY#0A. - Timeout: Set the timeout in milliseconds (e.g., 500 ms). If the device doesn't say
READYwithin this time, you can select the necessary action (stops or repeat the test).
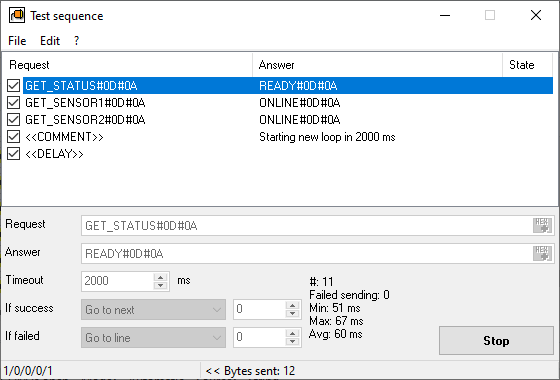
Step 4: Start the Test
Connect your hardware and click "Start". The plugin will highlight the current step in green if it passes or orange if it fails. The failed attemps are logged in the main window and "System" log (if enabled) for your final report.
Typical Usage Scenarios
1. Production Line QA Testing
Before shipping a batch of industrial sensors, a technician runs a sequence of 5 commands: Identity Check, Self-Test, Calibration, Data Stream Start, and Sleep. If any sensor fails to provide the correct "ACK" (Acknowledge) at any step, the Test Sequence plugin flags it as a "FAILED" ensuring zero defective units are shipped.
2. Firmware Update Validation
After flashing new firmware to a microcontroller, you need to ensure the protocol hasn't changed. The plugin sends old command sets and verifies that the responses still match the original specifications. This is a fast way to check for regressive bugs in your code.
3. Stress Testing with Timeouts
You can set up a sequence to run in a loop. By gradually shortening the Timeout value in the plugin, you can find the minimum/maximum/average processing speed of your hardware. If the device begins to miss responses at 10ms but works at 20ms, you have found the physical performance limit of the device's CPU.

Expertise: Why Timing Matters
In professional serial communication, "Success" isn't just getting the right data; it's getting it at the right time. The Test Sequence plugin for Advanced Serial Port Monitor is useful to manual testing because it eliminates human reaction time. It captures transient errors-where a device might respond correctly 99% of the time but lags on the 100th packet. By using this plugin, you are moving from "guessing" that your hardware works to "proving" it via structured data.
See also
Automated Hardware Validation
Identify Active Nodes: MODBUS Device Scan Plugin Guide
ASCII and Binary Device Emulation: Advanced Serial Port Monitor Plugins
Advanced Scripting and Macros
MODBUS Slave Emulator: Advanced Serial Port Monitor Plugin Guide
RS232 Analyzer from Advanced Serial Port Monitor
RS232 Monitor
Related topics: Advanced Serial Port Monitor
hereRS232 monitor RS232 analyzer COM Port Debug RS232 terminal Serial port sniffer Serial port spy UART monitor RS232 pinout and signals Data monitor cables.